


How to Automatically Forward Emails in Outlook App?

Do you want to streamline your email workflow and save time? Whether you’re an individual or a business, automating email processes can help you be more productive and organized. In this article, we’ll show you how to automatically forward emails in Outlook App, so you can start streamlining your workflow today. Keep reading to learn more!
Step 1: Login to Outlook App and select the ‘Settings’ icon.
Step 2: Go to ‘Mail’ settings, then select ‘Accounts’.
Step 3: Select the email account you want to configure forwarding for, then click ‘Forwarding’.
Step 4: Toggle ‘Forward my email to’ option to ‘On’.
Step 5: Enter the forwarding email address and save changes.
How to Automatically Forward Emails in Outlook
Outlook is a popular email client that allows users to quickly and easily set up automated email forwarding. This process can be done in a few simple steps and can save you a lot of time and stress. In this article, we will explain how to set up automatic email forwarding in Outlook, as well as how to make sure that the emails you send are properly sent and received.
Understanding Email Forwarding
Email forwarding is a way to automatically forward emails from one email address to another. This is useful for those who want to keep an extra copy of their emails for archiving purposes, or for those who want to keep multiple inboxes up to date with the same emails. It can also be used to forward important emails from one person to another, or to forward emails from a personal account to a work account.
Setting Up Email Forwarding in Outlook
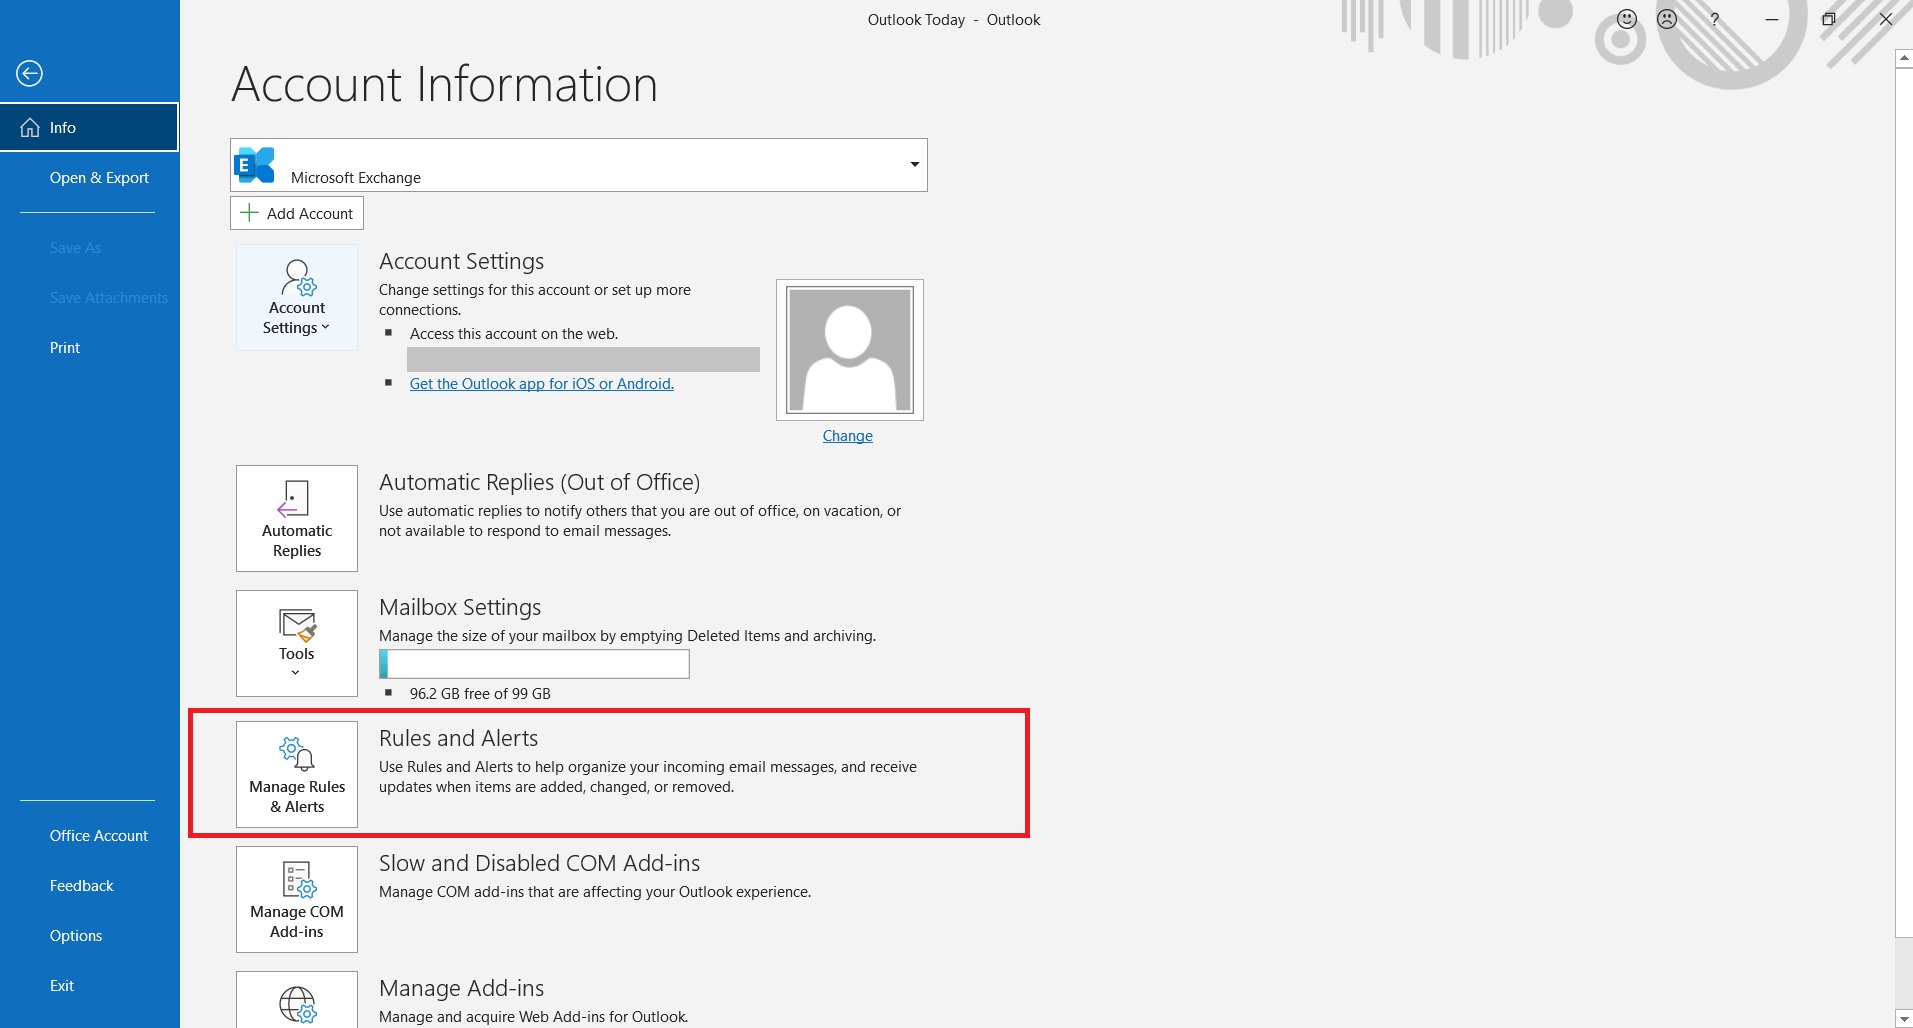
The first step to setting up automatic email forwarding in Outlook is to open the Outlook application. Once the application is open, navigate to the ‘Tools’ menu and then select ‘Rules and Alerts’. From here, you can create a new rule that will automatically forward any emails that meet certain criteria. To do this, you can choose a condition, such as ‘From’ or ‘Subject’, and then create an action that will forward the emails.
Testing Your Email Forwarding
Once you have set up your email forwarding rule, it is important to test it to make sure it is working properly. To do this, simply send a test email from the address you are forwarding from, and then check the inbox of the address you are forwarding to. If the email is delivered successfully, then your forwarding rule is working correctly.
Managing Email Forwarding in Outlook
Once you have set up the email forwarding rule in Outlook, you can manage it by going back to the ‘Rules and Alerts’ window. From here, you can edit or delete the rule, as well as create new rules if necessary.
Using Outlook to Automatically Forward Emails
Using Outlook to automatically forward emails is a great way to save time and keep multiple inboxes up to date. By following the steps outlined above, you can quickly and easily set up email forwarding in Outlook.
Related FAQ
What is the Outlook App?
The Outlook App, formerly known as Outlook Web App, is a web-based email client developed by Microsoft that enables users to access their email messages, calendar, contacts, and tasks from any web browser. The Outlook App includes features such as conversation view, which lets users view their emails as a conversation with the most recent message at the top, and provides the ability to sort emails by date and sender. The Outlook App also supports Outlook rules, which allow users to automatically forward emails from specific senders or with specific subjects to a designated folder or address.
How Do I Automatically Forward Emails in Outlook App?
In order to automatically forward emails in Outlook App, you must first create a rule. To do this, open the Outlook App, click the gear icon in the top right corner, and select “Manage Rules & Alerts” from the drop-down menu. On the Rules and Alerts window, click “New Rule”, select “Apply Rule on Messages I Receive” and click “Next”. On the next page, you will be able to set the conditions for the rule, such as sender, subject, etc. Select the conditions you want to use and click “Next”. On the next page, select the action you want to apply to the emails that meet the conditions, such as “Forward, Redirect, or Send”, and then click “Next”. Finally, specify the address to which you want to forward emails that meet the conditions and click “Finish”.
How Can I Set a Rule to Automatically Forward All Emails in Outlook App?
To set a rule to automatically forward all emails in Outlook App, you must first create a rule as described in the previous answer. On the Rules and Alerts window, click “New Rule”, select “Apply Rule on Messages I Receive” and click “Next”. On the next page, leave all the conditions blank and click “Next”. On the next page, select the action you want to apply to the emails that meet the conditions, such as “Forward, Redirect, or Send”, and then click “Next”. Finally, specify the address to which you want to forward emails that meet the conditions and click “Finish”.
Can I Automatically Forward Emails from Specific Senders in Outlook App?
Yes, you can automatically forward emails from specific senders in Outlook App. To do this, you must create a rule as described in the previous answers. On the Rules and Alerts window, click “New Rule”, select “Apply Rule on Messages I Receive” and click “Next”. On the next page, select the condition “With Specific Words in the Sender’s Address” and enter the email address of the sender you want to forward emails from. Then click “Next”. On the next page, select the action you want to apply to the emails that meet the conditions, such as “Forward, Redirect, or Send”, and then click “Next”. Finally, specify the address to which you want to forward emails that meet the conditions and click “Finish”.
Can I Automatically Forward Emails with Specific Subjects in Outlook App?
Yes, you can automatically forward emails with specific subjects in Outlook App. To do this, you must create a rule as described in the previous answers. On the Rules and Alerts window, click “New Rule”, select “Apply Rule on Messages I Receive” and click “Next”. On the next page, select the condition “With Specific Words in the Subject” and enter the subject of the emails you want to forward. Then click “Next”. On the next page, select the action you want to apply to the emails that meet the conditions, such as “Forward, Redirect, or Send”, and then click “Next”. Finally, specify the address to which you want to forward emails that meet the conditions and click “Finish”.
How Can I Edit or Delete an Existing Rule in Outlook App?
In order to edit or delete an existing rule in Outlook App, open the Outlook App, click the gear icon in the top right corner, and select “Manage Rules & Alerts” from the drop-down menu. On the Rules and Alerts window, select the rule you want to edit or delete and click “Edit Rule” or “Delete”. If you choose to edit the rule, you will be able to modify the conditions and actions for the rule. When you are finished, click “Save” to save your changes.
How to auto forward emails in Outlook
In conclusion, automatically forwarding emails in Outlook App is a useful tool that allows you to stay organized and stay on top of your emails. Knowing how to set up the forwarding rule in Outlook App will save you a lot of time and energy. With this knowledge, you can easily forward emails to the right people so that you can focus on the tasks that matter most.