


How to Add a Month in Excel?

Adding a month in Excel can be a useful tool for tracking expenses, monitoring sales trends, forecasting future growth, and more. Whether you’re a financial analyst, a business owner, or a student, learning how to add a month in Excel can make tasks more efficient and easier to manage. In this guide, we’ll walk you through the process of adding a month in Excel, step by step. By the end of this tutorial, you’ll be able to quickly and easily add a month to any spreadsheet.
Adding a Month in Excel:
To add a month in Excel, follow these simple steps:
- Open your Excel workbook and select the cell where you’d like to add a month.
- Select the ‘Date’ tab in the ribbon bar.
- Click the ‘Editing’ group and select ‘AutoFill’.
- Choose ‘Fill Months’. Excel will automatically fill the selected cell with the next month.
Adding a Month to an Excel Spreadsheet
Adding a month to an Excel spreadsheet is a useful tool for tracking data over time. By adding a month, you can easily keep track of past months, compare month-over-month performance, and create reports for analyzing data. This article will explain how to add a month to an Excel spreadsheet, including how to format the data, how to add a header, and how to add formulas.
Formatting the Data
The first step in adding a month to an Excel spreadsheet is formatting the data. You need to make sure that the data is in a format that Excel can recognize. To do this, you can use the Text to Columns feature. This feature allows you to specify the delimiter and the data type for each column. Once the data is formatted correctly, you can move on to adding the month.
Adding a Header
The next step in adding a month to an Excel spreadsheet is adding a header. This is important because it will help you identify the data in the spreadsheet. To do this, you can use the Insert tab and choose either the Header or Footer option. From here, you can type in the name of the month that you want to add.
Adding Formulas
The last step in adding a month to an Excel spreadsheet is adding formulas. This is important because it will help you track the data over time. To do this, you can use the formulas feature in Excel. You can use formulas to calculate totals, average values, or any other data that you need to track.
Using Automated Features to Add a Month in Excel
In addition to manually adding a month to an Excel spreadsheet, you can also use automated features. Excel has a number of built-in tools that can help you add months quickly and easily. For example, you can use the Auto-Fill feature to automatically fill in data for a month. You can also use the Date Picker feature to quickly select a month and add it to the spreadsheet.
Using Templates to Add a Month in Excel
Another way to quickly add a month to an Excel spreadsheet is to use templates. Excel has a variety of templates that you can use to add months quickly. These templates are pre-formatted and include all of the necessary formulas and fields that you need. All you have to do is fill in the data and the template will automatically update the month.
Using Shortcuts to Add a Month in Excel
Finally, you can also use shortcuts to quickly add a month to an Excel spreadsheet. There are a number of keyboard shortcuts that you can use to quickly add a month. For example, you can press Ctrl + Shift + M to quickly add the current month to the spreadsheet. You can also press Ctrl + Shift + Y to add the current year to the spreadsheet.
Other Considerations for Adding a Month in Excel
When adding a month to an Excel spreadsheet, there are a few other things to consider. First, you should make sure that the data is formatted correctly. This will ensure that the data is displayed correctly and is easy to read. Second, you should make sure that the header is correctly formatted. This will make it easier to identify the data in the spreadsheet. Finally, you should make sure that the formulas are correctly applied. This will ensure that the data is accurately tracked over time.
Checking for Errors
Before using the data, you should always check for errors. If a formula is incorrect, the data may be inaccurate. To check for errors, you can use the Error Checking feature. This feature will highlight any errors in the spreadsheet so that you can quickly identify and fix them.
Backing Up the Data
Finally, it is important to back up your data before making any changes. This will ensure that you have a copy of the data in case something goes wrong. To back up your data, you can use the Backup feature in Excel. This feature will create a copy of the spreadsheet and save it to a file.
Frequently Asked Questions
Q1. How do I add a month in Excel using a formula?
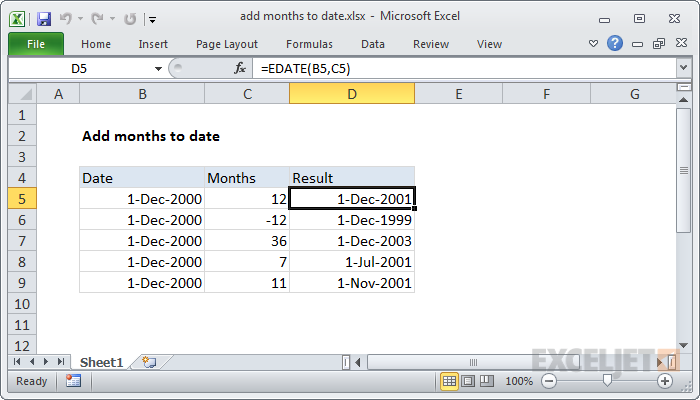
A1. To add a month in Excel using a formula, you can use the EDATE formula. This formula takes two arguments: the start date, and the number of months to add. So, for example, if you type in =EDATE(A2,1) into a cell, it will return the date one month after the date in cell A2. You can also use a negative number in the second argument to subtract months from a date.
Q2. How do I add a month in Excel using the Date & Time tool?
A2. You can also add a month in Excel using the Date & Time tool. To do this, click the ‘Formulas’ tab and then select ‘Date & Time’ from the ‘Function Library’ group. Then, select ‘ADDMONTHS’ from the list of functions. This will open the ‘ADDMONTHS’ dialogue box, where you can enter the start date and the number of months to add. Once you have entered the desired values, click ‘OK’ to add the month.
Q3. How do I add multiple months at once in Excel?
A3. To add multiple months at once in Excel, you can use the ‘EDATE’ formula. This formula takes two arguments: the start date, and the number of months to add. For example, if you type in =EDATE(A2,12) into a cell, it will return the date twelve months after the date in cell A2. You can also use a negative number in the second argument to subtract months from a date.
Q4. How do I add a month to a date in text format in Excel?
A4. To add a month to a date in text format in Excel, you can first convert the text into a date using the ‘DATEVALUE’ formula. This formula takes one argument: the text representation of a date. Once the text is converted to a date, you can use the ‘EDATE’ formula to add the desired number of months. For example, if you type in =EDATE(DATEVALUE(A2),1) into a cell, it will return the date one month after the date in cell A2.
Q5. Can I add a month in Excel without changing the day?
A5. Yes, you can add a month in Excel without changing the day. To do this, you can use the ‘EDATE’ formula. This formula takes two arguments: the start date, and the number of months to add. For example, if you type in =EDATE(A2,1) into a cell, it will return the date one month after the date in cell A2, but on the same day of the month.
Q6. How do I add a month to a specific day of the month in Excel?
A6. To add a month to a specific day of the month in Excel, you can use the ‘EDATE’ formula. This formula takes two arguments: the start date, and the number of months to add. For example, if you type in =EDATE(A2,1) into a cell, it will return the date one month after the date in cell A2, but on the same day of the month. You can also use a negative number in the second argument to subtract months from a date.
Add Months & Years in Excel – 2 Minute Excel Formula
Adding a month in Excel is a great way to keep track of time and make sure you’re staying on top of your deadlines. With the help of Excel’s easy-to-use formulas, you can quickly and accurately add a month to any date. By following these simple steps, you can quickly and easily add a month to any date in Excel. With this newfound knowledge, you can stay organized and on top of your data analysis projects.