


How to Autosave in Excel?

If you’re a regular Excel user, you know how frustrating it can be to lose your work due to an unexpected power outage or system crash. Fortunately, there is a quick and easy solution to this problem: Autosave. Autosave is a great feature that allows you to automatically save your work in Excel without having to manually save each file you create. In this article, we’ll show you how to use Autosave in Excel, so you can keep your work safe and secure.
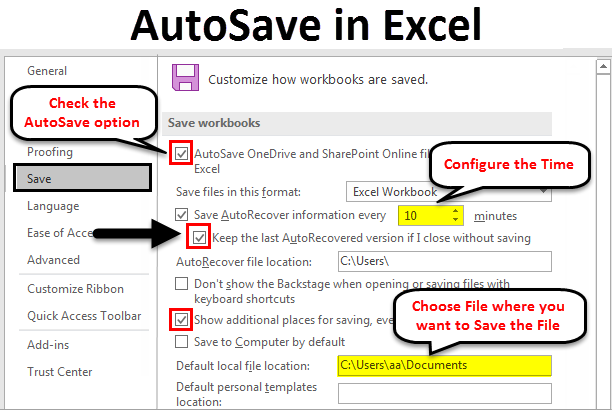
- Open Excel and click the File tab.
- Select Options and then Save.
- Tick the box next to “Save AutoRecover information every x minutes” and set the amount of time you want to pass before Excel saves your work automatically.
- Click OK.
Now, whenever you make a change in your Excel file, it will be saved automatically after the set amount of time has passed.
How to Automatically Save Excel Documents
Saving your work in Excel is an important part of keeping your data safe and secure. Fortunately, Excel makes it easy to quickly and automatically save your documents. With a few clicks, you can configure Excel to save your data on a regular basis, ensuring that you don’t lose progress and that you always have a recent version of the document.
Setup the AutoSave Feature
To enable the AutoSave feature in Excel, click the File tab in the top left corner of the window. This will open the backstage view. From here, choose the Options button in the bottom left corner of the window. This will open the Excel Options window.
Select the Save tab from the left-hand menu. In the Save Workbooks section, you’ll have the option to enable the AutoSave feature. Check the box next to “Save AutoRecover info every” and choose the interval you’d like to use. The options range from 10 minutes to 1 hour.
Manage the AutoRecover File Location
The AutoRecover feature is what Excel uses to save your data in the event of a crash or other interruption. By default, the AutoRecover file is saved to the same location as the original Excel file. To change this, click the File tab in the top left corner and select Options. This will open the Excel Options window.
Select the Save tab from the left-hand menu. Then, in the Save Workbooks section, click the “Browse” button under the AutoRecover file location. This will open the Save As window, where you can select a new location for the AutoRecover file.
Turn Off AutoSave
If you no longer want Excel to save your data automatically, you can easily turn off the AutoSave feature. To do this, click the File tab and select Options. This will open the Excel Options window.
Then, select the Save tab from the left-hand menu. Uncheck the box next to “Save AutoRecover info every”. This will disable the AutoSave feature, and Excel will no longer save your data automatically.
How to Automatically Backup Excel Documents
Backing up your Excel files is an important part of keeping them safe and secure. Fortunately, Excel makes it easy to automatically save your documents in a separate location. With a few clicks, you can configure Excel to save a backup copy of your documents on a regular basis, ensuring that you always have a recent version of the document stored in a separate place.
Setup the AutoBackup Feature
To enable the AutoBackup feature in Excel, click the File tab in the top left corner of the window. This will open the backstage view. From here, choose the Options button in the bottom left corner of the window. This will open the Excel Options window.
Select the Save tab from the left-hand menu. In the Save Workbooks section, you’ll have the option to enable the AutoBackup feature. Check the box next to “Keep the last auto saved version if I close without saving”. This will enable Excel to save a backup copy of your document in a separate location.
Manage the AutoBackup File Location
By default, the AutoBackup file is saved to the same location as the original Excel file. To change this, click the File tab in the top left corner and select Options. This will open the Excel Options window.
Then, select the Save tab from the left-hand menu. Then, in the Save Workbooks section, click the “Browse” button under the AutoBackup file location. This will open the Save As window, where you can select a new location for the AutoBackup file.
Turn Off AutoBackup
If you no longer want Excel to save a backup copy of your documents, you can easily turn off the AutoBackup feature. To do this, click the File tab and select Options. This will open the Excel Options window.
Then, select the Save tab from the left-hand menu. Uncheck the box next to “Keep the last auto saved version if I close without saving”. This will disable the AutoBackup feature, and Excel will no longer save a backup copy of your documents in a separate location.
Frequently Asked Questions
1. What is Autosave in Excel?
Autosave in Excel is a feature that allows you to save your work automatically at a specified time interval. This feature helps ensure that you don’t lose your work in the event of a power failure or computer crash, as it will save your work even if you forget to manually save it. Autosave can also help you recover work in the event of an accidental deletion or corruption of the file.
2. How do I turn on Autosave in Excel?
To turn on Autosave in Excel, open the application and then click File > Options > Save. In the Save options, check the box next to “Save AutoRecover information every X minutes.” You can then choose a time interval for the Autosave feature, such as 5, 10, 15, 20, or 30 minutes. Once you have set the time interval, click OK to save the changes.
3. Where does Autosave save my Excel files?
Autosave in Excel saves your files to a temporary folder, usually located at C:\Users\
4. What happens if the computer crashes while Autosave is running?
If the computer crashes while Autosave is running, your work should be safe as long as the Autosave feature was enabled before the crash. Autosave will save your work to the temporary folder and then you can open the file from the same location once the system has been restarted.
5. How do I recover an Autosaved file?
To recover an Autosaved file, first open Excel and then click File > Open > Recent. This will open a list of recently opened files, including any Autosaved files. Check the box next to the Autosaved file you want to recover and then click the Open button.
6. Can I disable Autosave in Excel?
Yes, you can disable Autosave in Excel by clicking File > Options > Save and then unchecking the box next to “Save AutoRecover information every X minutes.” This will turn off the Autosave feature and prevent Excel from automatically saving any changes you make. It is important to note that disabling Autosave means that you must manually save your work in order to ensure that it is not lost.
How to Enable Autosave in Microsoft Excel
The ability to autosave in Excel can be a game-changer for anyone working on a project that requires constant editing and revision. With its easy-to-navigate user interface and versatile features, Excel is a powerful tool that can help you improve your work productivity. Now that you know how to autosave in Excel, you can make sure that your work is safe and secure, even if an unexpected power outage occurs. So what are you waiting for? Get started now and take advantage of this amazing feature!