


How to Backup Iphone on Windows 10?

If you’re an iPhone user, then you know how important it is to keep your data backed up. With Windows 10, backing up your phone is a breeze! In this article, we’ll show you exactly how to backup your iPhone on Windows 10, so you can keep your data safe and secure. We’ll go over the different ways to back up your iPhone on Windows 10, as well as provide tips on how to make the process smoother and easier. So, read on to learn how to backup your iPhone on Windows 10!
Backing up your iPhone on Windows 10 is easy. Here are the steps to follow:
- First, connect your iPhone to your Windows 10 PC with the USB cable.
- Open the File Explorer window in Windows 10 and select your iPhone from the list of drives.
- Select the items you want to back up – such as photos, music and videos – and copy them to your PC.
- You can also use iTunes to back up your iPhone. Just open iTunes, select your device and then click Back Up Now.
Backing Up Your iPhone on Windows 10
Backing up your iPhone on Windows 10 is an important step to ensure your data is safe and secure. It’s a good idea to back up your iPhone periodically, especially if you’re adding new data or making changes to existing data. This article will explain how to back up your iPhone on Windows 10.
Using iCloud for iPhone Backup
One of the easiest ways to back up your iPhone on Windows 10 is by using iCloud. iCloud is a cloud storage service from Apple that allows you to store and back up your data on servers located in the cloud. When you back up your iPhone using iCloud, your data is stored on Apple’s servers and can be accessed from any device with an Internet connection. To back up your iPhone using iCloud, simply connect your iPhone to your Windows 10 computer and open iCloud for Windows. From there, you can select the data you’d like to back up and click the “Back Up Now” button.
Using Third-Party Backup Software
If you don’t want to use iCloud, you can use third-party backup software to back up your iPhone on Windows 10. There are many different third-party backup programs available, both free and paid. These programs allow you to back up your iPhone on your Windows 10 computer and store the data on your computer’s hard drive. They also allow you to restore your data if necessary.
Using iTunes to Backup iPhone
You can also use iTunes to back up your iPhone on Windows 10. To do this, connect your iPhone to your Windows 10 computer, open iTunes, and select the device icon in the upper-left corner of the window. From there, you can select the “Back Up Now” button to begin backing up your iPhone.
Restoring an iPhone Backup on Windows 10
When you need to restore an iPhone backup on Windows 10, the process is fairly simple. The first step is to connect your iPhone to your Windows 10 computer and open the backup program you used to back up your iPhone. From there, you can select the backup you’d like to restore and click the “Restore” button. Depending on the program you’re using, you may also be able to select which data you’d like to restore.
Restoring an iCloud Backup
If you used iCloud to back up your iPhone, the process of restoring an iCloud backup on Windows 10 is slightly different. First, connect your iPhone to your Windows 10 computer and open iCloud for Windows. From there, you can select the backup you’d like to restore and click the “Restore” button. Depending on the size of the backup, the restoration process may take some time.
Restoring a Third-Party Backup
If you used a third-party backup program to back up your iPhone on Windows 10, the process of restoring the backup is similar to restoring an iCloud backup. Simply connect your iPhone to your Windows 10 computer, open the backup program, and select the backup you’d like to restore. From there, you can click the “Restore” button to begin the restoration process.
Related FAQ
What is the first step in backing up an iPhone on Windows 10?
The first step in backing up an iPhone on Windows 10 is to download and install iTunes from the Microsoft Store. Once installed, you can launch iTunes and connect the iPhone to the computer via USB. Make sure to unlock the iPhone and accept any prompts to trust the computer. This will allow the computer to recognize the device and prepare it for a backup.
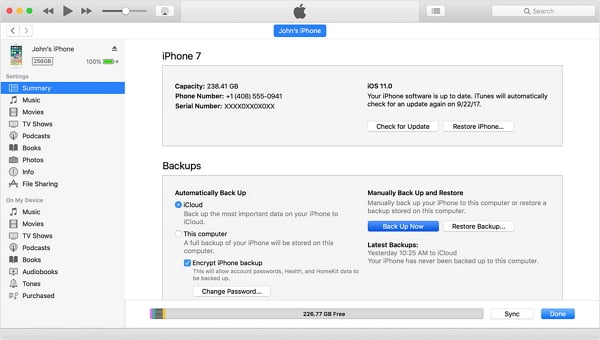
How can I create an iTunes backup?
Once the iPhone is connected to the computer, open iTunes and select the device from the top left corner. Next, click the ‘Summary’ tab and locate the ‘Backups’ section. Ensure that the ‘iCloud’ and ‘This computer’ boxes are checked, then click the ‘Back Up Now’ button. This will create an iTunes backup on the computer, and can be used to restore the iPhone if the need arises.
How can I encrypt an iTunes backup?
If you want to encrypt the iTunes backup, you can do so by clicking the ‘Encrypt Backup’ box and entering a secure password. This will ensure that the backup is safe and secure, and can only be accessed with the password. Once the password is entered, click the ‘Back Up Now’ button to create the encrypted backup.
How can I restore an iTunes backup?
To restore an iTunes backup, first connect the iPhone to the computer and open iTunes. Next, select the device from the top left corner and click the ‘Restore Backup’ button in the ‘Backups’ section. This will prompt iTunes to search for available backups, and you can select the one you want to restore. Once the backup is selected, click the ‘Restore’ button and enter the password, if necessary.
How can I transfer data from an iTunes backup?
If you want to transfer data from an iTunes backup, you can do so by launching iTunes and selecting the device from the top left corner. Then, click the ‘Transfer Purchases’ button in the ‘Backups’ section and follow the prompts to transfer the data. This will allow you to transfer music, videos, and other data from the iTunes backup to the iPhone.
How can I delete an iTunes backup?
To delete an iTunes backup, first open iTunes and select the device from the top left corner. Then, click the ‘Manage Backups’ button in the ‘Backups’ section and select the backup you want to delete. Finally, click the ‘Delete Backup’ button and confirm the action to delete the backup. This will remove the backup from the computer and free up space on the device.
How To Backup Your iPhone To Windows PC For Free
Backing up your iPhone on Windows 10 is a simple and efficient process that can save you from a lot of headaches in the future. With just a few clicks of your mouse, you can ensure that your data is safely stored in an external drive or cloud service. By taking this extra step, you can rest assured that your files, photos, and other important information will be safe and sound, no matter what.