


How To Change Pc Name Windows 10
Changing the name of your Windows 10 PC is a simple and straightforward process. Having a unique name for your computer makes it easier to identify on a network, and can also be a great way to add a personal touch. In this tutorial, we will guide you through the steps to rename your PC in Windows 10.
Step-by-Step Tutorial: How to Change PC Name Windows 10
- Step 1: Right-click on the Start button, and then click on System.
- Step 2: Click on the About tab on the left side.
- Step 3: Click on the Rename this PC button.
- Step 4: Enter the new name for your PC, and then click on the Next button.
- Step 5: Click on the Restart Now button to apply the changes.
How Do I Change My PC User Name In Windows 10?
Changing a PC User Name in Windows 10 is a simple process that can be completed in a few steps. If you are logged in as an administrator, you will be able to change the user name without any issue.
To begin, open the Start menu and type in “User Accounts.” This will open the User Accounts window. Then click on the “Change your account name” option. You should then be able to enter a new user name in the box that appears. Once you have entered a new user name, click on the “Change Name” button and you are done.
If you are not an administrator, then you will need to first open the Start menu and type in “Control Panel.” This will open the Control Panel window. Then click on the “User Accounts” option. You should then be able to select the user account you would like to change and click on the “Change the account name” option. From there, you should be able to enter a new user name in the box that appears. Once you have entered a new user name, click on the “Change Name” button and you are done.
It is important to remember that you will need to log out and log back in for the changes to take effect. This will ensure that Windows 10 recognizes the new user name and that all your settings are applied correctly.
How Do I Change The Owner Name On My PC?
Changing the owner name on your PC is a simple task that can be completed in a few steps. To begin, open the Control Panel by going to the Start menu and searching for “Control Panel.” Once you’ve opened the Control Panel, click on the “System and Security” link, then select the “System” link. This will open the System Properties window. Here, you will see the current owner name, which can be changed by clicking the “Change” button. A new window will open, where you can enter the new owner name and then click “OK” to save the changes. Once the changes have been saved, the new owner name will be displayed in the System Properties window.
In addition to changing the owner name on your PC, you can also customize the user account by selecting the “Change your account picture” option. From here, you can choose an image from your computer or use one of the many free images available online. You can also use an image from a USB drive or external storage device. Once you’ve selected an image, click “Save Changes” to apply the new image to your account.
Is It OK To Change PC Name?
Renaming your PC is a simple process that only takes a few minutes to complete. It is a great way to personalize your computer and make it easier to find on a network. Depending on your system, you may have different methods of changing your PC name. Here are the steps to follow to rename your PC on Windows 10:
- Open the Settings window by typing “Settings” in the search bar and clicking the “Settings” icon.
- Go to System > About.
- Scroll down to the bottom of the page and click the “Rename PC” button.
- Enter the new name for your computer, then click the “Next” button.
- Once the process is completed, you will see the new name of your PC on the “About” page.
It is important to note that you may be required to restart your PC after changing the name. This will ensure that all changes are applied correctly. Additionally, keep in mind that you may need to update any applications or services that rely on the old name of your PC.
In summary, changing the name of your PC is a relatively simple process. All you need to do is follow the steps outlined above and you should be able to rename your PC quickly and easily.
How Do I Change My Display Account Name?
Changing your display account name is a simple process. Depending on the type of account you have, the steps may vary slightly. Here is the general procedure to change your display account name:
1. Log in to your account.
2. Click on the “Settings” or “Profile” tab.
3. Look for the field where your display name is located, and click on it.
4. Enter the new name you want to use in the field.
5. Click “Save” or “Submit” to save the changes.
Your display name is the name that is used to identify you in the account. It is usually the same as your username, but some accounts allow you to set a separate display name. For example, a website may allow you to set a display name that is different from your username. This may be useful if you want to keep your real name private.
Once you have changed your display name, it may take a few minutes for the changes to take effect. After that, your new display name will be visible to other users on the website or in the app. Note that some websites may require you to verify your new display name before it can be used.
How To Change User Name Windows 10
Changing a PC name in Windows 10 is a relatively easy task. It is important to note, however, that the process can vary depending on the edition of Windows 10 that you are using.
For Windows 10 Home and Windows 10 Professional, you can change the computer name from the System Properties window. To do this, open the Start menu and search for “System”. Once the System window is open, click on the “Change settings” button.
From the System Properties window, click on the “Computer Name” tab. Here, you will be able to enter a new name for your computer. Once you have entered the new name, click “OK” and your computer will be renamed.
If you are using Windows 10 Enterprise or Windows 10 Education, you can use the PowerShell command to change the computer name. To do this, open the PowerShell window by pressing the Windows key + X and selecting “Windows PowerShell”.
Once the PowerShell window is open, type the following command and press enter: Set-ComputerName -NewName “
You can also use the Command Prompt to change the computer name. To do this, open the Command Prompt window by pressing the Windows key + X and selecting “Command Prompt”. Once the Command Prompt window is open, type the following command and press enter: wmic computersystem where name=”
How To Change Administrator Name On Windows 10
Changing the name of your PC in Windows 10 is a straightforward process. You can easily change the name of your PC from the System Properties window. This will not only change the name of your PC but also the name of your account and the name of the Homegroup you are in. It is important to note that if you are connected to a domain, the domain name is not changed.
Follow these steps to change the name of your PC in Windows 10:
- Right-click on the Start menu button and select System.
- In the System window, click on the “Advanced system settings” link.
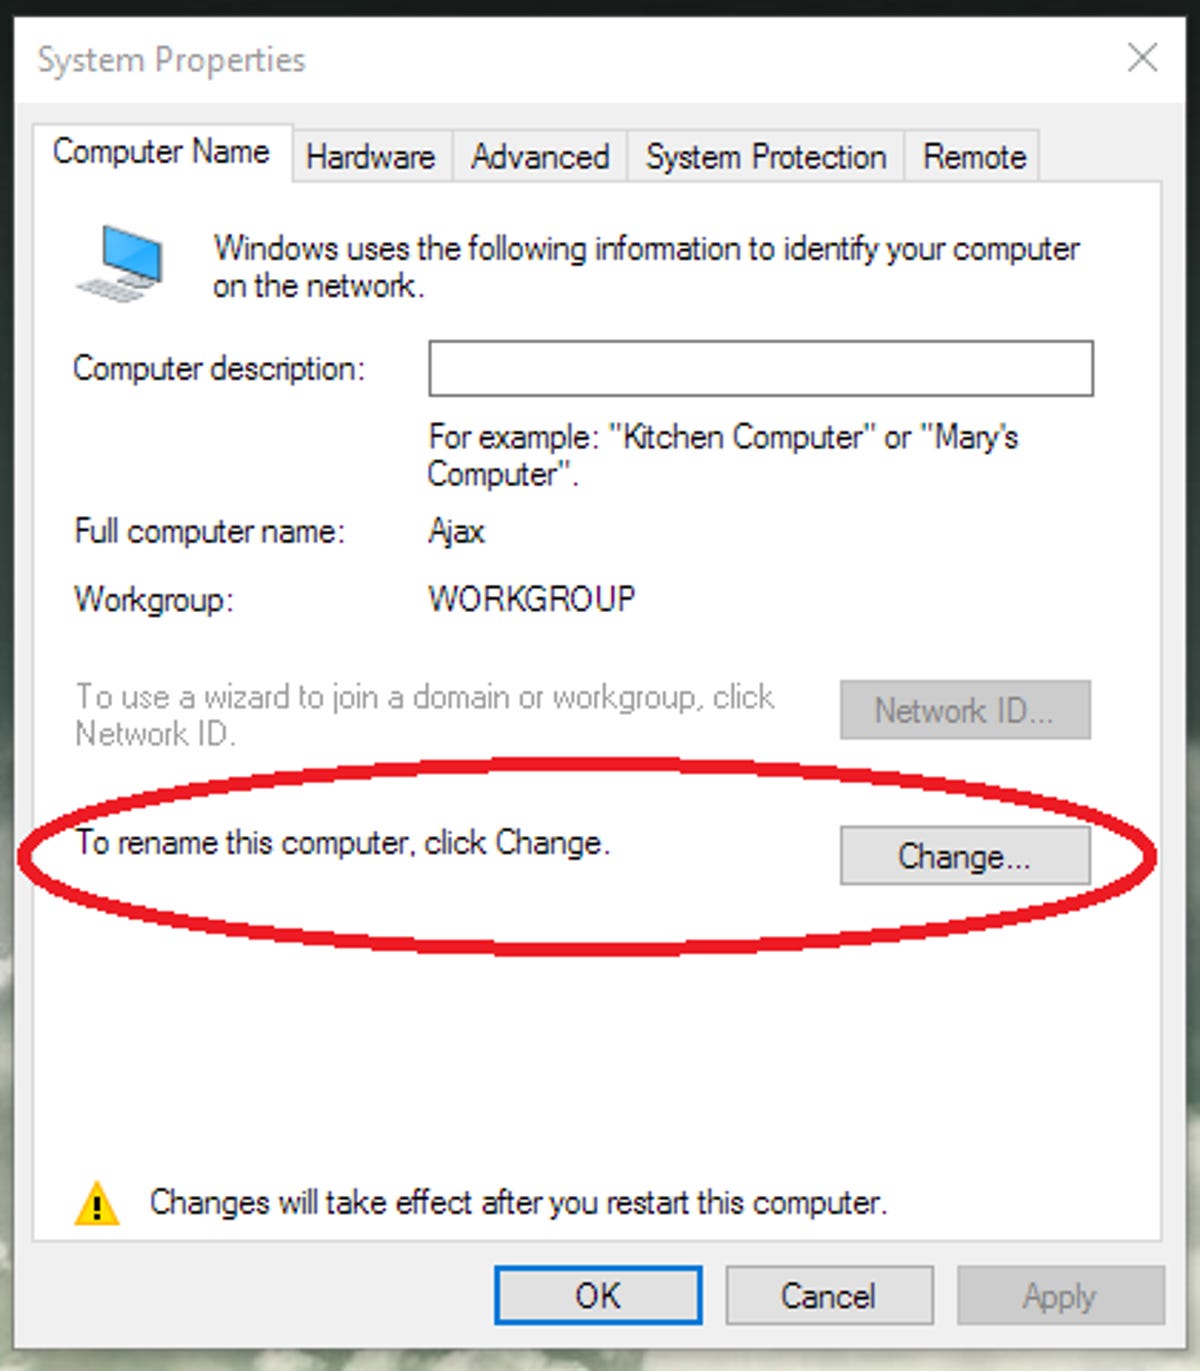
- In the System Properties window, click on the Computer Name tab.
- Click the Change button.
- Enter a new name for your PC in the Computer name field.
- Click OK.
- Restart your PC for the changes to take effect.
After restarting your PC, your new PC name will be displayed in the Start menu and in the Settings window. Any Homegroup you are in will also be renamed to your new PC name. Keep in mind that this process will not change the domain name if you are connected to a domain.
How To Change Pc Name Windows 11
Changing the name of your Windows 10 PC is a simple process that is helpful for personalizing the device to your liking.
To start, open the Start Menu and press the gear icon to open the Settings Menu. From the Settings Menu, navigate to System, and then About. Here you will see the current name of your PC. Click the Rename this PC button to change it.
After pressing the Rename this PC button, you will be prompted to enter a new name for your device. Once you enter the name, click the Next button to save the name. Your PC will then be restarted to apply the changes.
Once your PC restarts, the new name will now appear in the About tab of the System settings as well as the Start Menu. You can now personalize your PC to your liking.
Can’t Change Computer Name Windows 10
Changing the name of your PC in Windows 10 is a simple task, and there are two different ways of doing it. The first method is through the Settings app, and the second is through the traditional Control Panel.
Using the Settings App:
1. Go to the Start menu and select the gear icon to open the Settings app.
2. Select System.
3. On the left side of the window, select About.
4. In the right side of the window, you will find the option to change the device name.
5. Enter a name of your choice and click Save.
Using the Control Panel:
1. Go to the Start menu and type “Control Panel” in the search box.
2. Open the Control Panel and click on System and Security.
3. Select System.
4. In the right side of the window, select Change settings.
5. In the next window, select Change.
6. Enter a new name for your PC and click OK.
How To Change Pc Name On Lock Screen
Changing your PC name on Windows 10 is an easy process. It can be done both through the settings panel as well as through the command line. Changing the PC name can help you to easily identify your computer on the network and make it easier to set up a home network.
By using the settings panel, you can easily change your computer name in just a few steps:
- Open the settings panel by pressing the Windows key + I
- Click on the “System” option
- Click on the “About” option from the left sidebar
- Under the “Device specifications” section, click on the “Rename this PC” option
- Type in the new name for your PC and click “Next”
- The new name should be applied immediately
You can also change your PC name through the command line by running the “WMIC” command. To do this, open the command prompt and run the following command:
WMIC computersystem where name="
Once the command is executed, your PC name should be changed to the new name you specified. It is important to note that after you have renamed your PC, you may need to restart your computer for the new name to be applied.
How To Change Pc Name Windows 7
Renaming your computer in Windows 10 is an easy process and there are several methods to do it. This tutorial will show you different ways to change the name of your PC in Windows 10.
Method 1: Via System Properties
1. Right-click on the Start button and select System from the menu.
2. On the left side of the window, click on About.
3. On the right side of the window, you will see the current name of your computer. To change it, click the Change button.
4. Enter the new name for your computer and click OK.
5. Click OK again to save the changes.
Method 2: Via Control Panel
1. Go to the Control Panel.
2. In the Control Panel, go to System and Security > System.
3. On the left side of the window, click on Change settings.
4. On the right side of the window, you will see the current name of your computer. To change it, click the Change button.
5. Enter the new name for your computer and click OK.
6. Click OK again to save the changes.
How To Change Pc User Name
Renaming your PC in Windows 10 is a relatively straightforward process that can be completed in just a few steps. To get started, open the Start Menu and type “System” into the search field. This will bring up the System Information page that contains all the settings related to your PC.
Next, click on the “Change PC Settings” option at the bottom of the page. This will open the PC Settings page where you can customize various settings on your computer. From here, click on the “System” link in the left-hand navigation pane. This will bring up the “About” page which contains information about your computer.
Finally, scroll down and you will find the “Computer Name” field. This is where you can enter the new name for your computer. Once you have entered the new name, simply click the “OK” button and the name change will be applied. Your computer will now have the new name you have chosen.
How To Change Computer Name
To change the name of your PC in Windows 10, you need to follow the steps below.
1. Open the Start menu and select Settings.
2. In the Settings window, select System.
3. Select About on the left side of the window.
4. Under the Device Specifications section, click Rename this PC.
5. Enter the new name you want to give your PC and click Next.
6. You’ll be asked to confirm your new name. Click the Confirm button.
7. Your PC will now restart with the new name.
Once you have restarted the PC, you will see the new name of your PC in the Start menu. You can also check the new name by going to Settings > System > About. The new name will be displayed in the Device Specifications section.
It’s important to note that the name of your PC will be visible on your local network, so make sure to choose a name that’s appropriate. It’s also important to remember that if you have a Microsoft account, the name you choose will be used to sign in to the account.
How To Change Your Username / Computer Name In Windows 10
Changing the PC name in Windows 10 is a very simple and straightforward task that can be done in under a minute. By following the steps outlined above, you can change the name of your PC to whatever you’d like. This can be useful for quickly identifying multiple computers on a network, and it may even help you save time when setting up a new PC. If you ever find yourself in a situation where you need to give your PC a new name, you now know exactly what to do.