


How to Connect to Printer Using Ip Address Windows 10?
It’s become increasingly common to use wireless printers with your computer, but sometimes you may run into issues connecting them. If you’re running into problems connecting your printer to your Windows 10 computer using an IP address, then you’re in the right place. In this article, we’ll walk you through the steps for connecting to printer using IP address Windows 10. With this easy-to-follow guide, you’ll have your printer connected in no time!
To connect to a printer using an IP address in Windows 10:
- Open Control Panel and select Devices and Printers
- Choose Add a Printer
- Select Add a Network, Wireless or Bluetooth Printer
- In the Add Printer dialogue box, select the printer with IP address option and click Next
- Enter the IP address of the printer and click Next
- Confirm the printer name, click Next and complete the installation
Connecting Printer to Windows 10 with IP Address
Using an IP address to connect to a printer is a convenient way to get your printer connected to the Windows 10 operating system. This method works for both wired and wireless printers. In this article, we will take a look at the steps you need to take in order to connect to a printer using an IP address on Windows 10.
The first step you need to take is to make sure that the printer is connected to your network. If the printer is a wireless printer, make sure that it is connected to your Wi-Fi network. If the printer is a wired printer, make sure that it is connected to the router or switch that is connected to your network. Once you have confirmed that the printer is connected to the network, you are ready to move on to the next step.
The next step you need to take is to find the IP address of the printer. You can do this by printing a network configuration page from the printer. This page will contain the IP address of the printer. If you cannot find the IP address on the network configuration page, you can also use a tool such as IP Scanner to find the IP address of the printer.
Steps to Connect Printer with IP Address on Windows 10
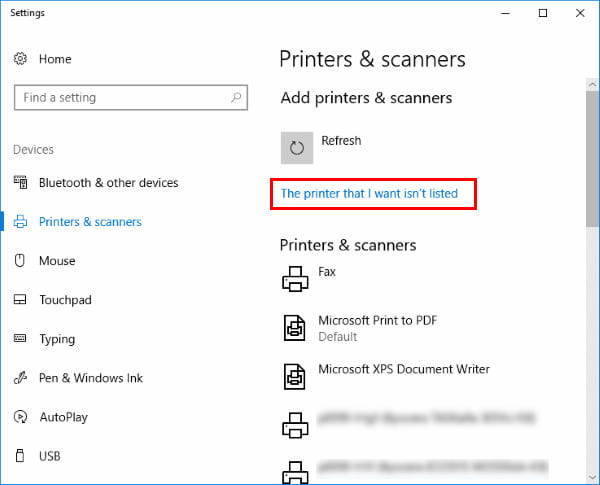
Once you have the IP address of the printer, the next step is to add the printer to the Windows 10 system. To do this, open the Start menu and select “Devices and Printers”. Select “Add a Printer” and then select “Add a Network, Wireless or Bluetooth Printer”.
In the next window, select “The printer that I want isn’t listed”. In the next window, select “Add a printer using a TCP/IP address or hostname”. Enter the IP address of the printer in the “Hostname or IP address” box and then select “Next”.
Verifying Printer Connection & Troubleshooting
The system will now attempt to connect to the printer. If the connection is successful, the system will prompt you to select the printer manufacturer and model. Select the appropriate manufacturer and model and then select “Next”. The printer should now be added to the system.
If the connection is unsuccessful, you will need to troubleshoot the connection. First, make sure that the printer is still connected to the network. If the printer is wireless, make sure that it is still connected to the Wi-Fi network. If the printer is wired, make sure that it is still connected to the router or switch that is connected to the network.
If the printer is still connected to the network, you may need to reset the printer. To do this, unplug the power from the printer and wait a few minutes before plugging it back in. After the printer has been reset, try connecting to the printer again using the IP address.
Installing Printer Drivers & Finishing Setup
Once the printer is added to the system, you will need to install the printer drivers. To do this, open the Start menu and select “Devices and Printers”. Right-click on the printer that you just added and select “Properties”. Select the “Drivers” tab and then select the drivers that you need to install.
Once the drivers have been installed, you will need to finish the setup process. This will vary depending on the type of printer that you have. Refer to the printer’s manual for instructions on how to complete the setup process. Once you have finished the setup process, you should be able to print to the printer from any computer on the network.
Few Frequently Asked Questions
What is an IP Address?
An IP address (Internet Protocol address) is a numerical label assigned to each device connected to a computer network that uses the Internet Protocol for communication. An IP address serves two main functions: host or network interface identification and location addressing. It is used to identify the device and its location in the network.
How do I Find My Printer IP Address Windows 10?
You can find your printer IP address on Windows 10 by going to the Control Panel > Devices and Printers. Right click on your printer and then click Properties. On the General tab, you will find the IP address under the heading “Location”. You can also find your printer IP address by typing ‘printui /s /t2’ in the Run window.
How to Connect to Printer Using IP Address Windows 10?
To connect a printer using IP address on Windows 10, first open the Devices and Printers window. Then click on Add a Printer and select Add a Local Printer. Select Create a New Port and choose Standard TCP/IP Port. Enter the IP address of the printer and hit Next. Follow the instructions on the screen to complete the installation.
What are the Benefits of Connecting to Printer Using IP Address?
Connecting to a printer using IP address provides a number of benefits. It makes it easier to manage your printer settings, as you can access the printer’s web page directly from your computer. It also allows you to access the printer from any computer in your network, as long as you know its IP address. Additionally, it allows you to print remotely, even when you are away from your home or office.
Are there any Security Considerations for Connecting to Printer Using IP Address?
Yes, there are several security considerations when connecting to a printer using IP address. It is important to make sure that the printer is using a secure connection, such as Wi-Fi Protected Access 2 (WPA2). Additionally, you should make sure that the printer is using a secure password to prevent unauthorized access. It is also important to regularly update the printer’s firmware to ensure that the latest security patches are installed.
What are Some Troubleshooting Steps for Connecting to Printer Using IP Address?
If you are having trouble connecting to your printer using IP address, there are several troubleshooting steps you can take. First, make sure that the printer is powered on and connected to the same network as your computer. Additionally, make sure that the printer’s IP address is correctly configured. You can also try restarting your computer and router. If the problem persists, you may need to contact your printer’s manufacturer for further assistance.
Add printer by IP windows 10
Having a printer connected to your Windows 10 device is a great way to make the most of your home office. By following the steps outlined in this article, you can easily connect to a printer using its IP address in no time. The process is simple and straightforward, and once you have your printer up and running, you’ll be able to print documents quickly and efficiently.