


How to Create a Email Signature in Outlook?

Are you looking for a way to make your emails stand out? Having a professional email signature is an easy way to add a touch of personality to your emails and build your personal brand. If you’re using Outlook to manage your emails, creating an eye-catching signature is easy! In this article, we’ll walk you through how to create an email signature in Outlook.
- Step 1:Open Outlook, click File > Options > Mail > Signatures.
- Step 2:Create a new signature or edit an existing one.
- Step 3:Add text, images, links, and your logo.
- Step 4:Click OK > Save > New Message.
Creating Email Signatures in Outlook
Creating an email signature in Outlook is a simple process that allows you to easily personalize and customize your emails. With an email signature, you can add your contact information, logo, or other information to the bottom of each email you send. Outlook provides a simple way to create and manage your email signatures, allowing you to easily update or change them whenever you need to.
Step 1: Open the Outlook Signature Editor
The first step to creating an email signature in Outlook is to open the Outlook Signature Editor. To do this, open Outlook and click on the File tab. From here, click on Options and then select the Mail tab. Under the Compose messages section, click on the Signatures button. This will open the Outlook Signature Editor, which will allow you to create and manage your email signatures.
Step 2: Create a New Signature
Once the Outlook Signature Editor is open, you will be able to create a new email signature. To do this, click on the New button, which is located near the top-right corner of the window. This will open the New Signature window, where you can enter the name of your new signature and select the email account that you want to use it with.
Step 3: Customize Your Signature
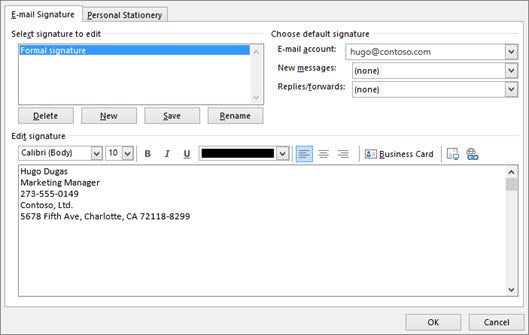
Once you have created a new signature, you can customize it to fit your needs. You can add text, images, or HTML code to the signature. You can also edit the font, size, and color of the signature text. If you need help creating or customizing your signature, you can use the tools and templates provided by Outlook.
Step 4: Save Your Signature
Once you have finished customizing your signature, you will need to save it. To do this, click on the OK button at the bottom-right corner of the window. This will save your signature and make it available for use in Outlook.
Step 5: Create an Email Signature for Each Account
If you have multiple email accounts, you will need to create a signature for each one. To do this, repeat the steps above for each email account. Once you have created a signature for each account, you can easily switch between them by clicking the Signature drop-down menu in the Compose window.
Step 6: Update Your Signature
If you need to update your signature, you can easily do so by opening the Outlook Signature Editor and editing the signature as needed. Once you have updated the signature, click on the OK button to save the changes.
Step 7: Insert Your Signature in Emails
Once you have created your signature, you can easily insert it into your emails. To do this, open the Compose window and click on the Signature drop-down menu. Here, you will be able to select the signature that you want to use. The signature will then be inserted at the bottom of your email.
Few Frequently Asked Questions
Q1. What is an Email Signature?
An email signature is a line of text or an image that is automatically inserted at the end of an email message. It contains contact information such as your name, title, company name, address, phone number, and website URL. It can also include other features such as a logo, social media links, and a professional headshot. It serves as a way for your recipient to contact you or learn more about you and your company.
Q2. What are the Benefits of Having an Email Signature?
Having an email signature can have many benefits. It can help to promote your business and make it easier for your recipients to contact you or learn more about you. It can also help to maintain a professional image and make sure that your contact information is always up-to-date. Additionally, it can help to make sure that your emails always look professional and consistent.
Q3. How do I Create an Email Signature in Outlook?
To create an email signature in Outlook, first open the Outlook app. Then, go to File > Options > Mail. On the Mail tab, scroll down to the Signature section and click on the “Signatures” button. From here, you can create a new signature by clicking on the “New” button. Then, enter the text or image you would like to include in your signature. Once you’re finished, click “OK” to save the signature and it will be automatically added to the end of all your emails.
Q4. How do I Add an Image to My Email Signature?
To add an image to your email signature in Outlook, first open the Outlook app. Then, go to File > Options > Mail. On the Mail tab, scroll down to the Signature section and click on the “Signatures” button. From here, you can create a new signature by clicking on the “New” button. Then, click “Insert Picture” and select the image you would like to include in your signature. Once you’re finished, click “OK” to save the signature and it will be automatically added to the end of all your emails.
Q5. Can I Add Social Media Links to My Email Signature?
Yes, you can add social media links to your email signature. In Outlook, go to File > Options > Mail. On the Mail tab, scroll down to the Signature section and click on the “Signatures” button. From here, you can create a new signature by clicking on the “New” button. Then, click “Insert Hyperlink” and enter the URL of the social media page you would like to link to. Once you’re finished, click “OK” to save the signature and it will be automatically added to the end of all your emails.
Q6. How do I Change My Email Signature?
To change your email signature in Outlook, first open the Outlook app. Then, go to File > Options > Mail. On the Mail tab, scroll down to the Signature section and click on the “Signatures” button. From here, you can edit an existing signature by selecting it and clicking the “Edit” button. Then, you can make the changes you would like and click “OK” to save the signature. Once you’re finished, the signature will be automatically updated on all your emails.
How to Add Signature in Outlook
Creating an email signature in Outlook may seem like a daunting task, but with the right guidance and resources, it can be a breeze. With the tips outlined in this article, you now have the knowledge to create an effective and professional email signature that will make a lasting impression with your contacts. So, take the time to make sure your signature looks right and make sure it reflects who you are as a professional. Good luck!