


How to Create a Network Drive Windows 10

If you’ve ever wanted to save and access files or folders on multiple computers, you know how helpful a network drive can be. Fortunately, creating a network drive on Windows 10 is relatively simple and straightforward. In this guide, we’ll walk you through the process step-by-step so you can quickly get started with your network drive.
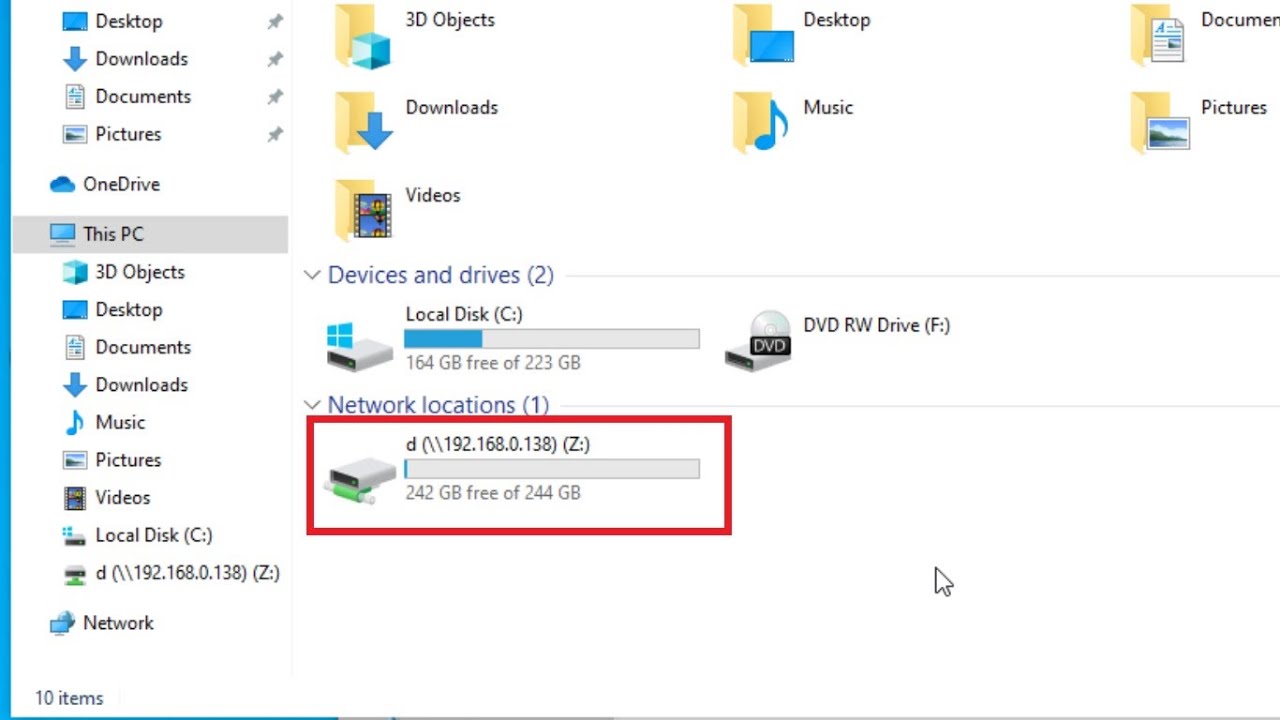
1. Open File Explorer and select This PC.
2. Click the Computer tab at the top of the window and select Map Network Drive.
3. Choose a drive letter from the drop-down menu.
4. Enter the address of the network location you want to map to the drive letter.
5. Tick the Reconnect at logon box to set up the mapped drive to connect automatically.
6. Click Finish.
7. Enter the username and password of the network if necessary.
8. Click OK.
How to Create a Network Drive in Windows 10
Creating a Network Drive in Windows 10 is a useful way to access files from a remote computer without needing to manually map and reconnect each time you need to access them. With a few simple steps, you can set up a Network Drive that will allow you to quickly access your files from any computer with an internet connection.
Step 1: Connect to the Remote Computer
The first step in creating a Network Drive is to connect to the remote computer that contains the files you want to access. You can do this by either physically connecting the two computers with an Ethernet cable, or by connecting to the remote computer over the internet. Once you have connected to the remote computer, you will need to make sure that both computers are able to communicate with each other.
Step 2: Create a Network Drive
Once you have established a connection between the two computers, you will be ready to create the Network Drive. To do this, open the File Explorer on the local computer and select the “Network” tab. From here, you will be able to select the remote computer from the list of available computers. Once selected, you will be able to select the specific folder or drive from the remote computer that you wish to access.
Step 3: Assign a Drive Letter to the Network Drive
Once you have selected the folder or drive from the remote computer, you will need to assign a drive letter to it. To do this, open the “This PC” window and click on “Map Network Drive”. From here, you will be able to select the drive letter that you wish to assign to the Network Drive. After selecting the drive letter, click “Finish” to create the Network Drive.
Step 4: Access the Network Drive
Once you have created the Network Drive, you will be able to access it just like any other drive on your computer. To access the Network Drive, simply open the File Explorer and select the drive letter that you assigned to the Network Drive. Once selected, you will be able to view and access the files and folders from the remote computer.
Step 5: Disconnecting the Network Drive
When you are done accessing the files from the remote computer, you will need to disconnect the Network Drive. To do this, open the File Explorer and select the drive letter that you assigned to the Network Drive. From here, you will be able to select the “Disconnect” option to disconnect the Network Drive.
Step 6: Reconnecting the Network Drive
If you need to access the files from the remote computer again, you will be able to reconnect the Network Drive. To do this, open the File Explorer and select the drive letter that you assigned to the Network Drive. From here, you will be able to select the “Reconnect” option to reconnect the Network Drive.
Troubleshooting
If you are having problems connecting to the remote computer or accessing the files, there are several troubleshooting steps you can take. First, make sure that both computers are connected to the same network. If they are not, you will need to connect them before you can access the files. If you are still having problems, make sure that the remote computer is configured to allow file sharing. Finally, make sure that the account you are using to access the remote computer has the necessary permissions to view the files.
Frequently Asked Questions
What is a Network Drive?
A network drive is a storage location on a computer network that is accessible to multiple users. It enables multiple users to store and share files with each other over a local area network or the internet. Network drives are also referred to as shared drives, networked drives, or network attached storage. Network drives allow users to access the same data from multiple computers, making it a convenient and cost-effective way to store and share files.
How do I Create a Network Drive Windows 10?
Creating a network drive in Windows 10 is simple. First, right-click on the Start menu and select “Network”. Then, click on the “Network and Sharing Center” option. From here, click on the “Change advanced sharing settings” link. Next, select the “Turn on network discovery and file and printer sharing” option and click the “Save changes” button. Finally, create a new folder on your desktop and right-click on it and select “Properties”. Under the “Sharing” tab, select “Advanced Sharing” and check the box next to “Share this folder”. Click “OK” to save your changes.
Where is the Network Drive Located?
The network drive is located on the computer or server that is hosting the drive. It can be accessed by any user that has been granted access to the drive on the local network or the internet. The location of the network drive will vary depending on the type of network and the operating system being used.
What are the Benefits of a Network Drive?
The primary benefit of a network drive is that it allows multiple users to access the same data from multiple computers. This makes it easier to collaborate on projects and share files. Additionally, a network drive is cost-effective and provides users with access to a large amount of storage space that is shared among multiple users.
What are the Risks of a Network Drive?
The primary risk of a network drive is that the data stored on it is vulnerable to malicious attacks if the security settings are not properly configured. Additionally, if the network drive is connected to the internet, it is also vulnerable to external attacks and viruses. Therefore, it is important to ensure that the network drive is properly secured to protect the data stored on it.
How do I Secure a Network Drive?
Securing a network drive is essential in order to protect the data stored on it. To secure a network drive, it is important to implement strong passwords and two-factor authentication. Additionally, it is important to configure the network settings to limit access to the drive to only authorized users. Additionally, it is important to regularly update the security settings and the software used to access the drive.
How to Setup a Network Drive on your Home Network
If you’ve been looking for a way to easily manage multiple computers and access files on them, creating a network drive in Windows 10 is a great solution. With a few simple steps, you can quickly set up a network and create a network drive that can be used to store and access files from any computer in the network. By following the instructions in this article, you’ll have a reliable, secure network drive that can be used for months and years to come.