


How to Design a Flyer in Microsoft Publisher?

Creating a flyer can help you spread the word about an upcoming event or promotion quickly and cost-effectively. Microsoft Publisher can be a great tool to help you design and create a professional-looking flyer that will capture the attention of your target audience. In this article, we will walk you through the steps of how to design a flyer in Microsoft Publisher.
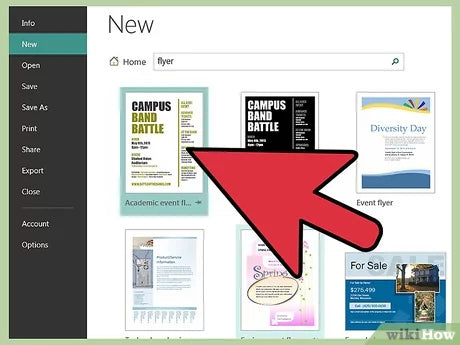
Designing a Flyer in Microsoft Publisher: To design a flyer in Microsoft Publisher, start by opening the application, then click ‘File’ and select ‘New.’ On the left-hand side of the window, choose the type of flyer you want to create. Next, click ‘Insert’ and add images and text to your design. To customize the design further, select ‘Format’ and choose the font and color options. Finally, save the document and use the ‘Print’ option to print it.
Design a Flyer Using Microsoft Publisher
Microsoft Publisher is a powerful desktop publishing program that is included in some versions of Microsoft Office. It can be used to create all sorts of marketing materials, including flyers. Designing a flyer in Publisher is relatively simple and requires just a few steps.
Choose a Template
The first step in designing a flyer in Publisher is to choose a template. Publisher includes a variety of templates for different types of flyers, so it’s easy to find the template that best suits your needs. When you’ve chosen the template, open it and make any changes you want to it.
Add Graphics
Publisher includes a variety of graphics and clip art that you can add to your flyer to make it look more attractive. You can also add your own photos, logos, and other graphics.
Edit Text
Once you’ve added any graphics to your flyer, you can begin editing the text. You can add your own text, or you can edit the text that’s already present in the template. You’ll want to make sure that the text is clear and easy to read, and that it accurately conveys the message you’re trying to send.
Format the Flyer
Once you’ve added all the text and graphics to your flyer, you can begin formatting it. Publisher includes a variety of formatting tools, such as fonts, colors, and backgrounds, that you can use to make your flyer look more professional.
Preview and Print
When your flyer is finished, you can preview it to make sure it looks the way you want it to. If you’re satisfied with the way it looks, you can print it out. If you’d rather distribute the flyer electronically, you can save the file as a PDF and email it to your contacts.
Few Frequently Asked Questions
Q1: What is Microsoft Publisher?
A1: Microsoft Publisher is a desktop publishing application that is included in the Microsoft Office suite. It is used to create documents such as newsletters, brochures, flyers, and other marketing materials with a professional look. Publisher includes a wide array of design tools, templates, and graphics that make it easy to create professional-looking documents. It also allows users to customize their documents with their own photos, text, and graphics.
Q2: What are the steps to design a flyer in Microsoft Publisher?
A2: The steps for designing a flyer in Microsoft Publisher are as follows:
1. Open Microsoft Publisher and select “Flyer” from the list of templates.
2. Choose a template that matches your flyer’s purpose and design.
3. Customize the template by adding text, images, and graphics to create a unique look.
4. Preview your design and make any necessary changes.
5. Print or save your flyer.
Q3: What are some tips for designing a flyer in Microsoft Publisher?
A3: Here are some tips for designing a flyer in Microsoft Publisher:
• Use a template to get started quickly.
• Choose a design that matches your purpose and audience.
• Keep it simple and use a limited number of fonts and colors.
• Use high-quality images to make your flyer stand out.
• Include your contact information and a call-to-action.
• Utilize the design tools to create a professional-looking flyer.
Q4: How do I add text to my flyer in Microsoft Publisher?
A4: To add text to your flyer in Microsoft Publisher, click the “Text Box” button in the toolbar and then draw a text box on the flyer. You can then type in your text and use the font and size drop-down menus to customize it. You can also move and resize the text box to better fit your design.
Q5: How do I add images to my flyer in Microsoft Publisher?
A5: To add images to your flyer in Microsoft Publisher, click the “Picture” button in the toolbar and select the image you want to add. You can also drag and drop an image from your computer onto the flyer. Once the image is on the flyer, you can resize and move it to fit your design.
Q6: How do I save or print my flyer in Microsoft Publisher?
A6: To save or print your flyer in Microsoft Publisher, click the “File” menu and select “Save As” or “Print”. You can then choose the format you want to save your flyer in (e.g. PDF, JPEG, etc.) or select the printer you want to use for printing. Once you’ve made your selections, click “Save” or “Print” and you’ll be ready to share your flyer!
Overall, designing a flyer in Microsoft Publisher is a fairly straightforward process. With a few simple steps and the right tools, you’ll be able to create a professional-looking flyer in no time. The design possibilities are endless, so don’t be afraid to experiment and have fun with it. With a little effort and creativity, you can create a flyer that will grab the attention of potential customers.