


How to Find the Range in Excel?

If you’re working with data in Excel and need to determine the range quickly and accurately, then you’ve come to the right place. In this article, we’ll be taking a look at how to find the range in Excel, and how you can use this powerful feature to your advantage. We’ll go over the basics of the range function, discuss how to use it, and provide a few examples to help you understand the concept. So, if you’re ready to learn how to find the range in Excel, let’s get started!
Finding the Range in Excel:
- Open your Excel spreadsheet.
- Enter the values that you want to use to determine the range in two adjacent columns.
- Click on the cell in the column on the right, which will be the last cell in the range.
- Click on the cell below and to the left of the cell you just selected.
- Press and hold the left mouse button while dragging the mouse over the cells you want to include in the range.
- Release the mouse button when you have highlighted all the cells you want in the range.
- Look in the formula bar at the top of the spreadsheet. The range should appear there, in the format of “=A1:B4”, for example.
What is the Range in Excel?
Range in Excel is a set of cells that are selected and can be used in calculations. The range of cells in Excel is often used to calculate a sum, average, count, or other type of calculation. It can also be used to create charts, graphs, or other visual representations of data. Range in Excel can be used to quickly select a group of cells or a set of data to perform calculations or create visualizations.
In Excel, the range is indicated by a pair of numbers, separated by a colon. The first number indicates the first cell in the range, and the second number indicates the last cell in the range. For example, a range of A1:A10 indicates that cells A1 through A10 are part of the range.
How to Find the Range in Excel?
The range of cells in Excel can be determined by manually selecting the cells or by using a few keystrokes to quickly select the range. To manually select a range of cells, click and drag your mouse over the cells that you want to include in the range. When you release the mouse button, the cells will be highlighted to indicate that they are part of the range.
If you need to quickly select a range of cells, you can also use a few keystrokes. The easiest way to select a range of cells is to use the arrow keys on your keyboard. To select a range of cells, use the arrow keys to move the cursor to the first cell in the range, then hold down the Shift key and use the arrow keys to move to the last cell in the range. When you release the Shift key, all of the cells will be selected.
Selecting a Range Using the Keyboard
To select a range of cells using the keyboard, press the F5 key to open the Go To dialog box. In the Reference box, type in the cell range that you want to select. For example, to select cells A1 through A10, you would type in A1:A10. You can also use the mouse to click and drag to select the range, then press Enter to select it.
Selecting a Range Using the Mouse
To select a range of cells using the mouse, click and drag your mouse over the cells that you want to include in the range. When you release the mouse button, the cells will be highlighted to indicate that they are part of the range.
Selecting a Range in a Different Sheet
If you want to select a range of cells in a different sheet, you can use the mouse or the keyboard. To select a range of cells using the mouse, click and drag your mouse over the cells that you want to include in the range. When you release the mouse button, the cells will be highlighted to indicate that they are part of the range.
To select a range of cells using the keyboard, press the F5 key to open the Go To dialog box. In the Reference box, type in the cell range that you want to select. For example, to select cells A1 through A10 in Sheet2, you would type “Sheet2!A1:A10”. You can also use the mouse to click and drag to select the range, then press Enter to select it.
Selecting a Range of Non-Adjacent Cells
If you want to select a range of non-adjacent cells, you can do so by using the mouse or the keyboard. To select a range of non-adjacent cells using the mouse, click on the first cell that you want to include, then hold down the Ctrl key and click on the other cells that you want to include. When you release the Ctrl key, all of the cells will be highlighted to indicate that they are part of the range.
To select a range of non-adjacent cells using the keyboard, press the F5 key to open the Go To dialog box. In the Reference box, type in the cell ranges that you want to select, separated by commas. For example, to select cells A1, A3, and A6, you would type in A1,A3,A6. You can also use the mouse to click and drag to select the range, then press Enter to select it.
Using the Name Box to Select a Range
The Name Box is a feature of Excel that allows you to quickly select a range of cells by typing in the range name. To select a range of cells using the Name Box, click on the Name Box and type in the range name. For example, to select cells A1 through A10, you would type in A1:A10. When you press Enter, the range will be selected.
Conclusion
There are several ways to select a range of cells in Excel. You can manually select the cells by clicking and dragging, or you can use a few keystrokes or the Name Box to quickly select the range. With a few simple steps, you can easily find the range in Excel.
Few Frequently Asked Questions
Q1. What is the Range in Excel?
A1. The range in Excel is a collection of cells that are selected from a worksheet. It can refer to a single cell, a row, a column, or a group of cells that have been selected. The range can be used to perform calculations, create charts, and other data analysis tasks. It is also used as a reference when creating formulas and functions.
Q2. How do I find the Range in Excel?
A2. You can find the range in Excel by selecting the cells you want to include in your range. To do this, click and hold the left mouse button and then drag the mouse to select the range of cells. You can also click the first cell in the range and then press and hold the Shift key while you click the last cell in the range. You can also select the range of cells by entering the range’s address into the Name Box.
Q3. What is the syntax for naming a Range in Excel?
A3. The syntax for naming a range in Excel is to use a combination of the column letter and the row number. For example, if you want to name a range of cells from A1 to C4, you would name the range “A1:C4”. This syntax can also be used to refer to specific rows or columns by using only the column letter or row number.
Q4. How can I quickly select the entire worksheet in Excel?
A4. You can quickly select the entire worksheet in Excel by pressing the Ctrl + A keys on your keyboard. This will select all of the cells in the worksheet and you can then perform calculations and other tasks on the entire range.
Q5. How can I select multiple non-contiguous ranges in Excel?
A5. You can select multiple non-contiguous ranges in Excel by holding down the Ctrl key while selecting the ranges you want to include. You can then use the Name Box to name the range by typing in the names of each range you have selected, separated by a comma.
Q6. How can I quickly select a range of adjacent cells in Excel?
A6. You can quickly select a range of adjacent cells in Excel by selecting the first cell in the range and then pressing and holding the Shift key while you select the last cell in the range. You can also select the range by clicking and dragging the mouse to select the range of cells.
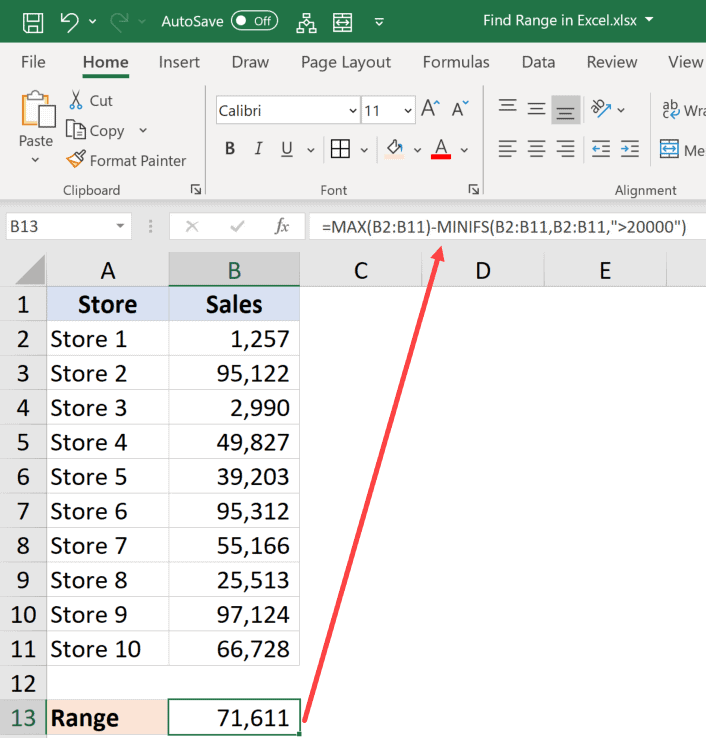
How to Calculate Range in Excel
The range in Excel can be easily found by using the MIN and MAX functions. Knowing how to find the range in Excel can be a great asset for those who use the program regularly. With this knowledge, you can quickly and accurately calculate the range of data points in your spreadsheet. This can be a great way to make decisions and analyze data with confidence.