


How to Fix Proxy Server on Windows 7?
Are you having trouble accessing websites on your Windows 7 computer? Are you getting error messages related to the proxy server? If yes, you’ve come to the right place. In this article, we will discuss how to fix proxy server issues on Windows 7. We will look at the common causes of proxy server problems and how to troubleshoot and resolve them. So, let’s get started!
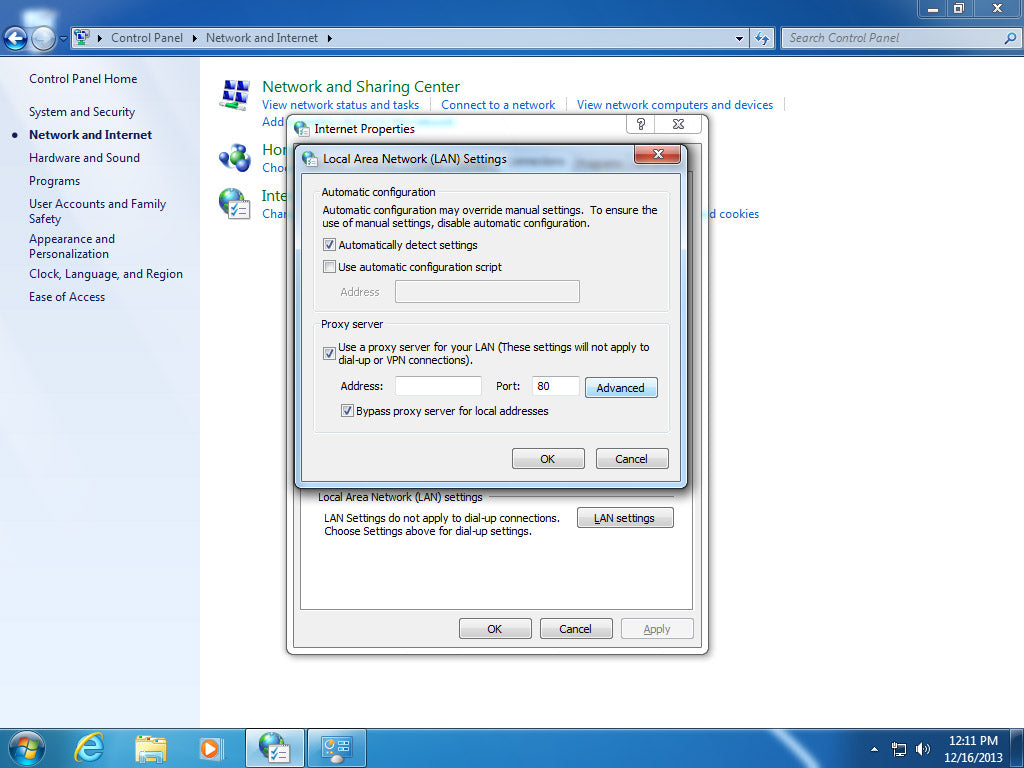
Fix Proxy Server on Windows 7:
- Click on the Start button in the bottom left corner of your screen.
- Type “Internet Options” into the search bar and select the first result.
- Click on the Connections tab and then select LAN Settings.
- Uncheck the box labeled “Use a proxy server for your LAN”.
- Click OK and close the Internet Options window.
Overview of How to Fix Proxy Server on Windows 7
Proxy servers are important in providing an additional layer of security between your computer and the Internet. They can also be used to bypass geographic restrictions. However, if the proxy server is not working correctly, it can cause a variety of issues, including a slow Internet connection, connection errors, and inability to access certain websites. This article will provide instructions on how to fix proxy server issues on Windows 7.
Steps to Troubleshoot Proxy Server on Windows 7
The first step in troubleshooting a proxy server issue on Windows 7 is to check for any proxy settings that have been configured. This can be done by navigating to the Control Panel and selecting the “Network and Internet” option. In the Network and Internet window, select “Internet Options”, and then select the “Connections” tab. Under the “Connections” tab, select “LAN Settings” and check the “Proxy server” section. If any proxy settings have been configured, they should be removed.
Check the Network Connection
Once any proxy settings have been removed, the next step is to check the network connection. To do this, open the “Network and Sharing Center” in the Control Panel and ensure that the network connection is working correctly. If there are any issues, they should be resolved before proceeding.
Check for Malware
Proxy server issues can also be caused by malware. To check for malware, download and install an anti-malware program such as Malwarebytes. After it has been installed, run a full system scan and remove any malicious programs that are detected.
Disable the Proxy Server
If the proxy server is still not working correctly, it can be disabled. To do this, open the “Internet Options” in the Control Panel and select the “Connections” tab. Under the “Connections” tab, select “LAN Settings” and uncheck the “Use a proxy server for your LAN” box.
Change the DNS Settings
If disabling the proxy server does not fix the issue, the next step is to change the DNS settings. To do this, open the “Network and Sharing Center” in the Control Panel and select the “Change adapter settings” option. Right-click on the network adapter and select “Properties”. In the Properties window, select the “Internet Protocol Version 4 (TCP/IPv4)” option and click the “Properties” button. In the Properties window, select the “Use the following DNS server addresses” option and enter the preferred and alternate DNS server addresses.
Reset the Winsock Catalog
If changing the DNS settings does not fix the issue, the next step is to reset the Winsock catalog. To do this, open the Command Prompt as an administrator and enter the command “netsh winsock reset”. Once the command has been executed, restart the computer and check if the proxy server is now working correctly.
Disable Windows Firewall
If none of the above steps have fixed the issue, the next step is to disable the Windows Firewall. To do this, open the “Control Panel” and select “System and Security”. In the System and Security window, select “Windows Firewall” and click the “Turn Windows Firewall on or off” option. In the Windows Firewall window, select the “Turn off Windows Firewall” option for both the “Private network settings” and “Public network settings”. Once the Windows Firewall has been disabled, check if the proxy server is now working correctly.
Disable the Antivirus Software
If the Windows Firewall is not the cause of the issue, the next step is to disable the antivirus software. To do this, open the “Control Panel” and select “System and Security”. In the System and Security window, select “Security and Maintenance” and click the “Turn off virus protection” option. Once the antivirus software has been disabled, check if the proxy server is now working correctly.
Top 6 Frequently Asked Questions
What is a Proxy Server?
A proxy server is an intermediary between a user and the internet. It is designed to improve the user’s online privacy and security by routing the user’s internet traffic through a server and hiding the user’s IP address. It also helps to bypass any local restrictions on websites and can be used to access geo-restricted content.
How to Change the Internet Settings on Windows 7?
In order to change the internet settings on Windows 7, you need to open the Control Panel. Once there, select the “Network and Internet” option. From there, you can choose the “Internet Options” option. After that, select the “Connections” tab and then click the “LAN settings” button. There you can change the proxy server settings.
How to Disable the Proxy Server on Windows 7?
To disable the proxy server on Windows 7, open the Control Panel. From there, select the “Network and Internet” option. From there, choose the “Internet Options” option. After that, select the “Connections” tab and then click the “LAN settings” button. Uncheck the box next to “Use a proxy server for your LAN”. Then click “OK” to save the settings.
How to Change the Port Settings for a Proxy Server on Windows 7?
In order to change the port settings for a proxy server on Windows 7, you need to open the Control Panel. From there, select the “Network and Internet” option. From there, choose the “Internet Options” option. After that, select the “Connections” tab and then click the “LAN settings” button. In the “Proxy Server” section, you can change the port settings.
How to Configure a Proxy Server on Windows 7?
To configure a proxy server on Windows 7, open the Control Panel. From there, select the “Network and Internet” option. From there, choose the “Internet Options” option. After that, select the “Connections” tab and then click the “LAN settings” button. In the “Proxy Server” section, you can enter the address and port of the proxy server you wish to use.
How to Test if the Proxy Server is Working on Windows 7?
In order to test if the proxy server is working on Windows 7, you can open a web browser and navigate to a website that displays your IP address. If the IP address is different than your actual IP address, then the proxy server is working correctly. If the IP address is the same as your actual IP address, then the proxy server is not working correctly.
Changing Proxy Settings Windows 7
If you are having difficulty connecting to the Internet on your Windows 7 computer due to a proxy server issue, this guide should help you get your connection back on track. By following the steps outlined in this article, you should be able to troubleshoot and resolve most proxy server issues on your Windows 7 machine. With a few simple steps, you can get your connection back up and running in no time. With continued maintenance and attention, you can keep your computer connected and running smoothly for years to come.