


How to Format Sd Card to Fat32 Windows 10?

If you have a Windows 10 PC and need to format an SD card to FAT32, then you have come to the right place. In this article, we’ll explain the step-by-step process of how to format an SD card to FAT32 on Windows 10. We’ll also discuss the advantages of using FAT32 over other file systems. With a few simple steps, you’ll be able to format your SD card and use it for whatever purpose you need. So, let’s get started.
Formatting an SD card to FAT32 using Windows 10 is easy and can be done in just a few steps. First, insert your SD card into your computer and open the File Explorer. Right-click on the SD card, then select Format. Select FAT32 from the drop-down menu, then click Start. After a few moments, the formatting will be complete, and your SD card is ready to use.
Formating an SD Card to Fat32 in Windows 10
In Windows 10, formatting an SD card to FAT32 is a simple process, and can be done in just a few steps. FAT32 is a file system that is widely supported by most operating systems, allowing for easy sharing of files between systems. By formatting an SD card to FAT32, you can ensure that the data stored on the card will be accessible from any operating system. This article will provide a step-by-step guide on how to format an SD card to FAT32 in Windows 10.
Step 1: Connect the SD Card to your Computer
The first step in formatting an SD card to FAT32 is to connect the SD card to your computer. To do this, you will need an SD card reader, which can be found at most electronic stores. Once you have the card reader, simply plug the SD card into the reader and then plug the reader into your computer.
Step 2: Open the Disk Management Tool
After connecting the SD card to your computer, the next step is to open the Disk Management tool. To do this, press the Windows key and type “Disk Management”. This will open the Disk Management tool, which is used to manage the disks and drives on your computer.
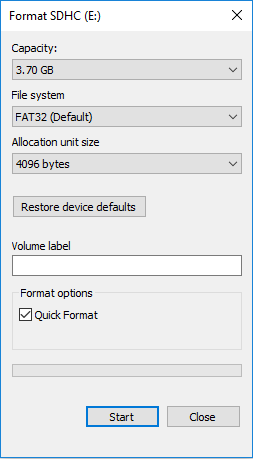
Step 3: Format the SD Card
Once the Disk Management tool is open, you will be able to see the SD card listed. Right-click on the SD card, and select the “Format” option. This will open a new window where you can select the File System. Make sure to select “FAT32” as the File System, and then click “OK” to start the format process.
Checking the Format of the SD Card
After the format process is complete, you can check the format of the SD card to make sure it was formatted correctly. To do this, open the Disk Management tool again and right-click on the SD card. Select the “Properties” option and then click on the “Volumes” tab. Here you will be able to see the File System listed as FAT32.
Verifying the File System
Once you have verified that the File System is set to FAT32, you can verify that the file system is working correctly by checking the files on the SD card. To do this, open the File Explorer and navigate to the SD card. Here you should be able to see the files that were stored on the card before formatting.
Testing the SD Card
Finally, you can test the SD card to make sure that it is working correctly. To do this, copy some files to the SD card and then try to access them from another device. If you are able to access the files, then the SD card has been formatted correctly.
Conclusion
Formatting an SD card to FAT32 in Windows 10 is a simple process that can be completed in just a few steps. By following the steps outlined in this article, you can ensure that the data stored on the SD card will be accessible from any operating system.
Related FAQ
How to Format an SD Card to FAT32 Windows 10?
Answer:
Firstly, connect your SD card to your computer via an adapter. Then, open the “Start” menu, type “Disk Management” into the search box, and select “Create and format hard disk partitions”. Once the Disk Management window opens, right-click on your SD card and select “Format” from the menu. In the Format window, select “FAT32” from the File System drop-down menu. Next, click the “OK” button and then click “OK” again in the confirmation window. Finally, click the “Yes” button to confirm the format of your SD card.
What are the Steps Involved in Reformatting an SD Card to FAT32?
Answer: The steps involved in reformatting an SD card to FAT32 are as follows: 1) Connect the SD card to your computer via an adapter. 2) Open the “Start” menu, type “Disk Management” into the search box, and select “Create and format hard disk partitions”. 3) Right-click on your SD card and select “Format” from the menu. 4) In the Format window, select “FAT32” from the File System drop-down menu. 5) Click the “OK” button and then click “OK” again in the confirmation window. 6) Finally, click the “Yes” button to confirm the format of your SD card.
What are the Advantages of Formatting an SD Card to FAT32?
Answer: There are several advantages to formatting an SD card to FAT32, including increased compatibility with older devices and operating systems. Additionally, FAT32 allows for larger file sizes than other file systems, such as FAT16 and exFAT. This makes it ideal for storing large files, such as videos or high-resolution photos. Finally, FAT32 is less prone to corruption than other file systems, making it more reliable.
Are there any Disadvantages to Reformatting an SD Card to FAT32?
Answer: Yes, there are some disadvantages to reformatting an SD card to FAT32. The main disadvantage is that FAT32 is limited to a maximum file size of 4GB, which can be an issue if you’re trying to store larger files. Additionally, FAT32 does not support security features like encryption and access control, so it’s not as secure as other file systems. Finally, some newer devices may not be compatible with FAT32.
What are the Alternatives to Formatting an SD Card to FAT32?
Answer: If you don’t want to format your SD card to FAT32, there are several other options. One option is to use the exFAT file system, which is supported by most modern devices and is more secure than FAT32. Additionally, you can use the NTFS file system, which is more secure than exFAT but is not compatible with some older devices. Finally, you can also use the HFS+ file system, which is compatible with both Mac and Windows systems.
Can I Revert an SD Card to Its Original File System After Formatting to FAT32?
Answer: Yes, it is possible to revert an SD card to its original file system after formatting to FAT32. To do this, you will need to open the “Start” menu, type “Disk Management” into the search box, and select “Create and format hard disk partitions”. Once the Disk Management window opens, right-click on your SD card and select “Format” from the menu. In the Format window, select the original file system from the File System drop-down menu and click the “OK” button. Finally, click the “Yes” button to confirm the format of your SD card.
How Can I Ensure that My SD Card is Compatible with My Device After Formatting to FAT32?
Answer: To ensure that your SD card is compatible with your device after formatting to FAT32, you should first check the device’s manual or specifications to see which file systems it supports. If your device supports FAT32, then you can proceed with formatting your SD card. If not, you should consider using a different file system, such as exFAT, NTFS, or HFS+. Additionally, you should check the device’s manual or specifications to see what size files it supports, as FAT32 has a maximum file size of 4GB.
HOW TO: Format SD Card To FAT32 | Win 10/8.1/8/7/Vista | TUTORIAL
In conclusion, formatting an SD card to FAT32 in Windows 10 is a simple and effective process that only requires a few clicks. With its larger capacity, FAT32 allows you to store more data on an SD card than with the default exFAT file format. This makes FAT32 an ideal choice for storing files across multiple computers and devices. Now that you know the steps to format an SD card to FAT32, you can make the most out of your SD card storage capabilities.