


How to Make All Caps in Excel?

If you’ve ever had to work with a large amount of data in Excel, you know the importance of formatting. One of the most common formatting tasks is to make text appear in all caps. It’s an easy task, but one that can be frustrating if you don’t know how. This tutorial will show you how to make all caps in Excel in no time at all, so you can quickly and easily format your data.
How to Make All Caps in Excel?
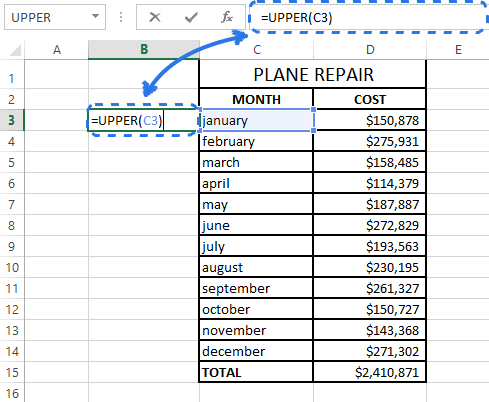
To make all caps in Excel, use the UPPER function. Simply select the cell or range of cells you want to change, then type =UPPER(cell) in the formula bar. Press Enter or click the Enter button to see the results.
You can also use the Format Cells dialog box to make all caps. To do this, select the cells you want to format, then click on the Home tab. In the Font section, select the All Caps option.
Using Excel for All Caps Text
Microsoft Excel is a powerful spreadsheet program that allows users to store, organize and analyze data. One of the features that Excel offers is the ability to format text, including making all of the letters in a particular cell appear as uppercase letters. This can be done through the use of the UPPER function.
In order to use the UPPER function, users must first select the cell that they want to format. Then, they will need to type “=UPPER(” and then select the cell that contains the text they want to make all caps. Once the cell is selected, they will need to type a closing parenthesis and then press enter. The cell should now contain all uppercase letters.
The UPPER function is a useful tool for formatting text in Excel. It can be used to quickly and easily convert text into all uppercase letters, saving users time and effort.
Formatting Cells for All Caps Text
In addition to using the UPPER function, users can also format cells in Excel to make all of the letters appear as uppercase letters. To do this, users will need to select the cell that they want to format and then click on the “Home” tab. In the “Font” section, they will need to click on the drop-down arrow next to the “Text Effects” button and select the “All Caps” option. The cell should now appear as all uppercase letters.
This method of formatting cells is useful for users who want to quickly format a cell without having to use a function. It is also helpful for users who are unfamiliar with the UPPER function and just want to make their text appear as uppercase letters.
Using Keyboard Shortcuts for All Caps Text
In addition to using the UPPER function and formatting cells, users can also make all of the letters in a particular cell appear as uppercase letters by using keyboard shortcuts. To do this, users will need to select the cell that they want to format and then press the “Ctrl+Shift+U” keys simultaneously. This will convert the text in the cell to uppercase letters.
This method of formatting cells is useful for users who want to quickly format a cell without having to use a function or click through menus. It is also helpful for users who are familiar with keyboard shortcuts and want to make their text appear as uppercase letters.
Using Excel for Lowercase Text
In addition to making all of the letters in a particular cell appear as uppercase letters, users can also use Excel to make all of the letters in a cell appear as lowercase letters. This can be done through the use of the LOWER function.
In order to use the LOWER function, users must first select the cell that they want to format. Then, they will need to type “=LOWER(” and then select the cell that contains the text they want to make lowercase. Once the cell is selected, they will need to type a closing parenthesis and then press enter. The cell should now contain all lowercase letters.
The LOWER function is a useful tool for formatting text in Excel. It can be used to quickly and easily convert text into all lowercase letters, saving users time and effort.
Formatting Cells for Lowercase Text
In addition to using the LOWER function, users can also format cells in Excel to make all of the letters appear as lowercase letters. To do this, users will need to select the cell that they want to format and then click on the “Home” tab. In the “Font” section, they will need to click on the drop-down arrow next to the “Text Effects” button and select the “All Lowercase” option. The cell should now appear as all lowercase letters.
This method of formatting cells is useful for users who want to quickly format a cell without having to use a function. It is also helpful for users who are unfamiliar with the LOWER function and just want to make their text appear as lowercase letters.
Using Keyboard Shortcuts for Lowercase Text
In addition to using the LOWER function and formatting cells, users can also make all of the letters in a particular cell appear as lowercase letters by using keyboard shortcuts. To do this, users will need to select the cell that they want to format and then press the “Ctrl+Shift+L” keys simultaneously. This will convert the text in the cell to lowercase letters.
This method of formatting cells is useful for users who want to quickly format a cell without having to use a function or click through menus. It is also helpful for users who are familiar with keyboard shortcuts and want to make their text appear as lowercase letters.
Few Frequently Asked Questions
1. How do I make all caps in Excel?
To make all caps in Excel, you need to use the UPPER function. This function converts all letters in a given cell or range to upper case. To use the UPPER function, select the cell or range you want to format and enter the formula =UPPER(cell or range). This will convert all characters to upper case. You can also use the Format Cells option to make all caps in Excel. To do this, select the cell or range you want to format and click on the Home tab. In the Font section, click on the drop-down arrow next to the Uppercase option and select All Caps. This will convert all characters in the selected cell or range to upper case.
2. What is the difference between the UPPER and Format Cells options?
The main difference between the UPPER function and the Format Cells option is that the UPPER function is a formula and the Format Cells option is a formatting tool. The UPPER function converts all letters in a given cell or range to upper case, while the Format Cells option can be used to apply a variety of formatting options to a cell or range such as text wrapping, font size and color, cell borders, and more.
3. What is the syntax for the UPPER function in Excel?
The syntax for the UPPER function in Excel is =UPPER(cell or range). This syntax will convert all characters in a given cell or range to upper case.
4. How do I use the Format Cells option to make all caps in Excel?
To use the Format Cells option to make all caps in Excel, select the cell or range you want to format and click on the Home tab. In the Font section, click on the drop-down arrow next to the Uppercase option and select All Caps. This will convert all characters in the selected cell or range to upper case.
5. What other formatting options are available through the Format Cells option?
The Format Cells option can be used to apply a variety of formatting options to a cell or range such as text wrapping, font size and color, cell borders, and more. You can also use the Format Cells option to add formulas, insert symbols, and change the alignment of text.
6. Can I use the UPPER function on a range of cells?
Yes, you can use the UPPER function on a range of cells. To do this, select the range of cells you want to format and enter the formula =UPPER(range). This will convert all characters in the selected range of cells to upper case.
Making all caps in excel is a great way to quickly and easily add emphasis to your data. With just a few clicks and keystrokes, you can easily format your data in the exact way you need it. Whether it’s for highlighting important information, or to create a uniform format, Excel’s all caps feature is incredibly helpful and efficient. So, the next time you need to make all caps in Excel, remember to use this easy and quick method to get the job done.