


How to Make Outlook Signature Automatic?

Want to create an Outlook signature that automatically adds to the end of your emails? It’s easier than you think! In this article, we’ll show you how to set up an Outlook signature that will be added to the bottom of every email you send. We’ll also cover some tips to make sure your signature looks professional. By the end of this article, you’ll have a signature that proudly displays your name, job title, and contact information. Let’s get started!
How To Make Outlook Signature Automatic?
- Open Outlook app and click on ‘File’ tab.
- Select ‘Options’ and select ‘Mail’.
- Select ‘Signatures’ option and click ‘New’.
- Type a name for the new signature and click ‘OK’.
- Select a text and/or image for the signature, click ‘OK’.
- Select ‘Signatures’ option and check ‘Automatically include my signature on messages I send’.
- Click ‘OK’ and select the new signature from the list.
- Click ‘OK’ to save the settings.
How to Automatically Add an Outlook Signature
Outlook allows users to create custom signatures that can be automatically added to the end of their emails. This feature is useful for adding a professional touch to emails and to quickly communicate contact information. Setting up an Outlook signature can be done in a few easy steps.
Step 1: Create a Signature
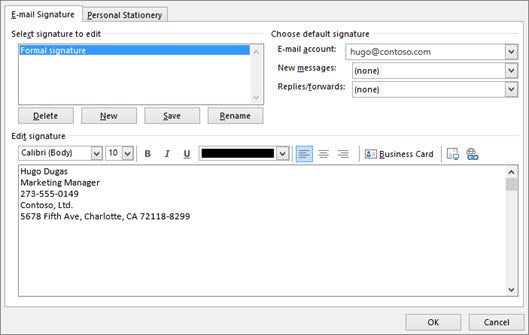
The first step is to create the signature that will be used. This can include text, images, or a combination of both. It can also include links to social media accounts or websites. To create a signature, click the “File” tab at the top of the Outlook window and select “Options”. Then click “Mail” on the left side of the window and select “Signatures”. On the right side of the window, click the “New” button to create a new signature.
Step 2: Edit the Signature
The next step is to edit the signature. This can be done by clicking the “Edit” button. This will open a new window where the signature can be customized. Text can be typed or copied and pasted into the window. Images can also be added by clicking the “Insert Picture” button and selecting the desired image.
Step 3: Set the Default Signature
Once the signature is created and edited, it can be set as the default signature for all emails. To do this, click the “New Messages” drop-down menu on the right side of the window and select the signature that was just created. The signature will now be automatically added to all new emails.
Step 4: Set the Default Signature for Replies and Forwards
The signature can also be set as the default for replies and forwards. To do this, click the “Replies/Forwards” drop-down menu on the right side of the window and select the signature that was just created. The signature will now be automatically added to all replies and forwards.
Step 5: Save the Signature
The final step is to save the signature. To do this, click the “OK” button at the bottom of the window. The signature will now be automatically added to all emails, replies, and forwards.
Step 6: Test the Signature
The signature should now be set up and ready to use. To test it, create a new email and check to see if the signature is automatically added. If it is not added, double check the settings to make sure that the signature is set as the default.
Frequently Asked Questions
What is an Outlook Signature?
An Outlook signature is a personalized signature that can be added to the bottom of emails. It typically includes contact information, a job title, or a logo. It is a great way to personalize your emails and give them a professional look.
How Do I Create an Outlook Signature?
Creating an Outlook signature is straightforward. First, open Outlook and go to File > Options > Mail. Under the Signatures tab, select “New” and type in the name of your signature. Then, enter the text you want to appear as your signature, such as your name, contact information, and job title. Once you’ve finished entering your information, click “OK” to save your signature.
How Do I Make Outlook Signature Automatic?
Making your Outlook signature automatic is easy. First, open Outlook and go to File > Options > Mail. Under the Signatures tab, select “New” and type in the name of your signature. Then, enter the text you want to appear as your signature, such as your name, contact information, and job title. Once you’ve finished entering your information, select the checkbox next to “Automatically include my signature on messages I send”. Click “OK” to save your signature and make it automatic.
Can I Have Multiple Signatures in Outlook?
Yes, you can have multiple signatures in Outlook. To create a new signature, open Outlook and go to File > Options > Mail. Under the Signatures tab, select “New” and type in the name of your signature. Then, enter the text you want to appear as your signature, such as your name, contact information, and job title. Once you’ve finished entering your information, click “OK” to save your signature. You can create multiple signatures and select which one to use when sending an email.
Can I Set Different Signatures for Different Accounts?
Yes, you can set different signatures for different accounts in Outlook. To do this, open Outlook and go to File > Options > Mail. Under the Signatures tab, select “New” and type in the name of your signature. Then, enter the text you want to appear as your signature, such as your name, contact information, and job title. Once you’ve finished entering your information, select the checkbox next to “Use this signature for” and pick the account you want to use the signature for. Click “OK” to save your signature.
Can I Customize My Outlook Signature?
Yes, you can customize your Outlook signature. To do this, open Outlook and go to File > Options > Mail. Under the Signatures tab, select “New” and type in the name of your signature. Then, enter the text you want to appear as your signature, such as your name, contact information, and job title. You can also add images, links, and formatting to your signature. Once you’ve finished customizing your signature, click “OK” to save it.
Can I Include a Logo in My Outlook Signature?
Yes, you can add a logo to your Outlook signature. To do this, open Outlook and go to File > Options > Mail. Under the Signatures tab, select “New” and type in the name of your signature. Then, enter the text you want to appear as your signature, such as your name, contact information, and job title. Once you’ve finished entering your information, click the “Insert Picture” button and select the logo you want to include in your signature. Click “OK” to save your signature.
How to Add Your Signature Automatically To All Outlook Emails
In conclusion, creating an Outlook signature that is automatically applied to your emails is a simple and efficient way to add a personal touch to your messages. Using the steps outlined above, you can customize your signature to your exact preferences and have it appear on all emails quickly and without fail. With a professional Outlook signature, you can make a great impression on the people you communicate with, and you can do it in no time at all.