


How to Record System Audio on Windows 10?

If you’re looking for an easy way to record system audio on Windows 10, you’ve come to the right place! In this article, we’ll explain the basics of recording system audio on Windows 10, as well as provide step-by-step instructions for setting up and managing recordings. Whether you’re trying to capture audio from a game, create a podcast, or record a conference call, this guide will help you quickly get started with recording system audio on Windows 10. So, let’s dive in and get started!
To record system audio on Windows 10, you will need a sound recording program like Audacity. You can download it for free from the official website. To record audio, follow the steps below:
- Open Audacity and select the “Record” button from the main menu.
- Choose your recording device from the drop-down list. Usually, it will be set to the default audio device.
- Adjust the input volume level to suit your microphone.
- Hit the “Record” button to start recording.
- When you are finished, click “Stop” to stop recording.
- Save your recording in a desired file format.
How to Record System Audio on Windows 10?
For Windows 10 users, recording system audio can be a useful tool. You can record a program or game that’s playing on your computer, or capture audio from an external device like a microphone or a music player. Here’s how to record system audio on Windows 10.
Step 1: Install a Recording Software
The first step in recording system audio on Windows 10 is to install a recording software. There are many recording programs available, including open-source programs like Audacity and paid programs like Adobe Audition. Choose a program that fits your needs, and install it on your computer.
Once you’ve installed the recording program, open it and set up your recording settings. You’ll need to select the audio source you want to record, as well as the file format you want to save the audio in.
Step 2: Adjust Your Audio Settings
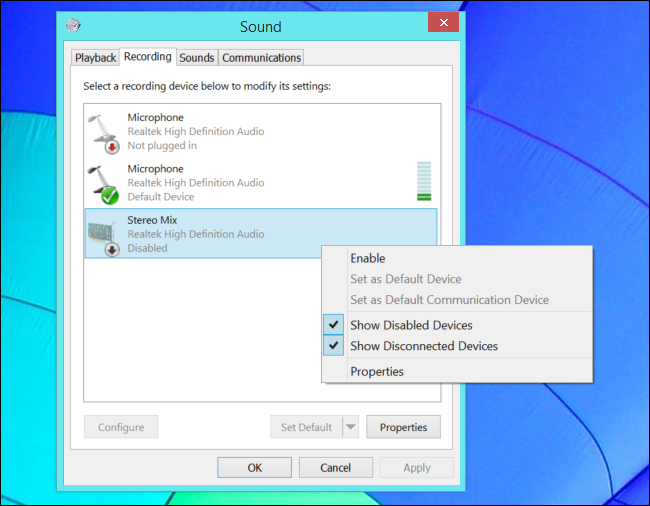
Once you’ve installed your recording program and set up your recording settings, you’ll need to adjust your audio settings. Go to the Control Panel and click on “Sound”. From there, you can select the audio source you want to record, as well as the volume level.
You can also adjust the playback settings in the Control Panel. This will let you control the output of the audio, allowing you to adjust the volume and balance.
Step 3: Record Your System Audio
Once you’ve adjusted your audio settings, you’re ready to record your system audio. Open your recording program and hit the “Record” button. Your recording program will start recording the audio from the selected audio source.
When you’re done recording, hit the “Stop” button. You’ll then be able to save the audio file in the format of your choice.
Step 4: Listen and Edit Your Recording
Once you’ve recorded your system audio, you can listen to it and make any necessary edits. Most recording programs have editing tools that allow you to trim, fade, and adjust the audio. This is a great way to improve the quality of your recordings, and make them sound more professional.
Step 5: Share Your Recording
When you’re happy with your recording, you can share it with others. Most recording programs have options for exporting your audio to various formats, such as MP3, WAV, and AIFF. You can also upload your recordings to services like SoundCloud, allowing you to easily share your audio with friends and family.
Tips for Recording System Audio
Use a Dedicated Audio Interface
If you’re serious about recording system audio, you may want to invest in a dedicated audio interface. This will allow you to connect your computer directly to an external sound source, giving you better sound quality and more control over your recordings.
Choose the Right Microphone
If you’re recording audio from a microphone, it’s important to choose the right microphone for the job. Different microphones are better suited for different types of audio, so make sure to do some research and choose a microphone that’s right for your recording needs.
Experiment with Effects and Filters
Recording programs often have a variety of effects and filters that you can use to enhance your recordings. Experiment with different effects and filters to find the ones that work best for your recordings.
Top 6 Frequently Asked Questions
What is System Audio?
System audio is the sound played by the computer, such as music, dialogue, sound effects, and other audio. It is different from microphone audio, which is the sound picked up by a microphone connected to the computer. System audio can be recorded on Windows 10 using the Sound Recorder, a built-in program.
How Do I Record System Audio on Windows 10?
To record system audio on Windows 10, open the Start menu, type “Sound Recorder” and press Enter. The Sound Recorder window will open. Click on the “Record” button, then select the “System Audio” option from the drop-down menu. You can then start recording the system audio. Once you’re done recording, you can save the file in WAV or MP3 format.
What are the Advantages of Recording System Audio?
Recording system audio has many advantages. It allows you to capture the audio from games, movies, music, and more. It can also be used to create podcasts, record online lectures, and capture sound effects. Recording system audio is a great way to capture audio that you wouldn’t be able to capture with a microphone.
Are There Any Disadvantages to Recording System Audio?
The main disadvantage of recording system audio is that it can be difficult to isolate the sound of a particular program or application. While you can record all the system audio, it can be difficult to focus in on one particular sound. Additionally, recording system audio can cause a significant amount of background noise, depending on the type of computer and sound card you are using.
What Accessories Do I Need to Record System Audio?
You do not need any special accessories to record system audio. All you need is the computer itself, as the Sound Recorder is already installed on Windows 10. However, if you want to improve the quality of your recordings, you may want to invest in a dedicated sound card or audio interface.
Can I Record System Audio and Microphone Audio Simultaneously?
Yes, it is possible to record system audio and microphone audio simultaneously on Windows 10. To do this, open the Sound Recorder, then click on the “Record” button. Select the “System Audio” and “Microphone” options from the drop-down menu. You can then start recording both system audio and microphone audio at the same time.
🔊 How to Record Audio on PC
If you’re looking for a quick and easy way to record system audio on Windows 10, then this guide should have given you the tools and knowledge you need to get the job done. With the right software and a few clicks, you can easily record any sound coming from your computer. So go ahead and give it a try, and you’ll be able to capture any sound you want in no time.