


How to Remove Microsoft Account From Laptop?

Are you looking for an easy way to remove your Microsoft account from your laptop? If so, this article is for you. In this guide, we will walk you through the steps of removing your Microsoft account from your laptop, giving you the freedom to switch to a different account or completely remove your account from the device. We’ll also provide tips for keeping your account secure so that your data and information remain safe. So, let’s get started!
Removing a Microsoft Account from Your Laptop
- Open the Start menu, select Settings > Accounts > Your info.
- Under the Your Account section, select Sign in with a local account instead.
- At the bottom of the page, select Sign out and finish.
- You’ll be asked to enter your Microsoft account password. Do so, and select Next.
- Enter a username for the local account, along with a password and a hint. Select Next.
- Confirm the local account details, and select Sign out and finish.
Introduction to Removing Microsoft Account from Laptop
Microsoft Accounts are used to log in to laptops and other devices. They are important for keeping track of files and settings, and they are also used to access Microsoft services like Outlook and OneDrive. However, if you no longer need the account or want to switch to another one, you can easily remove it from your laptop. In this article, we’ll look at the steps required to remove a Microsoft Account from a laptop.
Sign Out of Microsoft Account
The first step in removing a Microsoft Account from a laptop is to sign out of it. This can be done by clicking the Windows icon in the lower-left corner of the screen and selecting the “Sign out” option. Once you have signed out, the account will no longer be linked to your laptop.
Signing Out of the Microsoft Store
If the Microsoft Account was used to sign in to the Microsoft Store, you will need to sign out of it as well. To do this, open the Store app, then click the “Account” icon in the top-right corner of the screen. This will open a menu where you can sign out of the Microsoft Store.
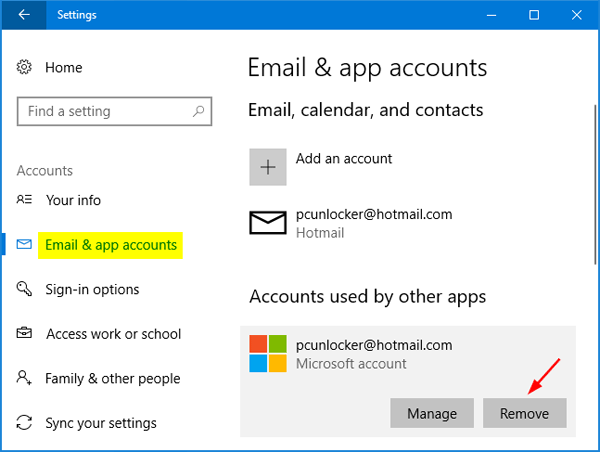
Removing the Account from Settings
Once you have signed out of the Microsoft Account and the Microsoft Store, you can remove the account from the laptop’s settings. To do this, open the Windows Settings app, then select the “Accounts” option. On the next screen, select the “Your info” tab, then select the account you want to remove. Finally, click the “Remove” button to remove the account from the laptop.
Remove Microsoft Account from Login
The next step is to remove the Microsoft Account from the Windows login screen. To do this, open the Windows Settings app, then select the “Accounts” option. On the next screen, select the “Sign-in options” tab. On this screen, you will see a list of accounts that are linked to the laptop. Select the account you want to remove, then click the “Remove” button.
Deleting the Account from Microsoft
The final step is to delete the Microsoft Account from Microsoft’s servers. This will ensure that the account can no longer be used to access any Microsoft services or devices. To do this, navigate to the Microsoft Account website and sign in with the account you want to delete. Once you are signed in, click the “Delete account” button and follow the instructions to delete the account.
Restart the Laptop
Once you have completed the steps above, the Microsoft Account should be completely removed from the laptop. To ensure that the account is no longer linked to the laptop, restart the laptop. This will ensure that all of the changes you made have been applied.
Few Frequently Asked Questions
What is a Microsoft Account?
A Microsoft Account is an account associated with a Microsoft service or product, such as Outlook, Skype, Xbox, or Office. It allows users to access various services and products with a single username and password. Microsoft Accounts allow users to sync their settings, files, and other data across devices, making it easier to stay productive when you’re on the go.
Why Would I Want to Remove My Microsoft Account From My Laptop?
You may want to remove a Microsoft Account from your laptop for a variety of reasons. If you’re selling your laptop, you’ll want to make sure that your personal data and files are no longer associated with the device. You may also want to remove your Microsoft Account if you’re no longer using the device, or if you’re having trouble with the account.
How Do I Remove My Microsoft Account From My Laptop?
Removing your Microsoft Account from your laptop is a relatively simple process. First, open the Settings app on your laptop. You can do this by either clicking the Start menu and selecting Settings, or by pressing the Windows key and I. Next, select Accounts and click ‘Sign-in with a local account instead’. Follow the prompts to enter your current Microsoft Account credentials and the new local account credentials. Once you’ve completed the process, your Microsoft Account will be removed from your laptop.
What Happens After I Remove My Microsoft Account From My Laptop?
After removing your Microsoft Account from your laptop, you will no longer be able to access any of the associated services or products. This includes services like Outlook, Skype, Xbox, and Office. Additionally, any files or data associated with the Microsoft Account will no longer be accessible from the laptop.
Can I Re-Add My Microsoft Account to My Laptop?
Yes, you can re-add your Microsoft Account to your laptop at any time. To do so, open the Settings app and select Accounts. Then, click ‘Sign-in with a Microsoft Account instead’ and enter your credentials. Once you’ve completed the process, your Microsoft Account will be re-added to your laptop and you’ll be able to access associated services and products.
Are There Any Risks in Removing My Microsoft Account From My Laptop?
Yes, there are some risks associated with removing your Microsoft Account from your laptop. For example, if you forget your Microsoft Account credentials, you won’t be able to access any of the associated services or products. Additionally, if you’re selling your laptop, any data associated with the Microsoft Account may still be accessible to the new owner. To avoid these risks, it’s always a good idea to create a local account before removing your Microsoft Account.
Removing your Microsoft account from your laptop is an easy and straightforward process. With just a few clicks, you can have your Microsoft account removed and get back to what matters most to you. Whether you need to remove the account due to security concerns or just to free up space, the process is quick and easy. By following the steps above, you can have your account removed in no time and get back to enjoying the features and content your laptop has to offer.