


How to Repeat Header Rows in Excel?

Do you have a large spreadsheet in Excel that you would like to organize? Are you struggling to figure out how to get your header rows to repeat on each page when you print the document? If so, you have come to the right place. In this article, we will walk you through the steps of how to repeat header rows in Excel. You’ll be printing your sheets like a pro in no time!
To repeat header rows in Microsoft Excel, follow these steps:
- Open your Excel spreadsheet.
- Highlight the rows you want to be your header row.
- Click the “View” tab and then select “Freeze Panes.”
- Choose “Freeze Panes” from the drop-down menu.
- Your header row will now be visible at the top of your spreadsheet whenever you scroll down.
Steps to Repeat Header Rows in Excel
Repeating header rows in Excel is an important feature for any spreadsheet. It helps to keep track of the information in large worksheets and to keep the data organized. This article will provide a step-by-step guide on how to repeat header rows in Excel.
Step 1: Open the Excel File
The first step to repeating header rows in Excel is to open the workbook that needs to be modified. This can be done by double-clicking the file in the file explorer or by opening the Excel program, then selecting the file from the list of recently opened documents.
Step 2: Select the Table
Once the Excel file is open, the next step is to select the table that needs to have the header row repeated. This can be done by clicking and dragging the cursor to highlight the rows and columns that make up the table.
Step 3: Select the View Tab
Once the table is selected, the next step is to select the View tab in the ribbon at the top of the window. This will open a new menu with several options for viewing and formatting the spreadsheet.
Step 4: Select “View Settings”
In the View tab, select the “View Settings” icon. This will open a new window with several options for customizing the view of the spreadsheet.
Step 5: Check the “Row Headers”
In the View Settings window, check the box next to “Row Headers” under the “Headers and Footers” section. This will add a row at the top of the table that will be repeated every time the table is printed or viewed.
Step 6: Select “OK”
Once the “Row Headers” box is checked, select the “OK” button in the bottom right corner of the View Settings window. This will apply the changes to the spreadsheet and the header row will be repeated whenever the spreadsheet is printed or viewed.
Step 7: Save the File
The final step is to save the file with the new settings. This can be done by selecting the “Save” icon in the ribbon at the top of the window, or by pressing the “Ctrl” + “S” keys on the keyboard. Once the file is saved, the header row will be repeated whenever the file is printed or viewed.
Few Frequently Asked Questions
What is a Header Row?
A header row is the top row of a worksheet in Excel that is used to label and organize data in the sheet. It is typically used to identify the content of each column in the sheet and to make it easier to read. The header row can be formatted differently than other rows to make it easier to identify.
What is the Benefit of Repeating Header Rows?
Repeating header rows can be beneficial when working with large amounts of data in Excel. By repeating the header row at the top of the page, it is easy to identify the content of each column when scrolling down the page. This can save time when trying to find specific data within a large worksheet.
How Do You Repeat a Header Row in Excel?
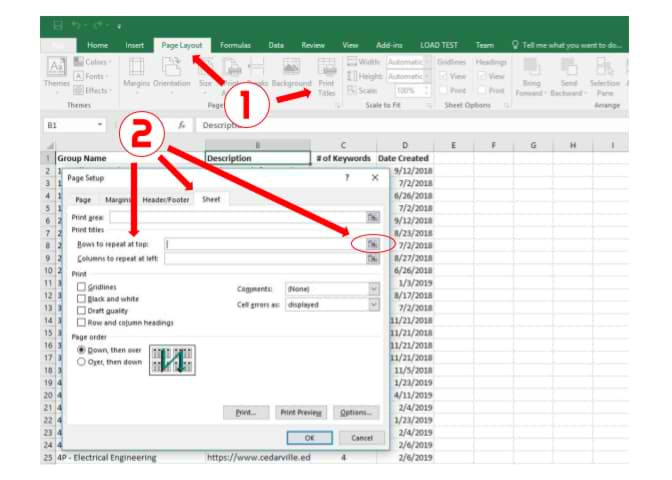
To repeat a header row in Excel, first select the row that you would like to repeat at the top of each page. Then, go to the Page Layout tab, and click the ‘Print Titles’ button located in the Page Setup section. In the Sheet tab of the Page Setup window, select the row you want to repeat and then click ‘OK’.
What Other Options are Available for Header Rows?
In addition to repeating header rows, there are other formatting options available. You can change the font, background color, and border of the header row to make it stand out from the rest of the data. You can also freeze the header row so that it appears at the top of the page even when you scroll down the page.
Can You Print Header Rows on Every Page?
Yes, you can print header rows on every page in Excel. To do this, go to the Page Layout tab, click the ‘Print Titles’ button, and select the row you want to repeat on every page. Then, select the ‘Print’ tab and check the box that says ‘Print titles on every page’.
Are There Any Other Tips for Working with Header Rows?
Yes, there are a few other tips for working with header rows in Excel. It can be helpful to create a separate worksheet just for the header row. This way, you can easily copy and paste the header row into other sheets. It is also important to keep the header row as simple as possible and avoid using too many formatting options.
Repeat ROW and COLUMN Headers on Each page in Excel
Excel is a powerful and versatile tool to help you manage and analyze data. With its repeat header rows feature, you can easily keep your header information visible on your spreadsheet while scrolling. With this quick and easy tutorial, you can now repeat header rows in Excel and keep your data organized. No matter what size your data is, you can use this feature to make sure all of your important information is always visible.