


How to Reset Virtual Memory Windows 10

Are you struggling to find out how to reset virtual memory in Windows 10? If so, you are not alone. Many Windows 10 users have trouble understanding how to manage virtual memory, which can lead to errors and slow performance. This guide will provide a step-by-step explanation of how to reset virtual memory in Windows 10, so you can maximize your computer’s performance and avoid potential errors.
Resetting virtual memory in Windows 10 is a simple process. Here’s how to do it:
- Press Windows Key + R to open the Run dialog box.
- Type sysdm.cpl and press Enter.
- Click on the Advanced tab.
- Click Settings under the Performance header.
- Click on the Advanced tab.
- Click Change under the Virtual Memory header.
- Uncheck the Automatically manage paging file size for all drives box.
- Select the drive you want to change.
- Select Custom size and enter the initial and maximum size.
- Click Set and then Ok.
- Restart your computer.
How to Reset Virtual Memory on Windows 10
Windows 10 virtual memory is an important part of the operating system that allows programs to use more RAM than is physically available. It also helps reduce hard disk usage, which improves system performance. Resetting virtual memory on Windows 10 can help improve system performance and fix certain issues related to virtual memory.
Step 1: Disable the Automatically Manage Paging File Size
The first step in resetting virtual memory on Windows 10 is to disable the “automatically manage paging file size” option. This can be done by right-clicking on the “My Computer” icon and selecting “Properties.” Next, select the “Advanced” tab and click on “Performance Settings.” In the “Performance Options” window, uncheck the “Automatically manage paging file size for all drives” option and click “OK.”
Step 2: Set the Initial and Maximum Size of the Paging File
The next step is to set the initial and maximum size of the paging file. This can be done by going back to the “Performance Options” window and selecting the “Advanced” tab. Next, click on “Change” under the “Virtual Memory” section. In the “Virtual Memory” window, uncheck the “Automatically manage paging file size for all drives” option and then select the drive where the system is installed.
Step 3: Set the Page File Size
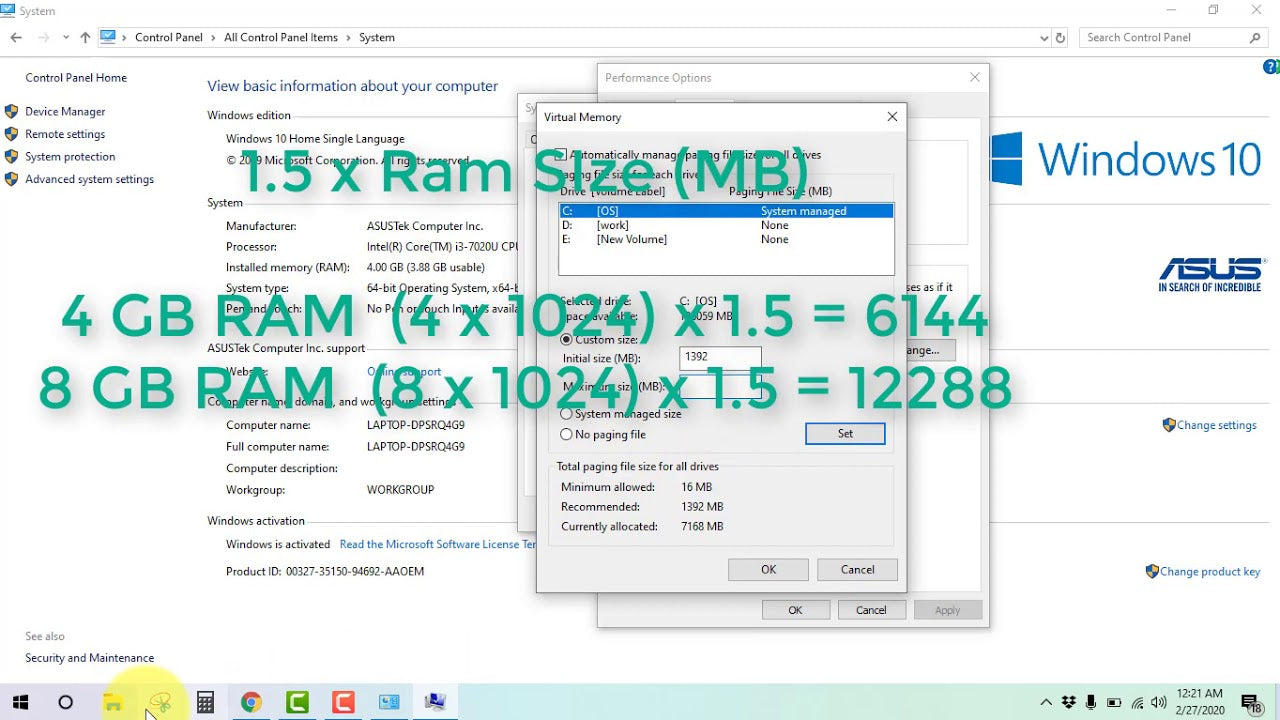
In the “Virtual Memory” window, select the “Custom size” option and enter the initial and maximum size of the paging file. The recommended size for the paging file is 1.5 times the amount of RAM installed on the system. After entering the initial and maximum size, click “Set” and then “OK.”
Step 4: Reboot the System
The last step is to reboot the system in order to apply the changes made to the paging file. This can be done by selecting “Restart” from the “Start” menu.
Step 5: Check the Results
Once the system has been rebooted, check the performance of the system to make sure that the changes made to the paging file have been successful. If the system is still running slowly, try increasing the size of the paging file.
Few Frequently Asked Questions
What is Virtual Memory?
Virtual memory is a feature of an operating system (OS) that enables a computer to compensate for physical memory shortages by temporarily transferring data from random access memory (RAM) to disk storage. When physical memory is in short supply, the operating system moves data from RAM to a space on the hard disk called a paging file. This concept allows a computer to run more programs than it has enough RAM to support.
How do I Reset Virtual Memory in Windows 10?
To reset virtual memory in Windows 10, you first need to go to the Control Panel. From there, go to the “System” menu and then click on the “Advanced system settings” option. On the System Properties window, click on the “Advanced” tab and then click on the “Settings” button under the Performance section. On the Performance Options window, click on the “Advanced” tab and then click on the “Change” button under the Virtual memory section. From there, you can uncheck the “Automatically manage paging file size for all drives” option and then select a new size for the paging file. Finally, click on the “Set” button, then click on the “OK” button and then restart your computer.
What is the Recommended Virtual Memory Size?
The recommended virtual memory size depends on the amount of RAM you have installed. Generally speaking, it should be set to 1.5 times the amount of RAM you have installed. For example, if you have 4GB of RAM installed, your virtual memory should be set to at least 6GB.
What are the Benefits of Resetting Virtual Memory?
Resetting virtual memory can have several benefits, including increased system performance and improved memory management. It can also free up disk space on your hard drive, as it can help reduce the amount of data stored in the paging file. Additionally, resetting virtual memory can improve the stability of your system, as it can help fix potential memory-related issues.
What are the Risks of Resetting Virtual Memory?
The main risk of resetting virtual memory is that it can cause instability in your system. If the new settings are not properly configured, it can lead to system crashes, freezes, or unexpected errors. Additionally, resetting virtual memory can cause some programs to no longer function properly, as they may rely on the old settings.
Is it Safe to Disable Virtual Memory?
No, it is not safe to disable virtual memory. Virtual memory is an important feature of an operating system and it is necessary for proper system operation. Disabling virtual memory can cause instability in your system and can lead to system crashes or unexpected errors. Additionally, some programs may no longer function properly, as they may rely on the old settings.
How to reset windows 10 virtual memory
A reset of virtual memory will help to improve the overall performance of your Windows 10 computer. By following the steps outlined in this article, you will be able to reset the virtual memory settings and improve the speed of your system. It is important to remember to always back up important data before making any changes to your computer’s settings, so that if anything goes wrong, you will have a working backup to restore from. With a few simple steps, you can reset your virtual memory settings and improve the performance of your Windows 10 computer.