


How to Save a Microsoft Word Document?
Do you need to save a Microsoft Word document? It’s an essential skill to have in the modern workplace. Knowing how to save a document can help you feel more confident while working on projects, and can even help you avoid frustrating mistakes. In this article, we’ll go over the basics of how to save a Microsoft Word document and provide helpful tips to make sure your documents are saved properly. Let’s get started!
How to Save a Microsoft Word Document?
- Open the Microsoft Word Document that you wish to save.
- Click the File tab at the top of the window.
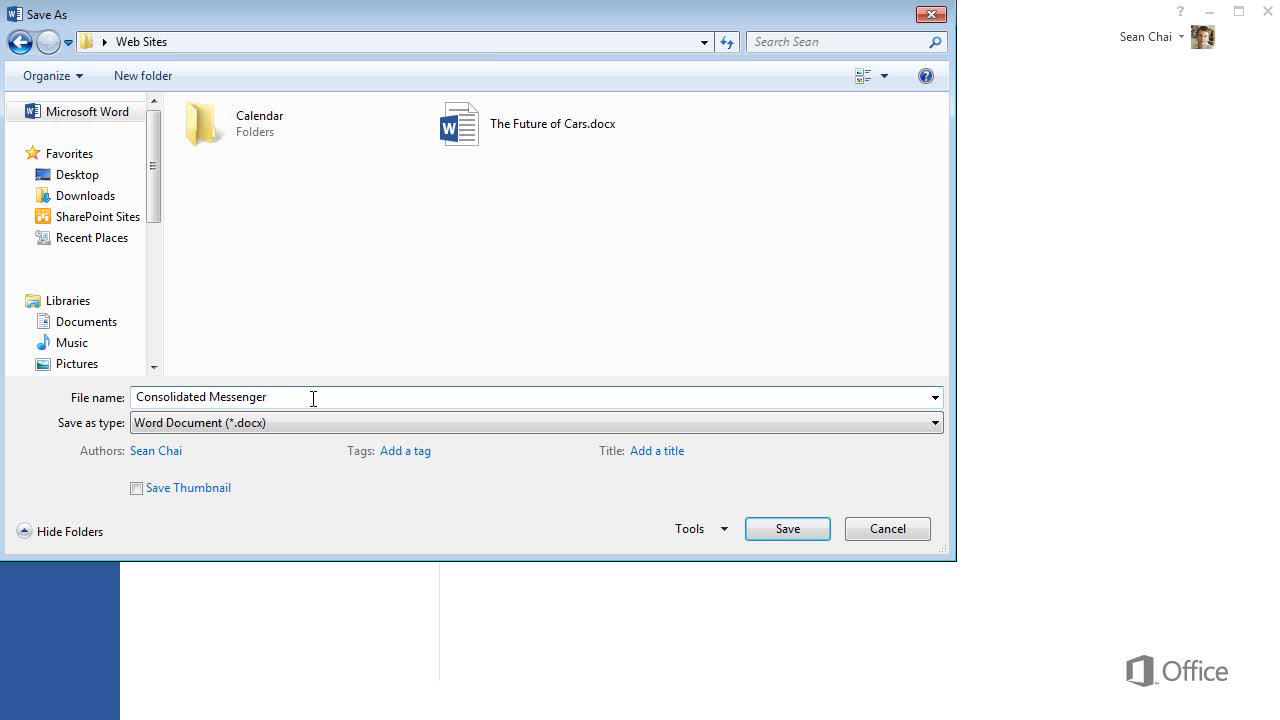
- Click Save As from the list of options.
- Choose the location where you would like to save the file.
- Name the file and select the file format you would like to save it as.
- Click Save.
Saving a Microsoft Word Document
Saving a Microsoft Word document is a quick and easy process that can be done in just a few steps. Whether you’re creating a new document from scratch or editing an existing one, you need to save your work in order to ensure that it will be available for future use. This article will explain how to save a Microsoft Word document in both the Windows and Mac operating systems.
Saving a New Document
When creating a new document in Microsoft Word, it is important to save it as soon as possible. This will prevent you from losing your work if you are interrupted or experience a power outage. To save a new document, click the “File” tab in the top left corner of the window and select “Save As” from the drop-down menu. This will open the “Save As” dialogue box where you can name the document and select the location where you would like to save it. Once you have selected a name and location, click the “Save” button and your document will be saved.
Saving to the Cloud
You can also save your document to the cloud by using the “Save As” dialogue box. Instead of selecting a hard drive location, select “OneDrive” or another cloud storage service from the list of options. This will allow you to access your document from any device with an internet connection.
Saving to a USB Drive
To save your document to a USB drive, click the “File” tab and select “Save As” from the drop-down menu. Then, select the USB drive from the list of options and click “Save”. Your document will be saved to the USB drive and you can easily transfer it to another device.
Saving an Existing Document
When editing an existing document in Microsoft Word, it is important to save your changes so that they will remain in the document. To save your changes, click the “File” tab and select “Save” from the drop-down menu. This will save your changes without altering the original document in any way.
Automatic Saving
Microsoft Word also has the ability to automatically save your document as you are working. This feature can be enabled by clicking the “File” tab and selecting “Options” from the drop-down menu. Then, select “Save” from the list of options and check the box next to “Save AutoRecover information every
Saving in Different File Formats
Microsoft Word documents can be saved in a variety of different file formats. To save a document in a different file format, click the “File” tab and select “Save As” from the drop-down menu. This will open the “Save As” dialogue box where you can select the file type you would like to save your document in. Once you have selected a file type, click the “Save” button and your document will be saved in the new format.
Compressing a Document
You can also compress a document in order to save space on your hard drive. To compress a document, click the “File” tab and select “Save As” from the drop-down menu. Then, select “Compressed (zipped) Folder” from the list of options and click “Save”. This will create a compressed version of your document that is much smaller than the original.
Few Frequently Asked Questions
Question 1: How do I save a Microsoft Word Document?
Answer: Saving a Microsoft Word document is a simple process. First, click the “File” tab located in the top left corner of the Word window. Then click “Save As” in the left menu. This will open a save window. Choose a file name for your document in the “File Name” field, and then choose a file location to save the document by clicking the “Browse” button to open the file explorer. Finally, click “Save” to save the document. Once saved, the document can be opened, edited, and saved again at any time.
Question 2: What file formats are available for saving a Microsoft Word document?
Answer: Microsoft Word allows documents to be saved in a variety of different file formats. The default file format is .docx, which is the Office Open XML format. Other available formats include .doc (the legacy format for Microsoft Word documents), .rtf (Rich Text Format), .txt (plain text), .pdf (Portable Document Format), and .html (Hypertext Markup Language). Depending on the desired output, more specialized formats such as .xps (XML Paper Specification) and .odt (OpenDocument Text) are also available.
Question 3: How can I save my Microsoft Word document as a template?
Answer: Saving a document as a template is a useful way to quickly create documents with the same formatting, content, and layout. To save a document as a template, first click the “File” tab and then click “Save As” in the left menu. Choose a file name for your template in the “File Name” field, and then choose a file location to save the template by clicking the “Browse” button to open the file explorer. Lastly, click the “Save as type” drop-down menu and select “Word Template”. Then click “Save” to save the document as a template.
Question 4: How can I save a Microsoft Word document in a different language?
Answer: To save a Microsoft Word document in a different language, first click the “File” tab and then click “Options” in the left menu. This will open the “Word Options” window. Select “Language” in the left menu and then select the desired language in the “Choose Editing Languages” section. Then click “OK” to save the changes. To save the document in the new language, click the “File” tab and then click “Save As” in the left menu. Choose a file name for your document in the “File Name” field, and then choose a file location to save the document by clicking the “Browse” button to open the file explorer. Finally, click “Save” to save the document.
Question 5: How can I save a Microsoft Word document as a PDF?
Answer: Microsoft Word allows documents to be saved as a PDF file. To do this, click the “File” tab and then click “Save As” in the left menu. Choose a file name for your document in the “File Name” field, and then choose a file location to save the document by clicking the “Browse” button to open the file explorer. Then click the “Save as type” drop-down menu and select “PDF”. Finally, click “Save” to save the document as a PDF.
Question 6: How can I save a Microsoft Word document with a password?
Answer: Microsoft Word allows documents to be saved with a password. To do this, click the “File” tab and then click “Save As” in the left menu. Choose a file name for your document in the “File Name” field, and then choose a file location to save the document by clicking the “Browse” button to open the file explorer. Then click the “Tools” drop-down menu and select “General Options”. This will open the “General Options” window. In the “Password to open” and “Password to modify” fields, enter your desired passwords and then click “OK”. Finally, click “Save” to save the document with the passwords.
Saving a Word Documnet – Word 2019
By following the simple steps outlined above, you can now save your Microsoft Word document with confidence. Knowing how to save your documents properly will help you stay organized and make sure that your work is preserved and ready to be used whenever you need it. With the right tools, you can save time and make sure that your work is secure and always accessible.