


How to Select Every Nth Row in Excel?

Are you looking for a quick and easy way to select every nth row in Excel? You’ve come to the right place! In this article, we’ll show you step-by-step how to select every nth row in Excel, whether you’re selecting every third row, every fourth row, or every row after a certain number. With these simple steps, you’ll have your data perfectly formatted in no time. Let’s get started!
Select Every Nth Row in Excel
To select every nth row in Excel, you can use a combination of the MOD and ROW functions. First, enter a value in a cell to serve as the modulus. Second, enter the following formula in the top cell of the range in which you want to select every nth row:
=MOD(ROW(),modulus)=0
Third, press Ctrl+Shift+Enter to enter the formula as an array formula. Finally, press Ctrl+C to copy the formula, then select the range of cells and press Ctrl+V to paste the formula in the range.
Using the “Modulus” Function to Select Every Nth Row in Excel
Selecting every nth row in Excel can be a time consuming task, but with the use of the modulus function it can be made much simpler. The modulus function is used to calculate the remainder of a number when it is divided by a divisor. In this case, by using the modulus function, we can easily select every nth row in Excel.
To use the modulus function, you need to first create a formula in the cell next to the row you want to select. This formula should be something like “=MOD(ROW(),N)”. In this formula, N is the number of rows that you want to select, and the ROW() function is used to get the row number of the current cell. After creating the formula, you can now select the rows with the number in the cell next to them that is equal to zero.
Once you have selected the rows, you can then apply any formatting or conditional formatting that you need. For example, you could highlight the selected rows in a different color, or apply a border to them. You could also use conditional formatting to automatically highlight the rows with a specific number.
Creating a Named Range for Every Nth Row in Excel
Creating a named range for every nth row in Excel is a great way to quickly select the rows you need. To do this, first select the range of cells that you want to include in the named range. Then, go to the Formulas tab and click the “Define Name” button. In the “Name” field, enter a name for the range, such as “EveryNthRow”. Then, click the “Refers To” field and enter the formula “=MOD(ROW(),N)”. Again, N is the number of rows that you want to select. Finally, click “OK” to create the named range.
Now that you have created the named range, you can use it to quickly select the rows you need. To do this, simply select the named range from the dropdown list in the “Name” box. Then, you can apply any formatting or conditional formatting that you need.
Using Filters to Select Every Nth Row in Excel
Another way to quickly select every nth row in Excel is by using filters. To do this, first select the range of cells that you want to filter. Then, go to the Data tab and click the “Filter” button. In the “Filter” dialog box, select the “Custom” filter option. Then, in the “Custom Filter” dialog box, select the “Modulus” filter type. Enter the value for N in the “Modulus” field. Finally, click “OK” to apply the filter.
Now that the filter has been applied, you can select the rows that have a number in the cell next to them that is equal to zero. Once you have selected the rows, you can then apply any formatting or conditional formatting that you need.
Using VBA to Select Every Nth Row in Excel
If you need to select every nth row in Excel on a regular basis, then you may want to consider using VBA. VBA stands for Visual Basic for Applications, and it is a programming language that can be used to automate tasks in Excel and other Office programs. To use VBA to select every nth row in Excel, you first need to create a macro. To do this, open the Visual Basic Editor (VBE) by going to the Developer tab and clicking the “Visual Basic” button.
Once the VBE is open, create a new macro by clicking the “Insert” menu and choosing the “Module” option. Then, enter the following code in the module: “Sub SelectNthRows() Dim Rng As Range Dim N As Integer N = InputBox(“Enter the number of rows to select”) For Each Rng In Selection If Rng.Row Mod N = 0 Then Rng.Select End If Next End Sub”. This code will prompt the user to enter the number of rows to select, and then it will select the rows with a number in the cell next to them that is equal to zero. Finally, save the macro and run it whenever you need to select every nth row in Excel.
Using the “INDEX” Function to Select Every Nth Row in Excel
The “INDEX” function can also be used to quickly select every nth row in Excel. To use this function, first select the range of cells that you want to include in the selection. Then, go to the Formulas tab and click the “Insert Function” button. In the “Function Arguments” dialog box, enter the “INDEX” function. Then, enter the following formula in the “Reference” field: “=INDEX(ROW(1:N),MOD(ROW(),N))”. This formula will select the rows with a number in the cell next to them that is equal to zero. Finally, click “OK” to apply the formula and select the rows you need.
Once you have selected the rows, you can then apply any formatting or conditional formatting that you need. For example, you could highlight the selected rows in a different color, or apply a border to them. You could also use conditional formatting to automatically highlight the rows with a specific number.
Few Frequently Asked Questions
Q1. How can I select every Nth row in Excel?
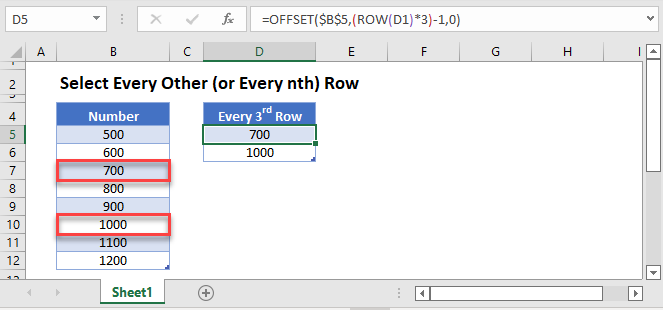
A1. You can select every Nth row in Excel by using the OFFSET function. This function allows you to specify a certain number of rows and columns to be included in the selection. For example, if you want to select every 5th row, you can specify the row offset as 5 and the column offset as 0. You can also use the MOD function to select only those rows that meet a certain criteria. For example, you could use the MOD function to select only those rows that are divisible by 5.
Q2. How do I use the OFFSET function to select every Nth row in Excel?
A2. The OFFSET function requires three arguments: a reference, row offset, and column offset. The reference is the starting cell from which you want to select the rows. The row offset is the number of rows that you want to move from the reference cell, and the column offset is the number of columns that you want to move from the reference cell. To select every Nth row, simply set the row offset to N and the column offset to 0.
Q3. How do I use the MOD function to select every Nth row in Excel?
A3. The MOD function allows you to select only those rows that meet a certain criteria. To select every Nth row, you can use the MOD function to specify that the row number must be divisible by N. For example, if you want to select every 5th row, you can use the formula MOD(ROW(),5)=0. This will select only those rows that are divisible by 5.
Q4. How do I select the first Nth rows in Excel?
A4. To select the first Nth rows in Excel, you can use the INDEX function. This function requires two arguments: an array and a row number. The array is the range of cells from which you want to select the rows, and the row number is the number of rows that you want to select. For example, if you want to select the first 5 rows, you can use the formula INDEX(A1:A10,1,5). This will select the first 5 rows from the range A1:A10.
Q5. What is the difference between the OFFSET and INDEX functions?
A5. The OFFSET function allows you to specify a certain number of rows and columns to be included in the selection. The INDEX function, on the other hand, allows you to select a certain number of rows from a specified range. The OFFSET function is useful for selecting every Nth row, while the INDEX function is useful for selecting the first Nth rows from a range.
Q6. How do I select every Nth row in Excel using VBA?
A6. You can use a For Next loop to select every Nth row in Excel using VBA. This loop requires two arguments: a start number and an end number. The start number is the row number from which you want to start the selection, and the end number is the row number at which you want to end the selection. Within the loop, you can use the Range.Select Method to select the rows. For example, if you want to select every 5th row starting from row 2, you can use the following code:
For i = 2 To LastRow
If (i Mod 5 = 0) Then
Range(“A” & i).Select
End If
Next i
Selecting every Nth row in Excel can be a daunting task, especially when dealing with a large dataset. However, with the proper use of the OFFSET function, you can easily select every Nth row in a dataset. This function allows you to specify the row offset, number of rows, and height of the range. With this powerful tool, you can quickly and accurately select every Nth row in your dataset, saving you time and effort.