


How to Send a Link to a Folder in Outlook?

Having trouble sending a link to a folder in Outlook? Don’t worry! This guide will walk you through the process step-by-step to help you get the job done. You’ll learn how to use Outlook’s built-in sharing tools to quickly and easily share a link to a folder with others. With the help of this guide, you’ll be able to share files and folders with recipients in no time. So let’s get started!
Sending a link to a folder in Outlook is easy. Here is how you do it:
- Open the folder you want to share in Outlook.
- Right-click on the folder and select “Share” from the menu.
- Click “Email” to generate a link for the folder.
- Copy the link and paste it into an email message.
- Send the email to the intended recipient.
How to Share a Folder Link in Outlook
Sharing a folder link in Outlook is an easy way to provide quick and easy access to a folder of documents or files to someone without requiring them to log into your system. Sharing a folder link in Outlook allows you to quickly send a link to the folder, rather than having to share the individual documents or files contained in the folder. This guide will help you learn how to share a folder link in Outlook.
The first step in sharing a folder link in Outlook is to open the folder that you would like to share. To do this, navigate to the folder in your Outlook email account, and then right-click on the folder. This will open a menu with several options, including the option to “Share Folder.” Select the “Share Folder” option and the Share Folder window will open.
The next step is to enter the email address of the person you would like to share the folder with. You can also enter a short message if you would like. When you are finished, click the “Send” button to send the folder link to the recipient.
Sending a Link in the Body of an Email
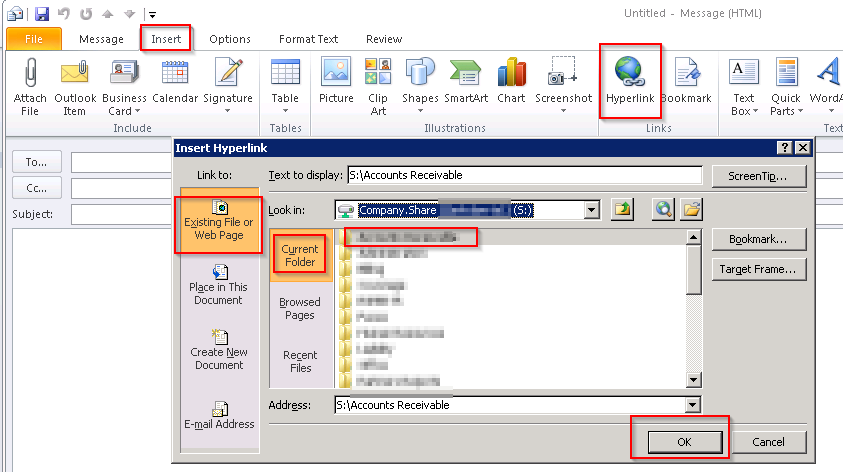
If you would like to include a link to the folder in the body of an email message, then you can do so by clicking on the “Link” button in the Share Folder window. This will open a new window that allows you to copy the link to the folder and paste it into the body of the email message. When you are finished, click the “Send” button to send the message with the folder link included.
Limitations with Sharing a Folder Link in Outlook
It is important to note that there are some limitations when sharing a folder link in Outlook. For example, the recipient of the folder link will not be able to add files to the folder, nor will they be able to edit the files that are already in the folder. Additionally, the folder link will only be valid for a limited amount of time, depending on the settings of your Outlook account.
How to Manage Access to a Shared Folder
Once you have shared a folder link in Outlook, you can manage the access of the recipient to the folder. To do this, right-click on the folder and select the “Manage Access” option. This will open a new window where you can select the type of access that the recipient will have to the folder. You can choose from “Read Only” access, “Read/Write” access, or even “Full Access” if desired.
Setting an Expiration Date for Access to the Folder
In addition to managing the type of access that the recipient has to the folder, you can also set an expiration date for the access. To do this, click on the “Set Expiration Date” option in the Manage Access window. This will open a new window where you can select the date that the recipient’s access to the folder will expire. Once you have made your selection, click the “Save” button to save the changes.
Revoking Access to the Folder
If you need to revoke access to the folder at any time, you can do so by right-clicking on the folder and selecting the “Manage Access” option. This will open the Manage Access window where you can select the recipient and then click the “Revoke Access” button. This will immediately revoke the recipient’s access to the folder.
Few Frequently Asked Questions
Q1. What is the easiest way to send a link to a folder in Outlook?
The easiest way to send a link to a folder in Outlook is to create a link that can be easily shared with others. To do this, open the folder in Outlook, click on the “Share” tab at the top of the folder window, and then click on “Create a link.” You will then be presented with a link you can copy and paste into an email or other document. The recipient of the link can then click on the link to open the folder in Outlook.
Q2. How can I customize the link I create?
When creating a link to a folder in Outlook, you can customize the link with a title, a description, and an expiration date. To do this, click on the “Advanced” link under the “Create a link” option. Enter the desired title, description, and expiration date (if desired) into the appropriate fields. Then, click the “Create link” button to generate the customized link.
Q3. When I create a link in Outlook, how can I know if the recipient has accessed the link?
When you create a link for a folder in Outlook, you can view the activity for the link by clicking on the “View Activity” link under the “Share” tab. This will provide you with a list of everyone who has accessed the link and when they accessed it.
Q4. How can I revoke access to the link I created?
If you need to revoke access to the link you created, click on the “Revoke Access” link under the “Share” tab. This will remove the ability for anyone to access the link, preventing them from opening the folder in Outlook.
Q5. Is there a way to update a link I have already created?
Yes, it is possible to update a link you have already created. To do this, open the folder in Outlook and click on the “Share” tab. Then, click on the “Update link” link. This will allow you to make changes to the title, description, and expiration date of the link.
Q6. How can I create a link that only certain people can access?
When creating a link to a folder in Outlook, you can specify who is allowed to access the link. To do this, click on the “Advanced” link under the “Create a link” option. Then, click the “Restrict access” checkbox and enter the email addresses of the people you want to have access to the link. Only those people will then be able to access the link.
How to send a link to a file or folder in an email
After following the steps outlined in this guide, you’re now ready to send a link to a folder in Outlook. With the help of this guide, you can now easily access the folder in Outlook without having to go through all the hassle of sending emails. Now, you can easily access the contents of the folder and share it with those you need to. Now, you can easily access the folder in Outlook and share it with those you need to.