


How to Turn Off Ipv6 Windows 10?

When it comes to staying safe and secure online, one of the most important steps you can take is to turn off IPv6 in Windows 10. IPv6, or Internet Protocol Version 6, is the latest version of the Internet Protocol (IP), the communication protocol used to connect computers and other devices on the Internet. While IPv6 provides several advantages over its predecessor, IPv4, it can also be a security risk, since it makes it easier for malicious actors to access your system. Fortunately, it’s easy to turn off IPv6 in Windows 10, so you can keep your data and devices safe. In this article, we’ll show you how to turn off IPv6 in Windows 10.
1. Open the Start menu and search for “Network Connections”.
2. Right-click the network adapter you are using and select “Properties”.
3. Uncheck the box next to “Internet Protocol Version 6 (TCP/IPv6)” and click “OK”.
4. Restart your computer.
Alternatively, you can disable IPv6 using the Windows Registry.
1. Type “regedit” in the search box and press Enter.
2. Navigate to “HKEY_LOCAL_MACHINE\SYSTEM\CurrentControlSet\Services\TCPIP6\Parameters”.
3. Right-click “Parameters” and select “New > DWORD (32-bit) Value”.
4. Name it “DisabledComponents” and set its value to “ffffffff”.
5. Close the Registry Editor and restart your computer.
Disabling IPv6 in Windows 10
IPv6, or Internet Protocol version 6, is the latest version of the Internet Protocol (IP). It is the successor to IPv4, which is the most widely used version of IP. IPv6 is designed to address some of the limitations of IPv4 and provide better support for modern applications and network devices. The Windows 10 operating system includes support for IPv6, and while this may be beneficial in some scenarios, it can also cause problems with certain applications and services. Fortunately, it is possible to disable IPv6 in Windows 10 if you need to.
Disable IPv6 in the Network Adapter Settings
The first step to disabling IPv6 in Windows 10 is to open the Network Connections window. This can be done by navigating to the “Network and Sharing Center” in the Control Panel, then selecting “Change adapter settings”. This will open a window showing all of the network adapters that are installed on your system. Right-click on the adapter that you want to disable IPv6 on and select “Properties” from the menu.
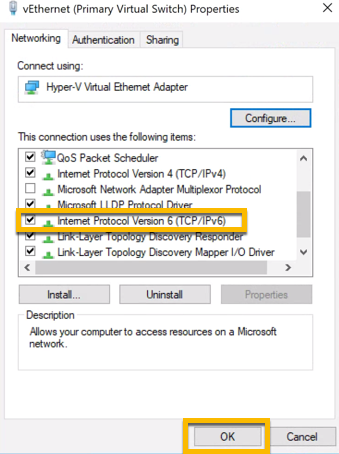
In the Properties window, select the “Networking” tab, then scroll down to the “Internet Protocol Version 6 (TCP/IPv6)” entry. Uncheck the box next to this entry to disable IPv6 on the selected adapter. Click “OK” to save the changes and close the window.
Disable IPv6 in the Windows Registry
If you want to disable IPv6 in Windows 10 on all of the network adapters in your system, you can do so by modifying the Windows registry. To do this, open the “Run” window by pressing the Windows key + R. Then type “regedit” and press enter. This will open the registry editor.
Navigate to the “HKEY_LOCAL_MACHINE\SYSTEM\CurrentControlSet\Services\tcpip6\Parameters” registry key. Right-click on the “Parameters” key and select “New > DWORD (32-bit) Value”. Name this value “DisabledComponents” and set its value to “ff”. This will disable IPv6 on all of the network adapters in your system.
Disable IPv6 in the Command Prompt
It is also possible to disable IPv6 in Windows 10 using the Command Prompt. To do this, open the Command Prompt as an administrator by pressing the Windows key + X and selecting “Command Prompt (Admin)” from the menu.
In the Command Prompt window, type the following command and press enter:
netsh interface ipv6 set teredo disabled
This will disable IPv6 on the system. You can verify that the command was successful by typing the following command and pressing enter:
netsh interface ipv6 show teredo
If the command returns “Disabled”, then IPv6 is disabled on the system.
Disable IPv6 in the Network and Sharing Center
It is also possible to disable IPv6 in Windows 10 by navigating to the “Network and Sharing Center” in the Control Panel. Once in the Network and Sharing Center, select “Change adapter settings”. This will open a window showing all of the network adapters on the system.
Right-click on the adapter that you want to disable IPv6 on and select “Properties” from the menu. In the Properties window, select the “Networking” tab, then uncheck the box next to “Internet Protocol Version 6 (TCP/IPv6)” to disable IPv6 on the selected adapter. Click “OK” to save the changes and close the window.
Disable IPv6 in the Group Policy Editor
It is also possible to disable IPv6 in Windows 10 using the Group Policy Editor. To do this, open the Group Policy Editor by pressing the Windows key + R, then typing “gpedit.msc” and pressing enter.
Navigate to the “Computer Configuration > Administrative Templates > Network > TCP/IP Settings” folder. In this folder, double-click on the “IPv6 Transition Technologies” setting and select “Disabled” from the drop-down menu. This will disable IPv6 on the system.
Conclusion
Disabling IPv6 in Windows 10 is relatively straightforward and can be done using the Network Adapter Settings, the Windows Registry, the Command Prompt, the Network and Sharing Center, or the Group Policy Editor. Disabling IPv6 may be necessary in some scenarios, so it is important to be aware of the different methods for doing so.
Related FAQ
Q1. What is IPv6?
Answer: IPv6 (Internet Protocol version 6) is the latest version of the Internet Protocol, the communications protocol that provides an identification and location system for computers on networks and routes traffic across the Internet. It is intended to replace the older IPv4 protocol, which is still used today. IPv6 offers improved security, better support for mobile devices, and more efficient routing of traffic across the Internet.
Q2. What are the advantages of using IPv6?
Answer: The advantages of using IPv6 include improved security, better support for mobile devices, and more efficient routing of traffic across the Internet. IPv6 also provides a larger address space, allowing for more efficient routing and better scalability. Additionally, it provides improved support for multicast traffic, which is necessary for technologies such as Voice over IP (VoIP). Finally, IPv6 is more efficient at routing traffic than IPv4, resulting in faster connections and better performance.
Q3. How do I turn off IPv6 in Windows 10?
Answer: To turn off IPv6 in Windows 10, open the Control Panel and navigate to “Network and Internet”. Select “Change adapter settings” and right-click on the connection for which you want to disable IPv6. Select “Properties” from the context menu and uncheck the box next to “Internet Protocol Version 6 (TCP/IPv6)”, then click “OK”.
Q4. Is it safe to disable IPv6?
Answer: Yes, it is safe to disable IPv6 in Windows 10. Disabling IPv6 may cause problems with certain applications or services that rely on IPv6, such as peer-to-peer applications or online gaming. However, in most cases, disabling IPv6 will not cause any issues and can help improve your system’s security and privacy.
Q5. How do I enable IPv6 in Windows 10?
Answer: To enable IPv6 in Windows 10, open the Control Panel and navigate to “Network and Internet”. Select “Change adapter settings” and right-click on the connection for which you want to enable IPv6. Select “Properties” from the context menu and check the box next to “Internet Protocol Version 6 (TCP/IPv6)”, then click “OK”.
Q6. Is IPv6 enabled by default in Windows 10?
Answer: Yes, IPv6 is enabled by default in Windows 10. However, it is possible to disable IPv6 if desired. Disabling IPv6 may cause problems with certain applications or services that rely on IPv6, such as peer-to-peer applications or online gaming. However, in most cases, disabling IPv6 will not cause any issues and can help improve your system’s security and privacy.
How to Enable or Disable IPv6 in Windows 10?
If you are using Windows 10, turning off IPV6 is a necessary step to ensure your computer is configured securely. With a few simple steps, you can easily turn off IPV6 on your Windows 10 device. Follow the instructions above, and you will have successfully disabled IPV6 on your Windows 10 device. Enjoy the added security and peace of mind that comes with knowing your computer is safe and secure.