


How to Uninstall Nvidia Drivers Windows 10?

Are you looking to uninstall Nvidia drivers from your Windows 10 device? Uninstalling outdated drivers can be a tricky task, especially if you don’t know how to do it. Fortunately, it doesn’t have to be difficult. In this article, we’ll show you how to uninstall Nvidia drivers from your Windows 10 device in just a few easy steps.
Uninstalling Nvidia Drivers Windows 10:
- Open the Windows Start menu
- Type in “Device Manager” and select it from the list
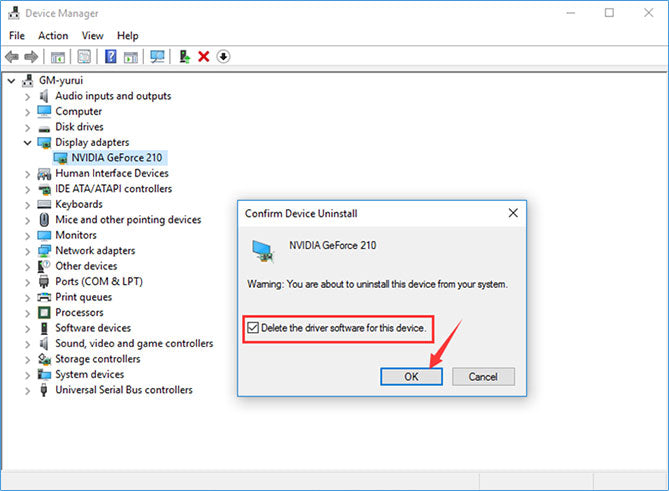
- Expand the Display Adapters section
- Right-click on the Nvidia device and select “Uninstall”
- When prompted, check the box to delete the driver software
- Click “OK” to confirm the uninstallation
- Reboot your computer
Uninstalling Nvidia Drivers on Windows 10
Nvidia drivers are essential components for computers that use Nvidia graphics cards. It is important to keep them up-to-date to ensure the best performance for your computer. However, if you need to uninstall Nvidia drivers from your Windows 10 computer, the process is relatively straightforward. In this article, we will go over the steps you need to take to uninstall Nvidia drivers from your Windows 10 PC.
Step 1: Download the Latest Nvidia Drivers
The first step in uninstalling Nvidia drivers on Windows 10 is to download the latest version of the drivers. You can do this by visiting the Nvidia website and downloading the drivers from there. Make sure to download the correct version of the drivers for your system. Once you have downloaded the drivers, you can proceed to the next step.
Step 2: Uninstall Existing Nvidia Drivers
Once you have downloaded the latest version of the Nvidia drivers, you can then begin to uninstall the existing drivers on your computer. To do this, you will need to open the Control Panel in Windows 10 and navigate to the “Programs and Features” section. Here, you will be able to see a list of all the installed programs on your computer. Locate the Nvidia drivers and select them. You can then proceed to uninstall them by clicking the “Uninstall” button.
Step 3: Clean Install the New Nvidia Drivers
Once the existing Nvidia drivers have been uninstalled, you can then proceed to install the new drivers. To do this, you will need to open the file that you have downloaded and follow the on-screen instructions provided. Make sure to select “clean install” when prompted as this will ensure that any remnants of the previous drivers are completely removed from your system. Once the installation is complete, you can then restart your computer and the new drivers should be installed and ready to use.
Step 4: Check for Updates
Once the new drivers have been installed, it is important to check for any available updates. You can do this by opening the Nvidia Control Panel and navigating to the “Updates” section. Here, you will be able to see if there are any available updates for your graphics card. If there are, you should install them to ensure that your graphics card is running at its best.
Step 5: Optimize Your Settings
Once the updates have been installed, you can then proceed to optimize your settings. This can be done by opening the Nvidia Control Panel and navigating to the “Settings” section. Here, you will be able to adjust various settings such as the graphics card’s performance, resolution, and more. You should take some time to experiment with the different settings to find the best setup for your system.
Step 6: Troubleshoot Issues
If you find that there are any issues with your graphics card or the Nvidia drivers, you can try to troubleshoot them by opening the Nvidia Control Panel and navigating to the “Help” section. Here, you will be able to find various troubleshooting tips and advice. If the issue persists, you can also contact the Nvidia support team for further assistance.
Step 7: Reinstall Nvidia Drivers
If you find that you need to reinstall the Nvidia drivers, you can do so by downloading the latest version from the Nvidia website and following the same steps outlined above. Make sure to select “clean install” when prompted as this will ensure that any remnants of the previous drivers are completely removed from your system.
Summary
Uninstalling Nvidia drivers on Windows 10 is a relatively simple process. All you need to do is download the latest version of the drivers from the Nvidia website, uninstall the existing drivers, and then clean install the new ones. Once the drivers are installed, you should check for updates and optimize your settings. If you find that there are any issues, you can try to troubleshoot them or contact the Nvidia support team for further assistance. Finally, if you need to reinstall the drivers, you can do so by downloading the latest version from the Nvidia website and following the same steps outlined above.
Frequently Asked Questions
Question 1: What is the recommended method for uninstalling Nvidia drivers on Windows 10?
Answer: The recommended method for uninstalling Nvidia drivers on Windows 10 is to use the Windows Device Manager. To do this, open the Windows Device Manager, right-click on the Nvidia device, and select “Uninstall Device.” Then, follow the on-screen instructions to complete the uninstallation process. It is also important to restart your computer after uninstalling the drivers.
Question 2: Is it safe to uninstall Nvidia drivers on Windows 10?
Answer: Yes, it is generally safe to uninstall Nvidia drivers on Windows 10. However, it is important to make sure that you follow the correct steps to uninstalling the drivers and restart your computer afterwards. Uninstalling the drivers can help to improve system performance or solve any incompatibility issues.
Question 3: How do I uninstall Nvidia drivers from the command line?
Answer: You can uninstall Nvidia drivers from the command line by running the following command: “devmgmt.msc /uninstall /devid {device id}.” This command will uninstall the device associated with the specified device ID. It is important to note that this command will only work if the device is installed correctly on your system.
Question 4: How can I check if my Nvidia drivers are up to date?
Answer: You can check if your Nvidia drivers are up to date by downloading and running the latest version of the Nvidia GeForce Experience software. Once installed, the software will automatically detect if there are any newer versions of the drivers available. You can then download and install the latest version of the drivers.
Question 5: What happens if I uninstall Nvidia drivers?
Answer: If you uninstall Nvidia drivers, your system may experience reduced performance, as the drivers are necessary for optimal performance. Additionally, some features such as 3D acceleration may not work correctly. Therefore, it is important to only uninstall the drivers if you are experiencing any issues or if you want to update to the latest version.
Question 6: How do I completely remove Nvidia drivers from my system?
Answer: To completely remove Nvidia drivers from your system, you will need to uninstall the drivers using the Windows Device Manager, as well as delete any remaining files associated with the drivers. To do this, open the Device Manager, right-click on the device and select “Uninstall Device”. Then, open File Explorer, navigate to the “Program Files” folder, and delete any folders associated with the Nvidia drivers. Finally, restart your computer to ensure that the drivers have been completely removed.
How to: UNINSTALL Graphics Driver (NVIDIA)
Uninstalling Nvidia drivers Windows 10 can be a confusing and complicated process, but with the right steps and knowledge, it can be a quick and easy task. With the steps outlined above, you should now have a better understanding of how to uninstall Nvidia drivers Windows 10. Remember to always keep your computer up to date and to back up your data before attempting any major changes. Thanks for reading and good luck!