


How to Use Normal Distribution in Excel?

Are you looking to learn how to use Normal Distribution in Excel? If so, you have come to the right place. In this article, we will discuss what Normal Distribution is and how to use it in Excel. We will look at the different formulas and functions available in Excel for calculating Normal Distribution, as well as some tips for making the most out of this powerful tool. With the help of this article, you will be able to easily and accurately use Normal Distribution in Excel for your data analysis needs. So let’s get started!
How to Use Normal Distribution in Excel?
- Open Microsoft Excel.
- Input the data set, either by typing the values in the cells or by copying the data from another source.
- Click the “Data” tab and select “Data Analysis.”
- Select “Normal Distribution” from the list of available options.
- Enter the input range for the data set and the output range for the results.
- Select the appropriate options for “Labels” and “Output Options.”
- Click “OK” to generate the results.
What is Normal Distribution?
Normal Distribution is an important concept in statistics and probability theory. It is also known as the Gaussian Distribution or the Bell Curve. It is a symmetric distribution that is shaped like a bell and has a single peak and a single trough. Normal Distribution is used to describe the probability of a variable occurring within a given range. It is used to describe the probability of a variable occurring within a given range.
Normal Distribution is used to represent a wide range of events, from predicting stock prices to analyzing the results of a survey. It is an essential tool for data analysis and forecasting. It is also used to calculate confidence intervals, which are used to measure the accuracy of predictions.
Normal Distribution can be used in Excel to quickly calculate the probability of a variable occurring within a given range.
Steps to Use Normal Distribution in Excel
To use Normal Distribution in Excel, the first step is to enter the data into the spreadsheet. The data should be entered into the cells in ascending order, from the smallest value to the largest. This will make it easier to calculate the probability of a variable occurring within a given range.
The next step is to select the cell range where the data is located. This cell range should be selected and then the “Data Analysis” option should be chosen from the “Data” tab. The “Normal Distribution” option should be chosen from the “Data Analysis” window.
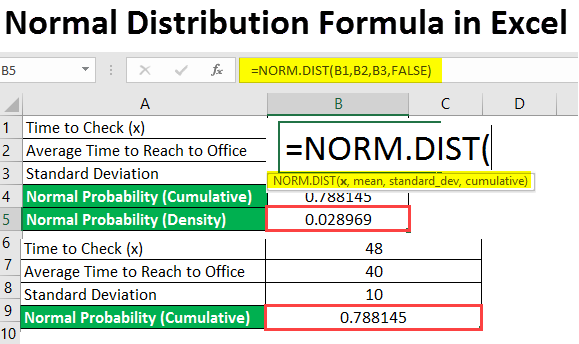
Calculating Probability with the NORMDIST Function
Once the “Normal Distribution” option is chosen, the “NORMDIST” function can be used to calculate the probability of a variable occurring within a given range. The function takes five arguments: the mean, the standard deviation, the lower bound, the upper bound, and a cumulative value of 0 or 1.
The mean and standard deviation values should be entered into the function. These values can be calculated manually or by using the “AVERAGE,” “VAR” and “STDEV” functions. The lower and upper bounds of the range should also be entered into the function. The cumulative value should be set to either 0 or 1. If the cumulative value is set to 0, the function will calculate the probability of a value occurring within the given range. If the cumulative value is set to 1, the function will calculate the probability of a value occurring below the given range.
Interpreting the Results
The output of the “NORMDIST” function will be a probability value between 0 and 1. This value can be interpreted as the likelihood of a variable occurring within a given range. For example, a probability value of 0.8 would mean that there is an 80% chance of the variable occurring within the given range.
Using Graphs to Visualize the Results
The results of the “NORMDIST” function can be visualized by creating a graph in Excel. The graph should be created by selecting the cell range where the data is located and then choosing the “Chart” option from the “Insert” tab. The “Line” option should be chosen from the “Chart Types” window.
The graph will show the probability of a variable occurring within a given range. The graph will also show the mean and standard deviation values calculated by the “NORMDIST” function. This will allow the user to visualize the results of the function and gain a better understanding of the data.
Using NORMINV Function
The “NORMINV” function can also be used to calculate the inverse of the “NORMDIST” function. This function takes four arguments: the probability, the mean, the standard deviation, and a cumulative value of 0 or 1.
The mean and standard deviation values should be entered into the function. The probability should be set to the same value as the output of the “NORMDIST” function. The cumulative value should also be set to either 0 or 1. If the cumulative value is set to 0, the function will calculate the value of the variable corresponding to the given probability. If the cumulative value is set to 1, the function will calculate the value of the variable corresponding to the given probability plus any values below it.
Interpreting the Results
The output of the “NORMINV” function will be a value corresponding to the given probability. This value can be interpreted as the value of the variable corresponding to the given probability.
For example, if the output of the “NORMDIST” function is 0.8, the output of the “NORMINV” function will be the value of the variable corresponding to a probability of 0.8. This value can then be used to determine the likelihood of the variable occurring within a given range.
Related FAQ
Q1: How do I calculate the mean and standard deviation of a normal distribution in Excel?
A1: To calculate the mean and standard deviation of a normal distribution in Excel, use the following formula: “=AVERAGE(data) for the mean and =STDEV.P(data) for the standard deviation”. The data in this formula refers to the range of cells containing the data. After entering the formula, press Enter to calculate the mean and standard deviation.
Q2: How do I create a graph of a normal distribution in Excel?
A2: To create a graph of a normal distribution in Excel, start by entering your data in two columns: one for the values and the other for their frequencies. Then, select both columns and go to the Insert tab. Under Charts, select Scatter with Straight Lines. This will create a graph of the normal distribution.
Q3: How do I calculate the probability of a value in a normal distribution in Excel?
A3: To calculate the probability of a value in a normal distribution in Excel, use the NORMDIST function. This function takes five arguments: the value, the mean, the standard deviation, the cumulative flag, and the probability density flag. Enter the values for each argument and press Enter to calculate the probability.
Q4: How do I calculate the minimum, maximum, and z-score of a normal distribution in Excel?
A4: To calculate the minimum, maximum, and z-score of a normal distribution in Excel, use the MIN, MAX, and Z.TEST functions. The MIN and MAX functions take two arguments: the range of cells containing the data and an optional logical value. The Z.TEST function takes four arguments: the data, the mean, the standard deviation, and the two-tailed flag. Enter the values for each argument and press Enter to calculate the minimum, maximum, and z-score.
Q5: How do I calculate the area under a normal distribution in Excel?
A5: To calculate the area under a normal distribution in Excel, use the NORMSDIST function. This function takes three arguments: the value, the mean, and the standard deviation. Enter the values for each argument and press Enter to calculate the probability of the value and the area under the normal distribution.
Q6: How do I calculate a confidence interval for a normal distribution in Excel?
A6: To calculate a confidence interval for a normal distribution in Excel, use the NORM.INV function. This function takes three arguments: the probability, the mean, and the standard deviation. Enter the values for each argument and press Enter to calculate the confidence interval. The confidence interval is the range of values within which the true mean of the normal distribution is likely to fall.
In conclusion, understanding and incorporating Normal Distribution into your Excel work can be very beneficial in terms of providing a visual representation of data, performing statistical calculations, and more. With a little practice and knowledge, you can easily become an Excel expert in no time and make use of this powerful tool to its utmost potential.