


How to Disable Sleep Mode Windows 10?

Are you constantly frustrated by your computer going into sleep mode at the most inconvenient times? Do you need to keep your computer running for certain tasks but find that sleep mode keeps interrupting your work flow?
Then you should consider disabling sleep mode on Windows 10. In this article, we look at how to disable sleep mode in Windows 10 and keep your computer running without interruptions.
To disable sleep mode in Windows 10, follow these steps:
- Go to Settings > System > Power & sleep.
- Under Screen, adjust the amount of time until the screen turns off when you're not using your device.
- Under Sleep, select Never.
Disabling Sleep Mode on Windows 10
Windows 10 is one of the most popular operating systems in the world, and it comes with a wide range of features, including the ability to enable or disable sleep mode.
Sleep mode is a great way to conserve energy, but it can be inconvenient if you don't want your PC to enter sleep mode at certain times or in certain situations. Fortunately, disabling sleep mode on Windows 10 is a relatively easy process and can help you save energy and time.
Sleep mode is a feature that is enabled by default on Windows 10, and it allows your computer to enter a low-power mode when it is not in use. When your computer is in sleep mode, it will enter a low-power state and won't consume as much energy as when it is running normally.
This can be useful for conserving energy, but it can be inconvenient if you don't want your PC to enter sleep mode. Fortunately, it is possible to disable sleep mode on Windows 10 and achieve the desired results. When you disable sleep mode on Windows 10, your computer will no longer enter a low-power state, and it will remain running at full power until you manually shut it down.
This can be useful if you don't want your computer to enter sleep mode during certain times or in certain situations, such as when you are downloading or streaming something. Disabling sleep mode will also help you save energy and time, as your computer won't be entering a low-power state when it isn't in use.
Methods to Disable Sleep Mode Windows 10
The easiest way to disable sleep mode on Windows 10 is to use the Power Options menu. This menu can be accessed by going to the Start menu and typing 'Power Options', and then selecting the 'Change when the computer sleeps' option from the list.
This will open a window where you can select the time after which your computer will enter sleep mode, and you can select 'Never' to disable sleep mode completely. Another way to disable sleep mode on Windows 10 is to use the Command Prompt.
This can be done by opening the Command Prompt (by typing 'cmd' in the Start menu) and then entering the 'powercfg.exe /hibernate off' command.
This will disable sleep mode on your computer, and you can enter the 'powercfg.exe /hibernate on' command to re-enable it.
Preventing Sleep Mode on Windows 10
If you want to prevent your computer from entering sleep mode, you can use the 'Do not sleep' setting in the Power Options menu. This will prevent your computer from entering sleep mode, even if the time limit for sleep mode is reached.
This can be useful if you don't want your computer to enter sleep mode at certain times or in certain situations, such as when you are downloading or streaming something.
Another way to prevent your computer from entering sleep mode is to use the Command Prompt. This can be done by opening the Command Prompt (by typing 'cmd' in the Start menu) and then entering the 'powercfg.exe /standby off' command.
This will prevent your computer from entering sleep mode, and you can enter the 'powercfg.exe /standby on' command to re-enable it.
Disabling Sleep Mode in the BIOS
Another way to disable sleep mode on Windows 10 is to use the BIOS. This can be done by restarting your computer and then pressing the appropriate key to enter the BIOS. Once in the BIOS, you will need to locate the 'Power' section and then look for the 'Sleep' or 'Hibernate' option.
You can then disable this option to prevent your computer from entering sleep mode. You can also disable sleep mode in the BIOS by adjusting the 'ACPI' settings. This can be done by locating the 'ACPI' section in the BIOS and then selecting the 'Disabled' option. This will prevent your computer from entering sleep mode, even if the time limit for sleep mode is reached.
Using Third-Party Software to Disable Sleep Mode
If you don't want to disable sleep mode in the BIOS or the Power Options menu, you can also use third-party software to do so. There are several free and paid software programs that can be used to prevent your computer from entering sleep mode, and they are relatively easy to use.
Many of these programs also allow you to set a schedule for when your computer should enter sleep mode, so you can still conserve energy without having to disable sleep mode entirely.
Disabling Sleep Mode on Windows 10 Summary
Disabling sleep mode on Windows 10 is a relatively easy process and can help you save energy and time.
The easiest way to do this is to use the Power Options menu, where you can select the time after which your computer will enter sleep mode, and you can select 'Never' to disable sleep mode completely.
You can also use the Command Prompt to disable sleep mode, or you can use the BIOS or third-party software.
Related FAQ
What is Sleep Mode?
Sleep Mode is a power saving state in Windows 10 where all the activities on the computer are put on pause, the display is turned off, and the system enters a low power state.
This is useful for saving energy when the computer is not in use for a period of time. It also helps conserve battery life on laptops.
Why Disable Sleep Mode?
There are a few reasons why someone might want to disable Sleep Mode on their Windows 10 computer. One is that it can cause issues with certain programs and processes that need to run continuously.
It can also be inconvenient if the computer is used frequently and constantly needs to be woken up from Sleep Mode. Finally, it can be useful to have the computer running continuously for tasks such as downloading files or running a server.
How to Disable Sleep Mode?
To disable Sleep Mode in Windows 10, you first need to open the Power Options window. You can do this by pressing the Windows key and typing “power options” and selecting it from the search results.
Once you’re in the Power Options window, select “Change plan settings” from the list of options on the left side. From there, you can choose how long you want your computer to stay active before it goes into Sleep Mode.
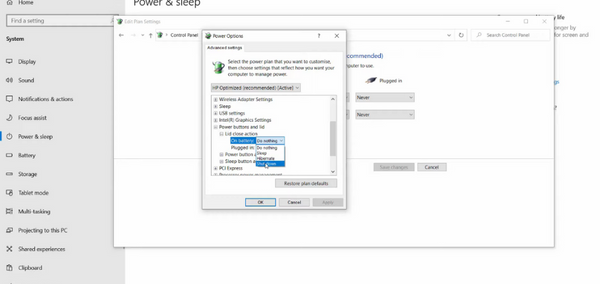
How to Change Sleep Settings?
In the Power Options window, you can choose to change the settings of Sleep Mode from the “Change advanced power settings” link. This will open a window where you can customize the settings for Sleep Mode.
You can choose to enable or disable Sleep Mode, as well as customize when the computer should enter Sleep Mode and how long it should stay in Sleep Mode.
How to Disable Sleep Mode With Command Prompt?
If you’d rather use the command line, you can disable Sleep Mode in Windows 10 using the command prompt. To do this, open the command prompt by pressing the Windows key and typing “cmd” and selecting it from the search results.
Then, type in the command “powercfg -h off” and press Enter. This will disable Sleep Mode on your computer.
How to Re-Enable Sleep Mode?
If you’d like to re-enable Sleep Mode on your Windows 10 computer, you can do so by following the same steps as above. First, open the command prompt and type in the command “powercfg -h on” and press Enter.
This will re-enable Sleep Mode on your computer, allowing it to enter Sleep Mode after the time period you have set in the Power Options window.
How to Turn Off Sleep Mode on Your Windows 10
In conclusion, disabling sleep mode on Windows 10 is a fairly straightforward process. All you need to do is open the Power Options window, select 'Change plan settings', and then select 'Never' from the drop-down menu.
This will ensure that your computer stays on and available for use at all times. It's a simple step that can save you a lot of time and frustration in the long run.