


How To Format External Hard Drive Windows 10?

In this guide, you will learn how to format an external hard drive for Windows 10 in a few simple steps. Whether you are looking to store files or use the external hard drive as a backup, formatting the drive is an important step to ensure its usability. This guide will teach you how to format an external hard drive for Windows 10 in the following steps:
- Connect the external hard drive to your computer
- Open File Explorer
- Right-click on the hard drive
- Select Format
- Choose your desired format type
- Click Start
How Do I Completely Format An External Hard Drive?
Formatting an external hard drive is an important step that should be taken before you start using it. It is a straightforward process that can be completed in a few steps. Before beginning, you'll want to make sure that you have a backup of any important files that are on the drive, as formatting will completely erase the drive.
Then, you'll need to connect the drive to the computer. Depending on the type of drive you are using, you may need to use a USB cable or a SATA cable. Once the drive is connected and you've backed up your files, you'll need to open the drive in the file explorer window. Here, you'll right-click on the drive, then select the "Format" option in the menu. This will open a new window, where you'll be able to select the file system you'd like to use.
The most common file system is NTFS, but you may also want to use FAT32 or exFAT depending on the type of drive you are using. You can then select the "Quick Format" option and click on "Start". This will begin the formatting process, which can take several minutes to complete. Once finished, the drive will be ready for use.
Why Can't I Format My External Hard Drive?
Formatting an external hard drive can often be a tricky process, as the external hard drive must be in the correct format for the system in which it will be used. There are a few different ways to format an external hard drive for use, depending on the system and the type of drive. To successfully format an external hard drive, the user should first determine which system the drive is intended for use with.
Once the system has been determined, the user should back up any important data they want to keep from the drive. Once the data is backed up, the user can then begin the formatting process. The user must then connect the external hard drive to the system, and open the computer's disk management utility.
The user should then select the external hard drive from the list of connected drives, and select the option to format. The user should then select the desired file system for the drive, such as FAT32, NTFS, or exFAT. The user should then select the Allocation Unit Size, which should be left at the default setting.
Once all the settings have been made, the user can begin the formatting process. The formatting process can take several minutes, and the user should not disconnect the drive while the process is taking place. Once the formatting process is complete, the user can then copy back the data to the external hard drive, and it will be ready for use.
How Do I Format My External Hard Drive Windows 10 Not Visible?
Formatting an external hard drive in Windows 10 is a simple process that can help you gain access to the drive and use it to store and retrieve data. The process involves configuring the drive with a file system and assigning a drive letter to it. This article will provide step-by-step instructions on how to format your external hard drive in Windows 10.
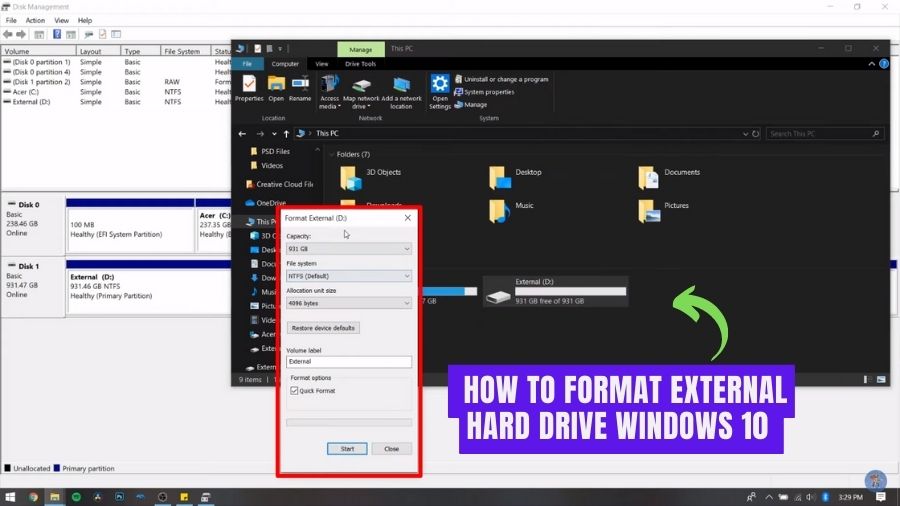
First, connect the external hard drive to your computer. Next, open the “This PC” window by pressing the Windows key and type “This PC”. Once the window is open, you should see your external hard drive listed. Right-click the drive and select “Format”. This will open the “Format” window. In this window, you will need to select a file system for your drive.
The most common file system is NTFS, but if you are planning to use the external hard drive with other operating systems, you may want to choose the FAT32 file system. Once you have selected the file system, you can assign a drive letter to the drive.
When you have finished, click the “Start” button to begin the formatting process. Once you have completed the formatting process, you should be able to see your external hard drive in the “This PC” window. You can now use the drive to store and retrieve data.
Should I Format My External Hard Drive To NTFS Or ExFat?
When deciding whether to format your external hard drive to NTFS or ExFat, it is important to understand the differences between the two. NTFS (New Technology File System) is a file system created by Microsoft and is optimized for Windows computers. It is more secure, supports larger files, and allows you to password protect files.
ExFat (Extended File Allocation Table) is a newer file system that is optimized for both Windows and Mac computers. It supports larger files and is more efficient than NTFS, but lacks the security features of NTFS. Before you begin formatting, you should make sure that your external hard drive is compatible with the file system you choose. If you are using a Windows computer, you can use either NTFS or ExFat.
However, if you are using a Mac computer, you must use ExFat. After you have confirmed compatibility, you can begin formatting. To format your external hard drive, you must first connect it to your computer. After it is connected, open "My Computer" or "This PC" and locate the drive. Right click on the drive and select "Format". From the File System dropdown, select either "NTFS" or "ExFat". Finally, click "Start" to begin the formatting process.
Format External Hard Drive Windows 10 Not Showing Up
If the external hard drive is not showing up in Windows 10, it can be difficult to get it working properly again. Fortunately, there are a few troubleshooting steps you can take to get the drive recognized and working properly.
- Check the power and data connections. Make sure that both the power and data cables are properly connected to the hard drive and computer.
- Check the External Hard Drive in Device Manager. In the Device Manager window, look for the drive and see if it is listed.
- Update the Drivers. If the external hard drive is listed, then you can try to update the drivers. Right-click on the device and choose “Update Driver”.
- Check in Disk Management. Open the Disk Management utility and see if the drive is listed there.
- Format the Drive. If the drive is not showing up in Disk Management, then you can try to format it. Right-click on the drive and choose “Format”.
- Check for Bad Sectors. If the drive is still not recognized, then you can try checking for bad sectors. Use a utility such as chkdsk to scan the drive for errors.
Once you have completed these steps, the external hard drive should be recognized and working properly in Windows 10. If the drive is still not working, then you may need to contact the manufacturer for further assistance.
How To Format An External Hard Drive That Is Not Visible
If you are looking for help on how to format an external hard drive that is not visible in Windows 10, then you have come to the right place. It can be quite troublesome if your external hard drive is not being seen in Windows 10, but with the right knowledge and steps, you can get it formatted and working in no time.
To get started, you will need to open the File Explorer and check if the external hard drive is listed there. If it is not, then the external hard drive may be malfunctioning and either needs to be replaced or repaired. However, if the external hard drive is visible in the File Explorer but not visible in the Disk Management utility, then you can follow these steps to format it:
- Right-click on the Start menu and select the “Disk Management” option.
- Once the utility is open, look for your external hard drive in the list of disks.
- If the external hard drive is visible in the list, right-click on it and select the “Format” option.
- In the Format window, choose the file system that you want to use for the external hard drive and click “OK”.
- Wait for the formatting process to complete and the external hard drive will be ready for use.
Once the external hard drive is formatted, you can use it to store your data and access it from any computer. Just make sure that you create regular backups of your important data so that you don’t lose it in case of any unforeseen issues.
Format External Hard Drive Windows 11
Formatting an external hard drive on Windows 10 is a simple process that will ensure your drive works properly and is secure. This guide will walk through the steps you need to take to format your external hard drive in Windows 10 so you can start using it in no time.
Before you get started, make sure you have all the necessary materials. You will need the external hard drive, a storage device that you intend to use, and a computer with Windows 10 installed. You will also need a USB cable to connect the drive to the computer.
Once you have all the necessary components, follow the steps below to format your external hard drive:
- Connect the external hard drive to your computer using the USB cable.
- Open File Explorer, type in “This PC” into the search bar, and select the result.
- Right-click on the external hard drive and select “Format”.
- Choose the appropriate File System, such as NTFS, exFAT, or FAT32.
- Select “Quick Format” and click “Start”.
- Once the formatting process is complete, click “OK”.
Your external hard drive is now ready for use. Just remember to always back up your important files and documents to another device or cloud storage.
How To Format External Hard Drive Windows 7
Formatting an external hard drive in Windows 10 is a straightforward process with a few simple steps. To begin, connect your external hard drive to the computer, either via USB or FireWire. Once the drive is connected, open up the File Explorer, which can be found by clicking the folder icon on the Windows Taskbar.
Once you have located the drive, right-click and select the “Format” option. A new window will appear and you will be asked to select a format. Choose either the NTFS or exFAT file system, depending on your needs. You can also choose to give the drive a label and/or quick format it. Once you have made your selections, click the “Start” button to begin the formatting process.
Depending on the size of the drive, this may take a few minutes. Once the process is complete, the drive will be ready to use. If you are formatting an external drive to use with both Windows and macOS, then you will need to format the drive with the exFAT file system. To do this, follow the same steps as above, but select the exFAT file system from the drop-down menu instead of NTFS.
How To Format External Hard Drive Windows 10 Cmd
Formatting an external hard drive in Windows 10 is an easy and straightforward process. Windows 10 has a built-in Disk Management tool that enables users to easily partition and format a hard drive. To format an external hard drive in Windows 10, the following steps must be followed:
- Connect the external hard drive to your computer.
- Open the “This PC” window. (Right click on the Windows icon at the bottom left corner of your screen and select “This PC”)
- Right-click on the external hard drive and select “Format…”.
- A “Format” window will appear. Select the file system (NTFS, exFAT, FAT32, etc.) that you want to use for the external hard drive.
- Enter a label for the external hard drive and check the “Quick Format” checkbox.
- Click “Start” to begin the formatting process.
- Once the formatting is completed, click “OK” to finish the process.
When formatting an external hard drive, users must keep in mind that it will erase all the data on the drive. Therefore, it is recommended to back up the data before formatting the drive. Additionally, formatting the drive will also change the file system of the drive. As a result, the drive may not be compatible with other operating systems.
Reformat External Hard Drive Mac
Reformatting an external hard drive on a Mac is a straightforward process. There are several different ways to do this, depending on the type of hard drive and the desired file system. The easiest way to reformat an external hard drive on a Mac is to use the Disk Utility application. Disk Utility can be found in the Utilities folder in the Applications folder.
When the application is opened, the connected external hard drive should appear in the left-hand pane. Select the drive and click the ‘Erase’ tab at the top of the window. A drop-down menu should appear with several file system options. Choose the desired file system and click the ‘Erase’ button in the lower right-hand corner. This will erase all data and reformat the hard drive with the chosen file system. Another option for reformatting an external hard drive on a Mac is to use the Terminal application.
Terminal can be found in the Utilities folder in the Applications folder. When Terminal is opened, the user can type the command ‘diskutil eraseDisk JHFS+ [name] [disk]’, substituting ‘[name]’ with the desired name for the hard drive and ‘[disk]’ with the disk number of the hard drive. After the command is entered, the hard drive will be reformatted with the Journaled HFS+ file system.
How To Format A Hard Drive With Windows On It
Formatting an external hard drive with Windows 10 is a simple process that only takes a few steps. To begin, connect the external hard drive to your system. Once the drive is connected, open the File Explorer window by clicking on the icon in the taskbar. When the File Explorer window opens, right-click on the external hard drive and select the “Format” option. This will open a new window where you can choose the file system you want to use for the drive.
For most drives, the default option of NTFS or exFAT is the best choice. You can also choose to enable quick formatting, which will format the drive faster but may not be as secure as a full format. After making your selections, click the “Start” button to begin the formatting process. When the formatting is complete, the drive will be ready to use.
You can now store files on the drive or use it to back up your computer. It is important to remember to regularly back up your files on the external drive to ensure that you do not lose your data in the event of a computer crash or hard drive failure.
2021-2022 APPROVED!!! | HOW TO FIND AND FORMAT EXTERNAL HARD DRIVES TO NTFS AND exFAT | PC | Xbox
Formatting an external hard drive for Windows 10 is a simple task that anyone can complete in a few steps. It is important to ensure that the external hard drive is formatted correctly to ensure that it works properly with Windows 10.
By following the steps outlined above, you can quickly and easily format an external hard drive for Windows 10 and enjoy the benefits of additional storage space. Properly formatted external hard drives can provide you with the extra space you need to store photos, music, documents and other files without taking up valuable space on your computer.
Conclusion
When deciding whether to format your external hard drive to NTFS or ExFat, it is important to understand the differences between the two. NTFS is more secure, supports larger files, and allows you to password protect files. ExFat supports larger files, is more efficient than NTFS, but lacks the security features of NTFS. If you are using a Windows computer, you can use either NTFS or ExFat. However, if you are using a Mac computer, you must use ExFat.