


How To Install Network Adapter Driver Windows 10 Without Internet?

Installing a network adapter driver without internet access may seem like a daunting task, but it is actually quite simple and can be done with just a few steps. Follow these steps to install a network adapter driver without internet access:
- Connect the network adapter to the computer.
- Search and download the correct network adapter driver.
- Open the downloaded driver file.
- Accept the agreement.
- Follow the installation instructions.
- Restart the computer.
Can You Install Network Adapter Without Internet?
Installing a network adapter without internet access is an easy process. All you need is the network adapter and a computer with a compatible operating system. However, the exact steps may vary depending on the type of network adapter and operating system you are using.
The first step is to insert the network adapter into the computer. Most network adapters will plug directly into the USB port of your computer, though some may require an additional port. Once the adapter is plugged in, the operating system will detect the new device and prompt you to install the necessary drivers. The next step is to install the drivers for the network adapter. The drivers can typically be downloaded from the manufacturer’s website, though some may come on a CD included with the adapter.
Once the drivers are successfully installed, the network adapter should be ready for use. Keep in mind that if you are using a wireless network adapter, you will need to configure the device in order to connect to a wireless network. This can usually be done using the software provided with the adapter, though you will need to have access to a wireless network in order to complete the configuration.
Overall, installing a network adapter without internet access is a straightforward process. All you need is the adapter and a compatible operating system, and you should be able to get the device up and running in no time.
How Do I Manually Add A Network Adapter In Windows 10?
Adding a network adapter to Windows 10 can be done manually in a few steps. To begin, you will need to open the Control Panel. On the Control Panel, select the Network and Sharing Center option. Under the Change Adapter Settings, select Add and then select Network Adapter. This will open the Add Hardware Wizard which will allow you to choose the type of network adapter that you would like to add.
Once you have selected the appropriate network adapter, click on the Next button and follow any further instructions provided. After installation, restart your computer and the network adapter should be visible in the Network and Sharing Center. You can also add a network adapter through the Device Manager. To do so, open the Device Manager from the Control Panel.
Select the Network Adapters category and click on the Add button. This will open the Add Hardware Wizard where you will be able to select the type of network adapter you would like to install. Follow any further instructions provided and restart your computer when prompted. The network adapter should then be visible in the Network Adapters category of the Device Manager.
How Do I Manually Install A Wireless Adapter Driver?
Installing a wireless adapter driver manually can be a challenge, but it is not impossible. The first step is to identify your adapter and find the correct driver for it. You can do this by visiting the manufacturer's website and searching for your model, or checking the product manual. Once you have downloaded the driver, you should unzip it and run the setup file. This will install the driver software onto your system.
If any additional instructions are provided by the manufacturer, you should follow them. If the manufacturer does not provide any additional instructions, you should proceed with the installation. The installation process typically involves clicking on the “Install” button within the installation window, then following the prompts in order to complete the installation. Once the installation is complete, you should be able to connect to the internet using your adapter.
In some cases, it may be necessary to reboot your computer in order to complete the installation. Make sure to save any unsaved work before rebooting. Additionally, you may need to configure your network settings in order to establish a connection. This can be done through the “Network and Sharing Center” in the Control Panel.
How Can I Download Drivers Easily Without Internet?
Drivers are essential components of a computer system. Without the correct drivers installed, your computer won't function properly. Unfortunately, not everyone has access to the internet in order to download the correct drivers. Fortunately, there are a few methods that you can use to download drivers even if you don’t have access to the internet.
One of the most common ways to download drivers without an internet connection is to use a driver update utility. Driver update utilities are programs that scan your computer for outdated drivers and then download the latest versions for you. All you have to do is install the program and it does all the work for you.
Another option is to download drivers onto a USB flash drive from another computer with internet access. Once the drivers have been downloaded, you can use the USB drive to transfer the files to your computer. You then have to install the drivers on your own computer.
Finally, you can also purchase driver repair discs from the manufacturer. These discs will contain the latest drivers for your computer and you can install them directly from the disc. Overall, there are several ways to download drivers without an internet connection. Depending on your situation, you can choose the method that works best for you.
How To Install Network Adapter Driver Without Internet Windows
Installing a network adapter driver without internet access can seem like a daunting task. However, with the right preparation, it is a relatively easy process. This tutorial will explain how to install a network adapter driver without internet access in Windows 10.
Firstly, you will need to download the correct driver for your network adapter. This can be done by searching for the name of your network adapter and downloading the corresponding driver. Once the driver is downloaded, you need to transfer it to the computer with no internet access. This can be done by using a USB flash drive or any other external storage device.
Once you have transferred the driver, open the Device Manager. You can do this by pressing the Windows key + X and selecting Device Manager from the list. Find your network adapter in the list and right-click on it. Select Update Driver and then select 'Browse my computer for driver software'. Point the driver software to the folder where you downloaded the driver. The installation process should then begin and should be completed within a few minutes.
After the installation is complete, restart your computer and your network adapter should now be working. This method can also be used to install other types of drivers, such as audio and video drivers, without internet access.
How To Install Network Adapter Driver Windows 10 Without Internet
Installing a network adapter driver on Windows 10 without an internet connection can be tricky but not impossible. It requires you to have the driver files available on a USB drive or CD. To install the driver, you need to open the Device Manager and then update the driver from the USB drive. This guide will explain how to do this in a few simple steps.
1. Firstly, plug in the USB drive that contains the driver files into the computer.
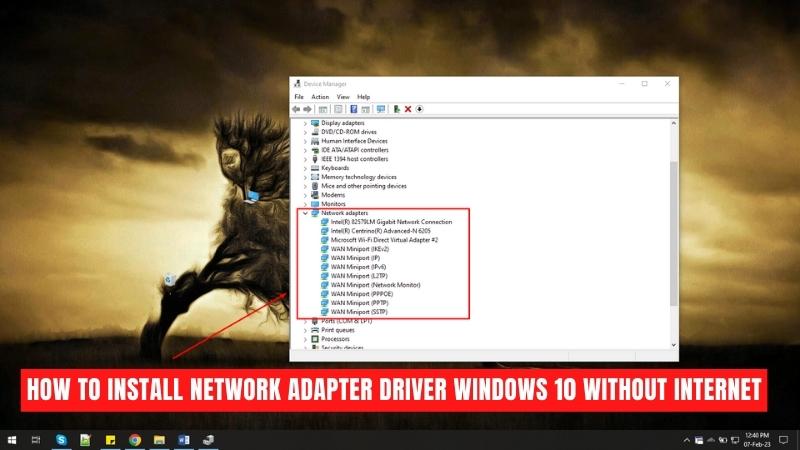
2. Then, open the Device Manager by pressing the Windows key + X and selecting Device Manager.
3. Next, find the Network Adapters section and right-click on the network adapter you wish to install the driver for.
4. From the drop-down menu, select Update Driver.
5. A new window will open, in which you'll need to select the option that reads "Browse my computer for driver software".
6. Now, navigate to the USB drive and select the driver files from its contents.
7. Finally, click the Install button to initiate the installation process. Once the installation is complete, you should be able to access the internet with your network adapter.
It's important to note that you should only install drivers from a trusted source, as any malicious drivers can cause damage to your computer.
How To Install Drivers Without Internet Or Cd Or Usb
Installing a network adapter driver without internet or CD or USB can be done using Windows 10's Device Manager. It is important to know the exact model and type of the network adapter that is installed in your computer, as this will help you download the right driver version. To install the network adapter driver without internet, CD or USB:
- Open Device Manager by right-clicking on the Windows Start menu and selecting Device Manager.
- Expand the Network Adapters section.
- Right-click on the network adapter and select “Update Driver Software”.
- Select “Browse my computer for driver software”.
- Select “Let me pick from a list of device drivers on my computer”.
- Click “Have Disk” and browse to the folder where the driver is stored.
- Select the driver from the list and click “Next”.
- Click “Install” and wait for the installation to finish.
- Click “Close” when the installation is complete.
Once the driver is installed, you can check the status of the network adapter in Device Manager. If the driver is installed correctly, the status should be “This device is working properly”. You can then connect your computer to the internet and the network adapter will function properly.
How To Install Network Drivers Without Internet
If you don't have access to an internet connection, you can still install your network adapter driver on Windows 10. To do this, you will need to have the driver setup file stored on a disk or USB drive.
- Insert the disk or USB drive into your computer and open the driver file.
- The setup wizard will show up on the screen and guide you through the installation process. Follow the onscreen instructions and click “Next” to continue.
- Once the driver is installed, Windows will detect the new hardware and ask you to restart your computer.
- After restarting, your network adapter will be ready to use.
Although installing the driver without an internet connection can be more complicated, it is still possible. As long as you have the driver setup file stored, you can install the network adapter without any issue. Make sure to keep the driver setup file in a safe place for future use.
How To Install Wireless Network Adapter Windows 10
Installing a wireless network adapter in Windows 10 is a fairly straightforward process.
The first step is to determine what type of adapter you will need. This will depend on your current setup and the type of network you are connecting to. Once you have determined what type of adapter you will need, you can then proceed with the installation.
The next step is to connect the adapter to your PC. If you are using a USB adapter, simply plug it into an available USB port. If you are using a PCI adapter, then you will need to open up the computer case and install the card into an available PCI slot. Once the adapter is connected, you will need to install the network driver.
Unfortunately, if you do not have access to the internet, then you will need to install the driver manually. To do this, you will need to locate the driver on the CD that came with the adapter and then install it from there. After the driver is installed, you should then be able to connect to the wireless network.
- Step 1: Determine the type of adapter you need.
- Step 2: Connect the adapter to your PC.
- Step 3: Install the network driver manually from the CD.
- Step 4: Connect to the wireless network.
Windows 10 Network Adapter Driver
Installing a network adapter driver on Windows 10 without an internet connection can be a bit tricky, but it is possible. The first step is to acquire the correct driver for your network adapter. If you have the driver installation disk from the manufacturer, you can use that.
Otherwise, you can download the driver from the manufacturer’s website. Once you have the driver, you need to transfer the driver to the computer without an internet connection. This can be done by burning the driver onto a CD or transferring it via a USB flash drive. Once the driver is on the computer, you can install it. To do this, head to Device Manager, right-click on the network adapter, and select Update Driver.
Then select Browse My Computer for Driver Software, and then select the location where you transferred the driver from. The driver should then be installed. Once the driver is installed, you should be able to access the internet and use your network adapter. If you are unable to access the internet due to no driver being installed, you may still be able to install the driver manually.
To do this, open the Command Prompt as administrator and enter “pnputil -i -a ”, where is the path to the driver’s .inf file. This should install the driver. Once the driver is installed, you should be able to access the internet and use your network adapter.
How To Install Wifi Driver In Windows 10
If you need to install a network adapter driver on Windows 10 without an Internet connection, you have a few options. You can either use another computer to download the driver and transfer it to the computer you need to install it on, or you can use a driver installation disc or USB drive.
- Using a Different Computer:
- On the computer you need to install the driver on, note the make and model of the network adapter.
- On the other computer, go to the manufacturer's website and search for the driver.
- Download the driver and save it to a USB drive or other storage device.
- Transfer the driver to the computer you need to install it on.
- Open the driver file and follow the instructions to install it.
- Using a Disc or USB Drive:
- If you have the driver disc or USB drive, insert it into the computer you need to install the driver on.
- Open the driver file and follow the instructions to install it.
Once the driver is installed, you should be able to connect to a network. Make sure to update the driver regularly to ensure your computer is running the most recent version.
Wifi Drivers For Windows 10 64-bit
Installing a network adapter driver in Windows 10 without an internet connection can be a bit tricky. However, with the right drivers, it is possible to get the driver installed without requiring an internet connection. Here is a step-by-step guide on how to do it.
- Download the correct driver for the network adapter you want to install. This should be available on the maker website of the network adapter.
- Copy the driver to a USB drive.
- Connect the USB drive to the computer that needs the driver.
- Go to Device Manager and find the network adapter that needs the driver.
- Right-click on it and select ‘Update Driver Software’.
- Select ‘Browse my computer for driver software’.
- Select ‘Let me pick from a list of device drivers on my computer’.
- Click ‘Have Disk’.
- Select the USB drive that contains the driver and click ‘OK’.
- Click ‘Next’ to install the driver.
Once you have followed the steps above, the driver should be installed without requiring an internet connection.
How to Install Any Laptop Wi-Fi Driver without Internet for Windows 10/8/7
Installing a network adapter driver on Windows 10 without an internet connection can be a challenging task, but with the right tools and steps, it doesn't have to be. With the right resources and knowledge, you can install a network adapter driver on Windows 10 without an internet connection.
By following the simple steps outlined in this article, you can successfully install a network adapter driver on Windows 10 without an internet connection, giving you the ability to connect to a network and enjoy the internet.