


How To Turn Off Auto Brightness Windows 10?

For Windows 10 users, it is important to understand how to turn off auto brightness. Auto brightness is a feature that helps to adjust the display brightness based on the ambient lighting.
This can be a useful feature in certain situations, but if you do not need it, it is best to switch it off. Here is how to turn off auto brightness in Windows 10:
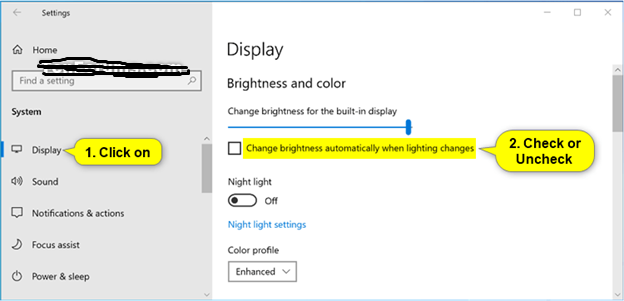
- Go to the Windows 10 Settings > System > Display
- Under the 'Brightness and Color' section, you will find the 'Change brightness automatically when lighting changes' toggle
- Switch the toggle off to turn off auto brightness
How Do I Turn Off Auto-brightness On My Computer?
Depending on what type of computer you are using, the process for turning off auto-brightness may be different. Most computers have a setting that can be adjusted in the computer settings or control panel. For Windows computers, the settings can be accessed via the Control Panel.
Go to the Control Panel, select the Display option, and then select the option to adjust the brightness and color.
Depending on the version of Windows you are using, you may have to click on the Advanced Settings option before you can adjust the brightness. Once you are in the settings, you can turn off the auto-brightness setting. For Mac computers, the settings can be accessed through the System Preferences menu. Go to the System Preferences, select the Display option, and then select the option to adjust the brightness and color. You can then turn off the auto-brightness setting.
For computers running Linux, the settings can be accessed through the desktop environment. Depending on the desktop environment you are using, the settings may be accessed differently. In most cases, you can access the settings through the Display Settings option. Once you are in the settings, you can turn off the auto-brightness setting.
How Do I Turn Off Auto-brightness On My Laptop Windows 10?
Auto-brightness on laptops is a convenient feature that adjusts the screen brightness according to the environment’s lighting. However, some users may find it annoying and distracting.
Fortunately, Windows 10 makes it easy to turn off auto-brightness and manually adjust the screen brightness. To turn off auto-brightness on a laptop running Windows 10, follow these steps:
- Go to the Start menu and select Settings.
- Click on System.
- Select Display.
- Find the “Change brightness automatically when lighting changes” setting and turn it off.
- Adjust the Brightness level to your desired setting.
Once you’ve completed these steps, the auto-brightness settings on your laptop will be disabled and you can manually adjust the brightness level.
This can be useful for users who find the auto-brightness feature too distracting or annoying.
Why Is My Brightness Changing By Itself Windows 10?
Many Windows 10 users have reported that their screen brightness changes by itself. This can be quite annoying and can affect your productivity. Fortunately, there is a way to fix this issue. The first step is to identify the root cause. This issue can be caused by a variety of reasons, including a faulty driver, incorrect settings, or a hardware problem.
To determine the cause, you can try restarting your computer, updating your drivers, and changing your power settings. If the problem persists, it is likely due to a hardware issue and you may need to contact a technician. Once you have identified the cause, you can take the necessary steps to resolve the issue. If the problem is due to a driver issue, you can update the driver or reinstall it.
You may also need to adjust your power settings and make sure that the correct settings are selected. If the issue is due to a hardware problem, you may need to replace a faulty part. Troubleshooting screen brightness issues on Windows 10 can be tricky, but with the right steps, you can easily fix this problem. If you are unable to find a solution, you may need to contact a technician for assistance.
How Do I Turn Off Auto-brightness On HP Windows 10?
Auto-brightness is a feature that is available on some HP Windows 10 devices that automatically adjusts the brightness of the display to the lighting conditions in the room.
If you do not want to use this feature, you can easily turn it off. To turn off auto-brightness on HP Windows 10:
- Open the Start menu and select Settings.
- Select System and then select Display.
- Scroll down to the "Brightness and color" section.
- Under the "Brightness" section, uncheck the box next to "Change brightness automatically when lighting changes".
After you have followed the steps above, your auto-brightness setting should be turned off. You can now make manual changes to the brightness settings on your HP Windows 10 device.
You can also turn the auto-brightness setting back on by following the same steps and checking the box next to "Change brightness automatically when lighting changes".
Turn Off Auto Brightness Windows 11
Windows 10 has a feature called Adaptive Brightness, which is designed to adjust your display's brightness based on ambient lighting levels. While this feature is convenient in some situations, you may prefer to set your own brightness level manually.
Fortunately, you can easily turn off the Adaptive Brightness feature in Windows 10. To turn off Adaptive Brightness, open the Settings app by pressing the Windows key + I. Then, select System. Next, select Display from the left-hand side menu.
Finally, locate the "Change brightness automatically when lighting changes" toggle and turn it off. You can also adjust your display brightness manually. To do this, open the Settings app by pressing the Windows key + I. Then, select System. Next, select Display from the left-hand side menu. Finally, locate the "Change brightness" slider and adjust it to your desired level.
Enable Adaptive Brightness Windows 10 Missing
Adaptive Brightness is a Windows 10 feature that adjusts your display brightness automatically based on the environment lighting. If you find that the auto brightness feature is not working properly, you may want to turn it off. Here are the steps to do so:
- Open the Settings app by pressing the Windows + I keyboard shortcut.
- Select System from the Settings menu.
- Select Display from the left pane.
- Scroll down and turn off the toggle under the Brightness and color section.
Once you have turned off the auto brightness feature, you will need to manually adjust the brightness of your display. You can do this by going to the same Brightness and color section and dragging the slider to the desired setting.
Alternatively, you can use the keyboard shortcut Windows + A to open the Action Center and adjust the brightness from there. If the auto brightness feature is still not working properly, you may need to update your display driver. You can do this by going to Device Manager, finding your display driver, and then choosing the Update Driver option from the context menu.
Can't Find Enable Adaptive Brightness
If you are having trouble finding the setting to turn off auto brightness in Windows 10, this guide will show you how to do it. To turn off auto brightness in Windows 10, you will need to open the Settings app. To do this, click the Start Menu and select "Settings".
Once the Settings window is open, click on "System" and select "Display" from the left-hand column. Scroll down until you see a setting labeled "Change brightness automatically when lighting changes". Toggle this setting off to disable auto brightness. Alternatively, you can adjust the brightness manually by clicking "Brightness and Color" and then adjusting the brightness slider.
This will allow you to manually set the brightness level of your screen. If you want to make sure that auto brightness is turned off, you can open the Windows Mobility Center. To do this, press the Windows Key + X and select "Mobility Center" from the menu. Under the "Display" section, you should see a setting labeled "Adaptive Brightness". Make sure the box next to this setting is unchecked.
Adaptive Brightness On Or Off
Adaptive brightness is a feature that adjusts the brightness of the display based on the light of the environment. This can be very useful in conserving battery power and reducing the strain on your eyes.
However, some people may find that they prefer to have the same brightness all the time, or they may not like the way the brightness changes from one moment to the next. If you are one of those people, you can turn off the auto brightness feature on Windows 10. To turn off adaptive brightness on Windows 10, follow these steps:
- Open the Settings app by pressing the Windows Key + I or searching for the app in the Start Menu.
- Click on System.
- Click on Display.
- Scroll down to the “Brightness and color” section.
- Turn off the toggle next to “Change brightness automatically when lighting changes.”
Once you have disabled the feature, your display should stay at the same brightness level, no matter what the environment is like. If you ever want to turn the feature back on, simply follow the same steps and turn the toggle back on. Keep in mind that if you do this, your display brightness will be adjusted automatically based on the lighting conditions.
Turn Off Adaptive Brightness Iphone
If you are an iPhone user, you may have noticed that your device's display brightness automatically adjusts depending on the ambient light. This feature is called adaptive brightness and is enabled by default. If you're not a fan of this feature, you can easily turn it off.
- Open the Settings app on your iPhone.
- Select the "Display & Brightness" option.
- Toggle the "Adaptive Brightness" switch to the "Off" position.
Once you have disabled adaptive brightness, you can adjust the brightness of your device manually by using the slider. You can also set up a schedule for when your device will automatically adjust the brightness. To do this, select the "Automatic" option and then select the time frames when your device will adjust the brightness.
Disabling adaptive brightness is a great way to customize the display of your iPhone and make sure that your device's brightness is always set to your preferred level.
Windows 11 Brightness Driver Download
If you are using Windows 10 and are looking for an easy way to turn off the auto-brightness setting, you have come to the right place. Auto-brightness is a feature that automatically adjusts your screen brightness depending on the ambient light conditions.
This can be helpful for some people, but can be annoying for others who don’t want their screen brightness changing all the time. Fortunately, it is easy to turn off auto-brightness in Windows 10.
- Open your Windows 10 Settings menu by pressing the Windows key + I
- Select System from the menu options
- Click on Display from the menu options on the left-hand side
- Scroll down to the Brightness and Color section
- Turn off the option for Change brightness automatically when lighting changes
- Close the Settings menu
That’s all it takes to turn off auto-brightness in Windows 10. Once you have done this, your screen brightness will remain the same no matter what the lighting conditions are. Of course, you can still adjust your brightness manually if needed.
How To Turn Off Adaptive Brightness Android?
Adaptive brightness is an energy-saving feature that automatically adjusts the brightness of your device's display.
On Android devices, it can be really helpful, but it can also be quite annoying if it's too dim or too bright. Fortunately, it's easy to turn off adaptive brightness on Android.
- Open the Settings app on your device.
- Tap on the Display tab.
- Scroll down and tap on Brightness.
- Toggle the Adaptive Brightness switch off.
Once you've turned off adaptive brightness, you can manually adjust the brightness of your device's display by dragging the slider to the left or right. You can also enable the Automatic brightness switch to enable the feature again. Keep in mind that some Android devices may have slightly different steps or settings, so be sure to check your device's user manual if you can't find the settings.
Adaptive Brightness Windows 11
Adaptive brightness is a Windows 10 feature that helps conserve battery life by adjusting the display brightness based on the current lighting conditions. This feature can be useful in certain situations, but it can also be annoying if it keeps changing the brightness when you don't want it to. Fortunately, you can easily turn off auto brightness in Windows 10.
- Open the Settings app by pressing the Windows key + I on your keyboard.
- Go to System > Display.
- Select Change brightness automatically when lighting changes to toggle the feature off.
Once you have disabled the auto brightness feature, you can manually adjust the brightness of your display to your liking by clicking and dragging the slider in the Brightness and color section. Additionally, you can also adjust the brightness of your display by pressing the Windows key + A and then clicking the brightness icon at the bottom of the Action Center.
How To Turn Off Automatic Brightness Windows 10 - 4 Fix
Turning off auto brightness in Windows 10 is a great way to make sure your device is always at the optimal brightness level. With just a few clicks, you can customize your brightness settings to ensure that your device is always as bright or as dim as you'd like it to be.
By following the simple steps outlined in this article, you can easily turn off auto brightness and make sure your Windows 10 device is always working the way you want it to.