


How To Rip Cds In Windows 10?

Ripping CDs to your computer is a great way to store and access your music library. Windows 10 makes it easy to do this with its built-in tools. In this tutorial, we'll show you how to rip CDs in Windows 10.
- Insert the CD into your computer's CD/DVD drive.
- Open Windows Media Player.
- Click the Rip CD button.
- Choose your audio quality.
- Click the Rip button.
- Wait for the ripping process to complete.
- Eject the CD.
Where Is The Rip CD Button In Windows 10 Media Player?
The Rip CD button in Windows 10 Media Player can be found under the ‘Rip’ tab. This tab is located in the top navigation bar of Windows 10 Media Player. To access it, open Media Player and click the ‘Rip’ tab at the top of the page.
This will open the tab and the Rip CD button will be located in the top left corner. The Rip CD button allows users to rip audio CDs into Windows Media Player. The ripped audio files can then be accessed through the Media Library.
Once the audio CD has been ripped, users can then edit the ripped files by changing the track order, adding album art, and editing the tags. To do this, click the Rip Music tab in the Navigation Pane and select the album.
Then click the Edit tab and select the track you want to edit. Here you can make changes to the track information and album art. Once the changes have been saved, the ripped audio files can then be burned to a CD, synced to a portable device, or shared with other devices.
How Do I Rip A CD To Mp3 On Windows 10?
Ripping a CD to an MP3 format on Windows 10 is a fairly easy process. You will need a CD drive, a computer with Windows 10, and an audio application like Windows Media Player or iTunes.
You will also need a media player that supports MP3 format. To begin, insert your CD into the CD drive of your computer. Open the media player application that you have chosen. The application will detect the CD and display its contents in the media player window.
Select the songs from the CD that you want to rip. Make sure to select the MP3 format for the files. When you have selected the songs that you want to rip, click on the “Rip” button.
The songs will now be ripped to your computer in MP3 format. Depending on the size of the songs, this process may take a few minutes. When the ripping process is complete, you can find the songs in the folder you have specified as the destination folder.
You can now play the songs on your computer or transfer them to a portable device. You can also use the songs in other applications, such as a video editor or a music-making program.
Why Won't Windows Media Player Let Me Rip A CD?
Ripping a CD in Windows Media Player can be a tricky task. It requires a few simple steps to be completed in order for the process to go smoothly. If any of the steps are skipped, or done incorrectly, it can lead to the CD being unplayable in the media player.
The first step is to make sure the CD is inserted into the computer's CD or DVD drive. Then, open Windows Media Player and select the Rip settings button. In this menu, you will be able to select the format you want the CD to be ripped in. This must be done correctly, as it will determine how the CD will be playable in the media player.
Once you have made your selection, click OK and the ripping process will begin. The rip settings can also be adjusted in the Options menu. This is where you can choose to have the media player automatically manage your music library, as well as select the destination folder for the ripped files.
This can be useful if you want to keep your music library organized. If you have followed all the steps outlined above and the CD still won't rip, then the issue may be with the CD itself. It may be scratched or damaged, preventing the media player from being able to read it. If this is the case, then you may need to purchase a new CD.
What Is The Best Way To Rip My CD Collection?
The best way to rip your CD collection is by using a digital audio converter. Digital audio converters are specifically designed to extract audio from CDs and convert it into a digital format.
This format is usually in a compressed format such as MP3 or WAV, which can be easily stored on a computer or other digital audio device. When selecting a digital audio converter, it is important to consider the type of audio files that you want to rip.
Some converters may only be able to extract audio in certain formats, while others may be able to work with a variety of formats. Additionally, some digital audio converters may come with a variety of features such as the ability to edit or normalize the audio after extraction.
Once you have chosen a digital audio converter, you can begin to rip your CD collection. This process is relatively straightforward, as all you need to do is insert the CD into the converter and select your desired format.
From there, the converter will take care of the rest, extracting the audio and converting it into the specified format. After the audio has been successfully converted, you can transfer the files to your computer or other device.
How To Rip A Cd On Windows 11
Ripping CDs in Windows 10 is an easy and straightforward process. All you need to do is insert a CD into your computer, open Windows Media Player, and then start the ripping process.
To begin ripping a CD in Windows 10, insert the CD into your computer. Once the CD is inserted, open Windows Media Player. If Windows Media Player doesn’t open automatically, you can access it from the Start menu.
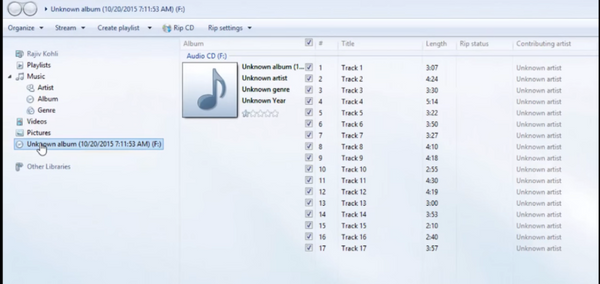
Once Windows Media Player is open, you will see the CD appear in the navigation pane on the left side of the window. To select the CD, simply click on it. This will open the CD’s contents on the right side of the window. Here, you will be able to select the songs you would like to rip.
To do this, simply check the box next to each song. Once you have selected the songs you would like to rip, click the Rip CD button at the top of the window. This will open the Rip settings dialog box, which allows you to choose the format you would like to rip the songs in, the location you would like the files to be stored, and more.
Once you have made your selections, click OK to start the ripping process. Windows Media Player will then begin ripping your CD. Once the ripping process is complete, the songs will be stored in the location you specified, in the format of your choice.
Where Is The Rip Cd Button In Windows 10
Ripping CDs in Windows 10 is a simple process that you can complete in just a few steps. The program that you will use to rip the CD is Windows Media Player. Windows Media Player is a music library and player that is built into Windows 10. To rip a CD using Windows Media Player, you will need to connect the CD drive to your computer.
1. Open Windows Media Player.
2. Insert the CD into the drive.
3. If a notification appears, select the options to 'Rip Music' and 'Copy to Music Library'.
4. Select the Rip Settings option.
5. From the drop-down menu, select the Audio Quality that you want to rip the CD at.
6. Select OK.
7. You will then be prompted to select the songs you want to rip. Select the songs that you want to rip and then click on the Rip button.
8. You will then see a progress bar showing the status of the ripping process.
9. When the ripping is complete, you will see the ripped songs in the Music folder in the Library of Windows Media Player.
Rip Cd Windows Media Player
Ripping a CD in Windows 10 can be done with the Windows Media Player program. Windows Media Player is a versatile media player that allows you to play digital music, videos, and photos.
It also provides an option to rip your CDs into digital audio files, such as WAV and MP3. Ripping a CD means to extract all the audio information from the CD and save it as a digital audio file on your PC.
To rip a CD with Windows Media Player, launch Windows Media Player and insert a CD into the CD/DVD drive. A message will appear in the Player Library asking you what you want to do with the CD.
Select the option “Rip CD” from the drop-down list. The CD ripping process will begin and the ripped audio tracks will be added to your Windows Media Player library. The ripped audio files will be in the WMA (Windows Media Audio) format.
If you would like to rip the CD in another audio format such as MP3, click the arrow next to the Rip button in the top right-hand corner of the application window and select “More Options”. In the Rip Music tab, select the format from the “Format” drop-down menu.
When you are finished, click “Apply” and then “OK” to save the settings. Click the Rip button to begin the CD ripping process in the new format. Ripping a CD in Windows 10 using Windows Media Player is a straightforward process.
All you need to do is launch Windows Media Player, insert a CD, select the “Rip CD” option, and the audio tracks will be extracted and saved to your PC. You can also choose to rip the CD in another audio format such as MP3.
Rip Cd To Mp3 Windows 10
Ripping a CD to an MP3 format in Windows 10 is the process of copying data from an audio CD to your computer and then converting it into a digital audio format.
This guide will provide you with step-by-step instructions on how to rip CDs in Windows 10. Before you begin, make sure you have a CD/DVD drive installed on your computer.
You will also need a program to convert the CD audio content into an MP3 file. Many audio players, such as Windows Media Player and iTunes, can do this. To rip a CD to an MP3 file in Windows 10:
- Insert the CD into your computer’s CD/DVD drive.
- Open the program you wish to use to rip the CD.
- Open the CD in the program. This will list the tracks on the CD.
- Select the tracks you wish to rip and click the “Rip” button.
- Choose the format you wish to use for the ripped audio. MP3 is the most popular.
- Choose a file location for the ripped audio. This is where the audio will be saved.
- Click the “Start” button to begin the ripping process.
- Wait for the ripping process to complete. Depending on the speed of your computer and the size of the CD, this may take a few minutes.
- Once the ripping is complete, you will have an MP3 file of the audio from the CD.
Ripping CDs to an MP3 format in Windows 10 is a simple process that can be done quickly and easily. With this guide, you can be ripping CDs in no time.
How To Copy Songs From Cd To Laptop
Ripping a CD to your laptop is a great way to back up your music, as well as make it more convenient to listen to on the go. The process of copying songs from a CD to your laptop is often referred to as “ripping”. Fortunately, Windows 10 makes it easy to rip music from a CD to your laptop. Before you begin, make sure that you have Windows Media Player installed on your laptop. Windows Media Player is included with Windows 10 and is available to download for free from the Microsoft store. Once you have Windows Media Player installed, you can follow these easy steps to rip music from a CD:
- Insert the CD into the laptop’s CD drive.
- Open Windows Media Player.
- Click the Rip CD button.
- Choose the rip music to this location option and select the folder in which you want to save the ripped music.
- Select the format in which you want the ripped music to be saved.
- Click the Rip button.
- Wait until the ripping process is complete.
- Once the ripping process is finished, the music will be saved in the folder you selected.
Ripping music from a CD to your laptop is a simple process, and Windows 10 makes it easier than ever. With Windows Media Player and a few clicks, you can quickly and easily rip music from your CD and save it to your laptop.
How To Burn Cd To Computer
Ripping a CD to your Windows 10 computer is an easy process that allows you to save the audio tracks to your computer and store them in a digital format. This process is also known as “ripping,” as you are essentially “ripping” the audio from the CD and storing it on your computer. Here are the steps you need to follow to rip a CD to your Windows 10 computer:
- Insert the CD into your computer. A notification will appear, asking what you want to do with the CD. Select “Open folder to view files.”
- The audio files on the CD will appear in a new window. Select the “Rip” tab in the top-right corner of the window.
- Select the audio format you want to use to rip the CD. Your options include MP3, WMA, and WAV. You can also select the audio quality for your ripped file. The higher the quality, the larger the file size.
- Click the “Rip” button. The audio files from the CD will be ripped and stored on your computer. Depending on the size of the audio files, the ripping process may take a few minutes.
- Once the ripping process is complete, you can access the audio files from the “Music” folder in your Windows 10 computer.
Rip Cd To Mp3 Windows 11
Ripping CDs to MP3s in Windows 10 is a relatively easy task, provided you have the right software. With most software, you can rip a CD in a few simple steps. To rip a CD in Windows 10, you first need to install a CD ripping program. There are a variety of available programs, both free and paid. Once you have installed the program of your choice, follow these steps: 1. Insert the CD you want to rip into the CD drive. 2. Open the CD ripping program and select the CD from the list of available drives. 3. Select the format in which you want the ripped files (such as MP3, WMA, or WAV). 4. Select the location on your computer where you want the files to be saved. 5. Click the “Rip” button to start the ripping process. 6. Once the ripping process is complete, you will have a folder containing the ripped files in the location you specified. You can now use the ripped files for whatever purpose you want. You can use them to burn a new CD, listen to them on your computer, or transfer them to your mobile device. With the right software, ripping CDs to MP3s in Windows 10 is a simple process.
How To Burn Cd In Windows 7
Ripping a CD in Windows 10 is an easy process that anyone can do. To begin, you need to have a CD drive in your computer and have the CD you wish to rip inserted into the drive. Once you have the CD ready to go, you can start the process in Windows Media Player. Open Windows Media Player, and select the Rip tab. This tab is located at the top of the screen and looks like a music note with a CD on it. Select the Rip Music tab and then select the format you wish to rip the CD in. The default format is Windows Media Audio, but you can also select MP3, WMA Lossless and WAV. Once you have selected the format, click the Rip CD button. This will begin the ripping process and the status bar will show the progress. When the CD is done ripping, the CD will be ejected and you will see a message that the CD is successfully ripped. You can now find your ripped files in the Music folder in File Explorer. The files will be in the same format you chose when you ripped the CD.
How To Rip Audio CD to MP3 in Windows Media Player | Windows 10 Tutorial
Ripping CDs in Windows 10 is a fairly straightforward process that requires only a few steps. It is a great way to organize your music and make sure you have access to it anytime you want. With the help of the Windows Media Player, you can easily create and manage your music library. Ripping CDs to Windows 10 is a convenient way to enjoy your music without worrying about having the physical CD with you. With a few simple clicks, you can have access to your favorite songs wherever you go.