


How to Check Data Source in Power Bi Desktop?

Data is the lifeblood of any organization, and the need to access and analyze it quickly and accurately is critical for success. Whether you’re a data analyst, business intelligence specialist, or a beginner in the world of data analysis, you may be wondering how to check data source in Power BI Desktop. In this article, we’ll discuss all the steps you need to take to ensure the data you’re using is accurate and up to date. We’ll look at how to access and explore data sources in Power BI Desktop, including how to connect to external data sources, and how to manage and share data within the application. You’ll also learn how to use Power BI Desktop’s built-in data quality tools to check the quality of your data. By the end of this article, you’ll have all the tools and knowledge you need to confidently check data sources in Power BI Desktop.
To check the data source of a Power BI Desktop file, open the report in the Power BI Desktop then select File > Options and settings > Data source settings. A list of the data sources used in the report appears in the window. You can also view the data sources in the Fields section in the Visualizations pane.
If you want to check the credentials of a data source, open the data source settings and select the ellipsis (…) menu beside the data source. You will see the credentials used to connect to the data source.
Overview of Data Sources in Power BI Desktop
Power BI Desktop is a powerful data analytics and visualization tool that can be used to explore data sources and create compelling data visualizations. It enables users to quickly access, analyze, and visualize data from a variety of sources and to easily share their insights with others. By connecting to multiple data sources, users can combine and analyze data from multiple sources to gain deeper insights into their data. In this article, we will discuss how to check data sources in Power BI Desktop.
Connecting to a Data Source
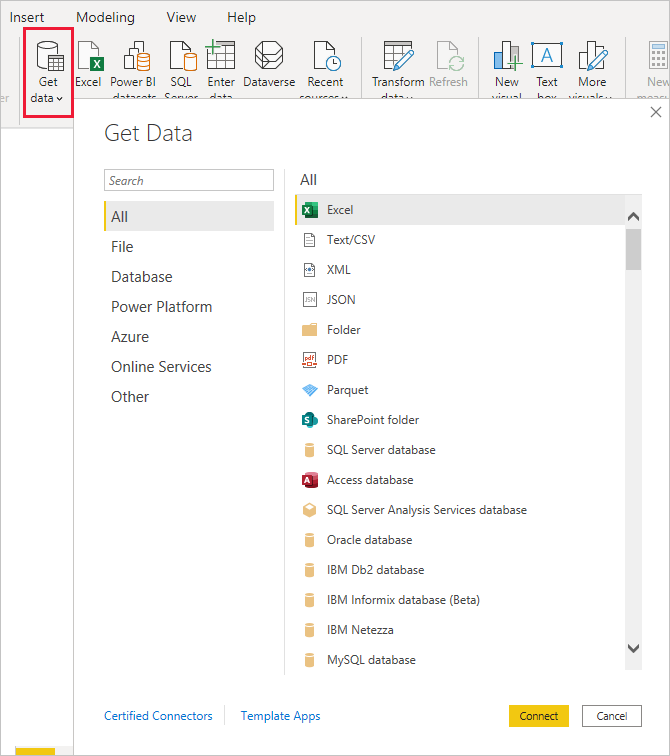
The first step in checking data sources in Power BI Desktop is to connect to the data source. Power BI Desktop offers a wide range of data source connections, including web, on-premises, and cloud-based sources. Users can connect to the data sources directly or through an intermediary such as an ODBC connector. To connect to a data source, users should select the “Get Data” option in the ribbon and then select the appropriate data source.
Once the data source has been connected, users can begin to explore the data by selecting the “Explore” option in the ribbon. This will open the Power BI Desktop query editor, which allows users to explore and transform the data in the data source. From the query editor, users can select the “Data source settings” option to view the available data sources and check if a data source has been connected.
Using the Data Source Settings
The data source settings in Power BI Desktop provide users with an overview of the connected data sources. The data source settings provide users with information such as the data source type, the connection string, and the authentication type. This information can be used to verify that the data source is properly connected and configured.
The data source settings also provide users with the ability to modify the data source connection. Users can modify the connection string, authentication type, and other settings to ensure that the data source is properly configured. Additionally, users can add new data sources or remove existing data sources from the data source settings.
Checking Data Source Connectivity
Once the data source settings have been configured, users can check the data source connectivity. To do this, users should select the “Test” option in the data source settings. This will test the connection to the data source and provide users with the status of the connection. If the connection is successful, users can be sure that the data source has been properly connected and configured.
Using the Query Editor to Test Data Source Connectivity
In addition to the data source settings, users can also use the query editor to test data source connectivity. To do this, users should select the “Advanced Editor” option in the ribbon. This will open the advanced query editor, which allows users to write and execute queries against the data source.
Users can then write a simple query to test the data source connectivity. If the query executes successfully, the data source connection can be considered successful. This is a quick and easy way to check data source connectivity in Power BI Desktop.
Using the Data Source Diagnostics Tool
The data source diagnostics tool in Power BI Desktop provides users with an overview of the data source connection. This tool can be used to check for any errors or warnings in the data source connection. Additionally, the data source diagnostics tool can be used to identify any performance issues that may be impacting the data source connection. This can be used to quickly identify and resolve any issues with the data source connection.
Conclusion
Power BI Desktop provides users with a powerful tool for connecting to and exploring data sources. By using the data source settings, query editor, and data source diagnostics tool, users can easily check data sources in Power BI Desktop. This can help users ensure that their data sources are properly connected and configured.
Related Faq
Q1. What is Power BI?
Answer: Power BI is a suite of business analytics tools to analyze data and share insights. It connects to hundreds of data sources and enables users to create reports and dashboards with interactive visualizations. It also provides real-time insights and collaboration capabilities across multiple devices. Power BI is accessible on the web, desktop, and mobile devices.
Q2. How do I check a data source in Power BI Desktop?
Answer: To check a data source in Power BI Desktop, first open the report you want to check. Then select “Edit Queries” from the Home ribbon. From the Query Editor, select the data source you want to check and select “Source” from the View ribbon. This will open the data source settings window, where you can view the data source’s properties and settings.
Q3. What are the different data sources supported by Power BI?
Answer: Power BI supports a wide range of data sources, including databases, files, and cloud-based services. Some of the supported databases and file types include SQL Server, Excel, Access, CSV, JSON, and XML. It also supports popular cloud-based services such as Salesforce, Google Analytics, Facebook, and more.
Q4. What is the process for connecting to a data source in Power BI?
Answer: Connecting to a data source in Power BI is straightforward. First, select “Get Data” from the Home ribbon. This will open the Get Data window, where you can select the data source you want to connect to. After selecting the data source, you can configure the connection settings and select the data you want to import. Once the data is imported, you can then use it to create visualizations and reports.
Q5. What are the benefits of using Power BI?
Answer: Power BI provides a range of benefits, including improved data analysis, collaboration, and visualization. It allows users to access and analyze data from multiple sources, including databases and cloud-based services. It also enables users to collaborate with colleagues on reports and visualizations. Additionally, Power BI provides an intuitive and interactive visual experience for exploring data.
Q6. How can I share my Power BI report?
Answer: Power BI provides a range of options for sharing your reports. You can share your report with colleagues or external users by sending a link or embedding the report in a website or application. Additionally, you can share the report with users on mobile devices by sending a link or publishing the report to the Power BI mobile app.
Power Bi Data Source Connection: How to change Data source setting in Power bi
In conclusion, understanding how to check data sources in Power BI Desktop is a crucial step in ensuring that the data you are working with is valid and accurate. By following the steps outlined above, you can quickly and easily assess the data sources in your Power BI Desktop project and make sure that the data you are working with is reliable and up to date. Knowing how to check data source in Power BI Desktop is an important skill for any data analyst or business intelligence practitioner.