


Amazing features of the new Microsoft Edge in Windows 11?

Amazing features of the new Microsoft Edge in Windows 11?
When we wrote the first edition of Windows 10 Inside Out back in 2015, this chapter focused on the then-new default browser in Windows 10, Microsoft Edge, and we offered advice on how to make the transition from the previous default browser, Internet Explorer.
Five years later, Internet Explorer is a distant memory, used mostly on enterprise PCs where legacy line-ofbusiness apps require it. Meanwhile, the Microsoft Edge browser that rolled out with Windows 10 in 2015 has been replaced by a brand-new browser, also called Microsoft Edge.
If that seems confusing, well, you’re not alone. Microsoft had high hopes for the original Edge browser (now known as “legacy Edge”), which used a modified version of the Trident browser engine from Internet Explorer.
But those modifications, designed to increase compatibility with the modern web, still resulted in too many incompatibilities and page rendering issues in dayto-day browsing.
As a result, Microsoft announced in 2019 that it would cease development of the legacy Microsoft Edge and would build an all-new Microsoft Edge using the same open source Chromium engine that is at the heart of Google’s Chrome browser. After a lengthy testing period, the new Edge was officially released in January 2020.
Microsoft began delivering the new browser as a replacement for legacy Edge installations using Windows Update in mid-2020, and the new Edge is a standard part of Windows 10 installations beginning with version 20H2. Unlike the legacy Edge, which was available only for Windows 10, the new Edge is a cross-platform offering. It’s also available for Windows 7 and Windows 8, MacOS, iOS devices, and Android devices.
We assume that all of our readers understand the basics of using a web browser, so we won’t belabor the obvious in this chapter. We don’t cover either the legacy Edge or Internet Explorer, except in passing. Our intent is to help you adapt to and become more productive with the new Edge.
AN OVERVIEW OF THE NEW MICROSOFT EDGE
The design of the new Microsoft Edge differs from that of the legacy Edge it replaced, but it follows the same trend toward visual simplicity (the minimization of “chrome”) that has been characteristic of all modern browsers. The new Microsoft Edge has no menu bar; instead, it has navigation controls and commands on a toolbar, as shown in Figure 8-1.
Figure 8-1 Several of the navigation controls and command buttons shown here can be hidden using options in Edge Settings.
If you’ve used Google Chrome or another browser based on the Chromium engine, you’ll undoubtedly notice similarities to that browser. But if you look carefully, you can also spot a few elements where the new Edge asserts its identity. For example, clicking the padlock at the left of the address bar in the new Edge shows an informational pane like the one shown in Figure 8-2. The items at the top are identical to those that appear when you perform the same action in Chrome, but the Tracking Prevention section at the bottom is unique to the new Edge.
Figure 8-2 The new Microsoft Edge uses the same open source engine as Google Chrome, but it has some key differences, like the Tracking Prevention feature shown here.
As we noted at the beginning of this chapter, Microsoft began automatically updating legacy versions of Edge to the new, Chromium-based Edge in mid-2020. You might, however, find yourself running the legacy Edge if you reinstall Windows 10 using installation media for version 2004 or earlier. If you’re not certain which version is installed on your PC, use Settings And More > Help And Feedback > About Microsoft Edge to check the version number. The new Edge is version 77 or higher, whereas the legacy Edge stopped at version 44.
Choosing an Edge release channel
By default, Windows 10 installs the Stable channel of the new Microsoft Edge. That’s the public release, which is updated to a new version every six weeks. Just like Windows 10, however, you can choose to live dangerously and skip ahead to a future version by joining the Edge Insiders group.
As with Windows 10, Edge Insider builds are delivered in three channels:
Beta This is the most stable Microsoft Edge preview channel. It stays one version ahead of the public release and receives major updates every six weeks.
Dev These preview releases are delivered weekly and are generally stable enough for everyday use, in our experience.
Canary When you sign up for this channel, your browser is updated daily with the latest code from the Microsoft Edge engineering team. You can expect not-so-occasional crashes and unexpected behavior.
The good news is that you can install multiple preview versions alongside one another and switch freely between them. If you’ve set an Edge Insider channel as your default browser, and a page refuses to load or otherwise misbehaves, you can switch to the stable channel and continue on your way.
No signup is required. Just go to the Microsoft Edge Insider page and download the version (or versions) you want to try out: https://www.microsoftedgeinsider.com.
Managing Edge updates
Although the new Microsoft Edge is installed with Windows 10 version 20H2 and later, it doesn’t update itself through the same channels as the operating system or Store apps. Instead, Edge has its own updater, which runs as a scheduled task.
When an update is ready, it downloads in the background, and an up-arrow icon on the Settings And More menu indicates that the update is available. The update is applied automatically when you restart Edge.
You can also check for the presence of an update by going to edge://settings/help, where you can check the currently installed version. If an update is available, you’ll see a message like the one shown in Figure 8-3.
Figure 8-3 This About dialog box provides version information and alerts you if an update is ready to install.
In home and small business settings, there’s no good reason to defer browser upgrades. In enterprise deployments, administrators might want to manage the timing of updates and update checks. To do so, use the update-related group policies described in this Microsoft Edge Reference document:
https://docs.microsoft.com/deployedge/microsoftedge-update-policies
For organizations that have built workflows using the legacy Edge and need to continue using it, deployment instructions are available at https://docs.microsoft.com/deployedge/microsoftedge-sysupdate-access-old-edge
Specifying your default browser
Microsoft Edge is Microsoft’s recommended default browser. To make a different browser your default, go to Settings > Apps > Default Apps. Under the Web Browser heading, you should see the name of your current default browser. Click that entry to display a menu that lists Microsoft Edge and any other browsers you have installed, along with an invitation to visit the Microsoft Store.
SETTING UP MICROSOFT EDGE
In this section, we cover the most important options for configuring Microsoft Edge and customizing it to suit your personal tastes. We start with the most important of these options: your browser profile.
Managing Edge profiles and sync
When you run Edge for the first time in a Windows 10 account, the browser prompts you to create a profile, which it uses to keep track of your settings, privacy preferences, saved passwords, browsing history, and so on. You can set up multiple profiles and switch between them with relative ease. The most common use case is to separate your work-related activity from personal browsing so that you don’t accidentally mix up your work and personal browsing histories, email, and services.
If you’re signed in using a Microsoft account or an Azure AD account, the picture associated with your profile appears in the upper-right corner, just to the left of the Settings And More menu (the three dots at the right of the menu bar). Clicking that profile picture displays a pane like the one shown in Figure 8-4, where you can manage your existing profile, switch to a different profile, browse as a guest, or add a new profile.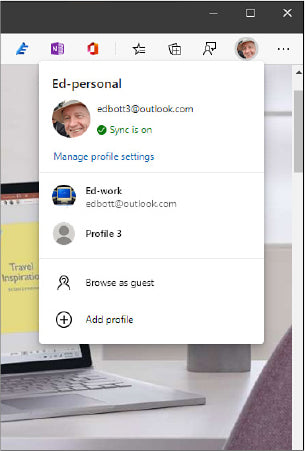
Figure 8-4 If you set up multiple personal and work profiles in Edge, you can switch between them to keep saved settings and history separate from one another.
Edge creates generic names for profiles you set up using the Add Profile option: Personal for those associated with Microsoft accounts, Work for those associated with Azure AD via Microsoft 365 business subscriptions, and Profile <number> for profiles where you don’t sign in.
The advantage of signing in with a Microsoft or Azure AD account, of course, is that you can sync your browsing data across multiple devices. Click Manage Profile Settings from the profiles menu to open a page like the one shown in Figure 8-5.
Figure 8-5 To change the name of the current profile or remove it completely, use the hidden menu shown here.
For a profile that’s tied to an online account, click Sync to manage what kinds of browsing data are synced between browsing sessions. This sync works between different devices, including PCs and Macs as well as mobile devices running Edge on iOS or Android. Using matching profiles also makes it more convenient to use Edge Insider builds alongside the stable release on the same PC. You have the option to turn off sync completely, using the profile strictly as a way to sign in to online services and save your settings and history locally. But most people will want to adjust the settings using the controls shown in Figure 8-6.
Figure 8-6 For an online account, you can choose which types of browsing data to sync or turn off sync completely.
We can’t imagine why anyone would turn off automatic syncing of Favorites and Collections, but if you use a third-party password manager, you probably want to turn the Passwords and Addresses And More switches to the Off position.
By definition, profiles that are not signed in cannot sync browsing data across different sessions. The Sync command is grayed out and unavailable, but you can still save passwords, payment info, and addresses as part of the local profile.
To switch profiles, click the profile picture and then choose the alternative profile from the menu. Each profile opens in a separate browser window, with its own taskbar button marked by a tiny profile picture to help distinguish it from other profiles. The Browse As Guest option uses a temporary profile, separate from all other profiles on the device; it does not save history, cookies, or other site data, nor can it use extensions.
Customizing the new tab page
When you set up a new profile for the first time, you’re prompted to choose a design for the page you see each time you open a new tab. If you’re signed in with a Microsoft account or a local account, your options include a search box, with the option to add Microsoft news headlines, a fresh background image, or both. Figure 8-7 shows the Inspirational layout, with a search box and a background image, but no news headlines.
Figure 8-7 The Inspirational option creates a new tab page that combines a search box with an image that changes daily.
If your Edge profile uses an Azure AD account associated with a Microsoft 365 business subscription, you get a few additional options that include links to online apps and documents you’ve worked with recently. In either case, you can change the layout any time by opening a new tab and clicking the gear icon in the upper-right corner.
In either page layout, the new tab page also includes a row of seven quick links, each shown as a tile with a favicon and a name. Click in the upper-right corner of any of these quick links to edit the name or remove the tile.
If none of these options meet your requirements, you’ll need to find a browser extension that can take over the new tab page.
Privacy and tracking prevention
Some websites use tracking capabilities to gather information about your browsing history, information you enter in your browser, and other details of your online life to build a profile that companies can use for targeted advertising and other purposes. If that bothers you, you can order Microsoft Edge to prevent certain types of tracking. To set your preferences, use the Tracking Prevention tools at the top of the Privacy, Search, And Services tab in Edge Settings. Figure 8-8 shows the three options available for this feature.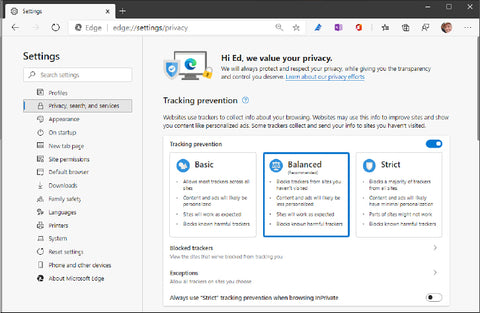
Figure 8-8 By default, Tracking Prevention is set to Balanced. Choosing the Strict option effectively turns this feature into an ad blocker and may cause problems for some sites.
The Tracking Prevention feature in Microsoft Edge uses open source tracking protection lists to classify online trackers and group them into categories. These “Trust Protection Lists” are maintained by Disconnect, a firm based in San Francisco, California. (The most recent version is available for inspection at https://github.com/disconnectme/disconnect-trackingprotection. (These lists are downloaded automatically and stored locally; Edge uses them to prevent resources that are defined as trackers from storing resources or accessing stored resources. (For a detailed discussion of how this feature works, see the Microsoft Docs article, “Tracking Prevention in Microsoft Edge (Chromium)” at https://docs.microsoft.com/microsoft-edge/webplatform/tracking-prevention.)
The three available Tracking Prevention levels work as follows:
- Basic This is the least restrictive level, allowing almost all trackers and blocking only malicious trackers such as those that attempt to perform unauthorized cryptomining. If you use a third-party adblocking tool, this setting might be appropriate.
- Balanced The default level blocks trackers from sites that you haven’t visited directly while minimizing the risk of compatibility issues.
- Strict Turning on this setting delivers the maximum privacy benefit and effectively turns the Tracking Prevention feature into an ad-blocking tool. In the process, you can expect some web pages to break.
By default, Tracking Prevention is set to the Balanced level. With that setting on, you’ll still see a fair number of ads, but most third-party tracking is blocked. Turning the setting up to Strict can break some web functionality and will subject you to lots of “please disable your ad blocker” messages.
You can see which trackers have been blocked and turn this feature on or off for an individual website by clicking the padlock button and using the controls at the bottom of the information pane for that page. To see a list of all the trackers that have been blocked, go to edge://settings/privacy/blockedTrackers.
Customizing the startup page
Unless you configure it to do otherwise, a new instance of Microsoft Edge opens on the new tab page. (We explain how to customize this page in “Customizing the new tab page,” earlier in this chapter.)
If you prefer to start each new browser instance in a less generic way, go to Edge Settings > On Startup and choose one of the two alternatives there:
- Continue Where You Left Off restores the tabs that were open the last time you shut down Edge.
- Open A Specific Page Or Pages starts each session by reviewing a specific group of sites.
In Figure 8-9, for example, we’ve chosen two news sites and the local forecast from the National Weather Service as the startup page.
Figure 8-9 Choose this option if you want to start each day by checking your favorite news and weather pages.
Using the built-in password manager
Security experts have some simple advice for creating secure online passwords: Use a random combination of numbers, symbols, and mixed-case letters that can’t be guessed, and never, ever reuse passwords. But how do you possibly keep track of those random, unique credentials when you visit scores of password-protected sites every month?
The solution is to use a password manager that can keep track of those secrets and fill them in automatically when you visit a shopping site or an online financial institution or a subscription service.
Like all modern browsers, Microsoft Edge includes a nofrills feature that can store, sync, and help you manage those credentials. It doesn’t require an extra download and it doesn’t charge a subscription fee as some thirdparty password management utilities do. Your saved/synced data is secured by the same encryption and two-factor authentication features you use with Microsoft’s email and cloud storage services.
As we were updating this chapter, Microsoft was getting ready to add some advanced password-management features typically found in paid third-party password managers, including a feature that suggests strong passwords on new websites, as well as an option to alert you if your saved credentials have been involved in an online data breach. Still, because there’s no way to sync those saved passwords with other browsers, the built-in Edge features work best if you install Edge on every device you own, including your smartphone.
Regardless of how you choose to manage your own passwords, you should go to edge://settings/passwords, as shown in Figure 8-10, and confirm that the two switches are set so they match your preferences.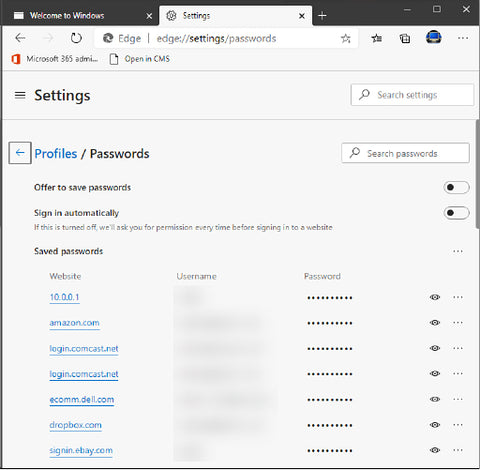
Figure 8-10 The two switches at the top of this page control whether Edge offers to save passwords or fill them in automatically at a matching site.
For security reasons, saved passwords are displayed as a string of dots that doesn’t reveal the contents or even the length of an individual password. To reveal a password, click the eye icon and then be prepared to establish your identity with a password, PIN, or Windows Hello biometric proof. Click the three dots at the far right of any saved credentials to display two additional actions: Click Details to display a dialog box where you can edit and save the username and password (but not the saved web address). Click Delete to remove the entry.
To save new credentials, go to a password-protected website and sign in as usual. When you do, Edge displays a dialog box like the one in Figure 8-11. Click Save to add the credentials to your profile, or click Never to add that site to a list of sites where you don’t want to be asked to save credentials.
Figure 8-11 When you save your username and password at a new site, Edge offers to save those credentials if you’ve enabled this option. If you manually change a password that Edge automatically filled in, a similar dialog box offers to update the saved password.
For large collections of saved passwords, use the search box at the top of the Passwords page in your profile to find the names of websites or usernames. For security reasons, this tool won’t search through the contents of the passwords themselves.
To export your saved passwords as a CSV file that you can use with another password manager (or as a backup), click the three dots to the right of the Saved Passwords heading to reveal the hidden Export Passwords menu option.
Adding and using extensions
From the earliest days of the World Wide Web, browsers have supported ways to extend their functionality with third-party add-ons. Internet Explorer, for example, supported ActiveX controls, a powerful but notoriously insecure way to make the browser perform new tricks.
By contrast, modern browsers use extensions, built with JavaScript and HTML and distributed through a managed store, to add new capabilities securely to the browser. Over the past decade, third-party developers have built a thriving ecosystem of extensions for Google Chrome. Password managers, ad blockers, writing tools, and research aids are among the most popular categories, but the sheer breadth of extensions is staggering.
Figure 8-12, for example, shows the OneNote Web Clipper extension in action. Clicking its button on the Edge menu bar reveals the four options shown here, reformatting the page for use in a OneNote notebook. This task would be tedious or impossible to accomplish manually.
Figure 8-12 Extensions like the OneNote Web Clipper can reformat pages on the fly to make them easier to save as part of a OneNote notebook.
Because Microsoft Edge is built on the same code base as Google Chrome, most extensions written for Chrome will work without modification. (Most exceptions are extensions that require access to a Google account or to Google services.) Developers can make a few small modifications to a Google Chrome extension and submit it to the Edge Add-ons store. You can browse through the full selection by categories or search for a specific extension at https://microsoftedge.microsoft.com/addons.
If the extension you need isn’t available from Microsoft, chances are you can get it from Google’s Chrome Web Store. To install extensions from that source, you’ll need to enable the Allow Extensions From Other Stores setting in Edge on the Extensions page, as shown in Figure 8-13. That’s also where you go to manage installed extensions.
Figure 8-13 Installed extensions show up on this list. Click the Details button to see any additional settings, including the option to show the extension’s button or uninstall it.
The on/off switch next to each installed extension allows you to enable or disable it on the fly. Most extensions are designed to run at all times, but you might have specialpurpose add-ons that you turn on only when they’re required.
By default, a button for each extension shows up on the Edge toolbar, to the right of the address bar. That’s preferred for extensions that require interaction to do their magic. For extensions that work mostly in the background, consider cutting down on clutter by rightclicking the button and choosing the Move To Menu option. (You can move the button back by right-clicking the button at the top of the Edge menu and choosing Move To Toolbar.)
Finally, take advantage of keyboard shortcuts to expand the utility of extensions. On the Extensions page, click Keyboard Shortcuts (or go to edge://extensions/shortcuts). Click in the box to the right of any extension and press a shortcut that consists of either Ctrl or Alt plus a letter or number.
FINDING AND ORGANIZING INFORMATION
In this section, we cover the built-in tools that allow you to track down information using the full array of online search tools and then organize those results so you can reuse and share your findings as needed. Some of these tools are familiar, like the Favorites that have been part of Microsoft browsers for a quarter century. The new Edge adds a useful alternative called Collections, which we cover here. But we start with the place you go when you don’t know where to go: your favorite search engine.
Changing the default search provider
You don’t need to go directly to a search engine to find information in Microsoft Edge. If you use one of Microsoft’s new tab page layouts, you can enter your request in the search box on that page. Even easier is to just start typing in the address bar. When you use the address bar in this fashion, Microsoft Edge does its best to simplify your search. As you type, the browser offers a proposed completion of your entry, along with a list of matching sites from your browsing history.
On a clean installation of Windows 10, Microsoft’s Bing is, unsurprisingly, the default search provider. With a few simple steps, you can change the default to one of the predefined alternatives. From Edge Settings, choose the Privacy, Search, And Services tab. Scroll to the bottom of the page and click Address Bar And Search. (If that seems like too much work, go directly to edge://settings/search.) Your options are shown in Figure 8-14.
Figure 8-14 The second option, which allows you to assign an alternate search engine to the new tab page, doesn’t appear until you change the address-bar search engine to something other than Bing.
Your options for the Search Engine Used In The Address Bar setting include some familiar names, including Google and Yahoo as well as the privacy-focused DuckDuckGo. To add a search provider that supports the OpenSearch standard but isn’t on the default list, go to the search provider’s website and search for anything; that action is enough to add the new provider to the list of available search engines.
Changing the source of search results from the address bar doesn’t affect the search box on Microsoft’s new tab page, which continues to use Bing even after you make the change. When you select a search engine other than Bing, a second option appears: Search On New Tabs Uses Search Box Or Address Bar. Set this option to Address Bar to make both locations match. (Note that this setting has no effect on what you type in the search box on the Windows 10 taskbar.)
Saving, editing, and organizing Favorites
Like every modern browser, Microsoft Edge lets you build a repository of favorite webpages—destinations that you know or suspect you’ll want to return to now and then. Once a page has been designated a favorite, you can reopen it with only a few clicks instead of having to search for it again or pull it up from your browsing history. Your browsing history is available for reuse as well, of course (see “Finding previously visited pages in History” later in this chapter), but for pages you visit regularly, a well-placed favorite can be more convenient.
To add a shortcut for the current page to Favorites, click the star at the right side of the address bar in Microsoft Edge, or use the keyboard shortcut Ctrl+D. As Figure 8- 15 shows, that action opens the Edit Favorite dialog box, where you can change the name to something descriptive and move the link to an existing folder. (Click More to see a full list of folders and create a new folder, if necessary.) Click Done to save your changes.
Figure 8-15 Press Ctrl+D or click the star icon at the right of the address bar to add or remove a page from your Favorites list. The Favorites Bar is a special folder whose contents can be displayed below the address bar in Microsoft Edge.
(Think of this location as your favorite Favorites.) By default, it’s hidden. To make it visible, click Settings And More > Favorites > Show Favorites Bar. Or use the keyboard shortcut Ctrl+Shift+B and turn on Show The Favorites Bar.
The easiest way to access your saved favorites is to start typing in the address bar. Any matching favorites will appear at the top of the list. To see the entire list, click the Favorites button on the toolbar. You can also get to the favorites list by pressing Ctrl+Shift+O. From that same page, you can also search for Favorites using the search box at the top of the page.
Click a favorite to launch it in the current tab. Hold down Ctrl as you click to open the link in a new tab (or rightclick the link and then click Open In New Tab). Hold down Shift and click to open the link in a new window.
The menu that appears when you right-click also gives you the means to rename or remove a shortcut as well as an option to edit the URL associated with each saved favorite. Right-click any empty space in the Favorites list to create a new folder on the fly or sort the list by name.
If you recently switched your browser default to Microsoft Edge, you might have favorites or bookmarks from another browser that you want to import. To do that, go to edge://settings/importData. Choose your previous browser from the drop-down list at the top, choose the data you want to add to your Edge profile, and then click Import.
Saving and sharing your research as Collections Collections are a signature feature of the new Microsoft Edge, offering a way to save and share research that’s unlike anything in any other modern browser.
Collections are an ideal solution for researching travel, purchases, projects, and school papers. Superficially, they resemble folders full of favorites, but the actual content appears in a pane to the right of the main browser window and can include more than just simple links. Figure 8-16 shows a collection containing research collected ahead of a new car purchase.
Figure 8-16 Collections consist of cards that you can drag to rearrange. You can save images, snippets of text, product details, or even notes.
Collections consist of cards, each of which contains a discrete piece of data you want to collect. Dragging a link to a page (from the address bar or from within an open page) creates a card with a link and a thumbnail of the webpage. You can also select snippets of text from a web page and drag them to a collection; clicking the card returns to that page with the snipped text highlighted.
Drag an image to a collection to save it directly, or click the Add Note icon at the top of a pane to open a yellow sticky note. There, you can change the font, add bullets, or add headers using the toolbar at the top of the note. When you’re ready to save the note, select Save.
To create a new collection from scratch, click the Collections button on the toolbar, and then click the Start A New Collection link at the top of the Collections pane. If you’ve already begun doing some research in the current Edge window, use Ctrl+click to select a group of tabs, right-click to display a menu, and then click Add All Tabs To A New Collection.
You can drag collections in the Collections pane to the order you prefer, and drag cards in a collection to reorder them. Hover the mouse pointer over a card to display a check box in the upper-right corner. Select that box (and repeat the process for other cards, if necessary) to display a toolbar that allows you to copy, share, or delete the selected items.
Collections integrate well with Microsoft Office apps. When you choose the option to share a selection or an entire collection, the menu options shown in Figure 8-17 appear. You can share using Excel, OneNote, or Word. You can also open, copy, or paste the cards in your collection in just about any target, including another collection.
Figure 8-17 When sharing a collection, you can send selected items to key Office apps, making it possible to create a tidy report with minimal effort.
Finding previously visited pages in History
Microsoft Edge maintains a local history of the sites you visit using a particular profile. If you need to return to a site and you neglected to add it to your favorites, you should be able to find it by searching through the history. (Note that this local history is separate from the browsing history that is maintained and synced when you sign in using a Microsoft account.)
To inspect your history in Microsoft Edge, click Settings And More > History > Manage History, or use the keyboard shortcut Ctrl+H. Each entry has its own date and time stamp, and Microsoft Edge presents this list in descending chronological order, using relative dates and times: Recent, Today, Yesterday, Last Week, and so on, as shown in Figure 8-18.
Figure 8-18 Microsoft Edge organizes your browsing history in reverse chronological order. Use the search box and date controls on the left to find a page you’ve previously visited.
Enter a word or a snippet of text in the Search History box to find entries that include the search text in the page title or the URL. If you know roughly when you visited a site, select one of the controls beneath the search box to filter the results by date first, then enter your search text to find matching entries.
Clicking an entry in the History list selects the check box to its left. Right-click any entry to display a menu that enables you to open that page (or all currently selected pages) in a new tab, a new window, or a new InPrivate window. If you have only one entry selected, the last item on that menu, More From The Same Site, filters the list to show only pages from the same domain as the one you right-clicked.
You can remove any entry from the history list by clicking the X at the right of its timestamp. Press Ctrl+A to select all pages in the current view, and then click Delete to remove them from the History list. To erase the entire local history in Microsoft Edge for the current profile, click Clear Browsing Data at the top of the list.
MANAGING TABS
Like all modern browsers, the new Microsoft Edge allows you to keep multiple pages open on separate tabs in the same application window and switch between them quickly. This feature is a tremendous timesaver for anyone doing research or trying to juggle multiple tasks. You can open a new tab in any of several ways:
- To open a new tab, press Ctrl+T, or click the New Tab button, just to the right of the current tabs.
- To open a link in a new tab without shifting focus from the current tab, right-click the link and choose Open Link In New Tab, or hold down Ctrl while you click the link.
- To open a link in a new tab and shift focus to the newly opened tab, hold down Ctrl+Shift and click.
- To duplicate a tab, press Ctrl+Shift+K, or right-click the tab and choose Duplicate from the shortcut menu. Note that your new duplicate tab also includes the history associated with the original tab.
- To close any open tab, point to its tab heading and click the X at the right side. To close the current tab, press Ctrl+W.
- To pin a tab to the browser window so that it appears in a place of honor to the left of all open tabs, right-click its tab heading and choose Pin from the shortcut menu. Pinned tabs occupy a tiny amount of space, displaying only the site’s favicon rather than the full title (on the theory that you know what each pinned tab is and therefore you don’t need to see those details). Pinned tabs reopen every time you open a new Microsoft Edge window for the currently signed-in account.
You can also use keyboard shortcuts to cycle between tabs: press Ctrl+Tab to move from left to right or Ctrl+Shift+Tab to go from right to left. To reposition a tab within an array of tabs, drag the tab you want to move laterally. To peel a tab from the current browser window and make it appear in a new window, drag the tab away from the tab bar and release it.
You can also select multiple tabs, using the standard Windows shortcuts, Ctrl+click (to select a noncontiguous set of tabs) and Shift+click (for a contiguous set). You can right-click the selection and choose the option to move them to another window, or drag the selection out of the current window to open them in their own browser window. Right-click the selection to perform another action: add the tabs to your favorites, add them to a collection, or close them. Other options on the right-click menu include Close Other Tabs, which closes those you haven’t selected, and Close Tabs To The Right, which lets you close sites you opened in new tabs if you accidentally went down a rabbit hole of browser tabs.
Silencing a noisy tab
There is nothing quite as frustrating as suddenly hearing sound blasting out of your PC’s speakers because a web page began automatically playing a video clip. If the sound is coming from the current page, you can press Ctrl+M to mute the audio. If you’re not sure which page has decided to suddenly start screaming, yelling, or singing, scan the tab headings and look for a speaker icon, which indicates that sound is playing from that tab. Click that speaker icon to immediately mute the sound without having to open the tab itself. Click again to unmute the tab’s audio stream.
Pinning tabs for quick access
If you want a particular tab available every time you launch Microsoft Edge, the simplest solution is to pin that tab. To do that, right-click the tab and choose Pin. Right-click and choose Unpin if you change your mind. Pinned tabs occupy a minuscule amount of visual space near the left edge of the window.
Yet another way to make a particular tab easily reusable is to pin it to the taskbar. To pin the currently open page to the taskbar, click Settings And More > More Tools >Pin To Taskbar. Sites that can be installed as Progressive Web Apps (PWAs) can be pinned to Start, by choosing Settings And More > Apps > Install This Site As An App. (For more details on how PWAs work, see Chapter 6.)
PRIVACY AND SECURITY ISSUES
The beauty of the web is that you can use it to connect instantly to an almost unlimited world of information. The bad news is that some of those destinations are potentially dangerous to your PC’s health and to your privacy.
There’s no way to make the web perfectly safe, but Windows 10 does include features that help you minimize concerns over security and privacy. We discuss many of those features, including Microsoft Defender SmartScreen, in Chapter 11, “Managing user accounts, passwords, and credentials,” and Chapter 18, “Windows security and privacy.”
To make sure that SmartScreen is on in the new Microsoft Edge, go to the Privacy, Search, And Services tab in Edge Settings. The switch you’re looking for is near the bottom of the pane, beneath the Security heading.
If you care about online security, one smart practice you should adopt for everyday browsing is to prefer a secure connection (HTTPS) even on sites that don’t traditionally require it. Insecure links to seemingly harmless destinations can leak information about you and can also be used to spoof sites, potentially compromising a machine using a man-in-the-middle attack. All modern browsers, including Microsoft Edge, flag the addresses of sites that are insecure as well as those that contain a mix of secure and insecure content (look for a “Not Secure” label where you would normally see the padlock icon in the address bar). In that spirit, we have gone out of our way in this book to use HTTPS links. In this section, we focus primarily on features that are unique to web browsing.
Controlling site permissions
The new Microsoft Edge includes a dizzying array of permissions that you can configure to control how webpages interact with your PC. To see the full list, go to the Site Permissions page at edge://settings/content. There, you can adjust global options for Cookies And Site Data, Location, Notifications, and access to your camera and microphone. You might decide, for example, that you don’t want any websites to disturb you with notifications, ever, so you can set the Notifications permission to block all such requests.
Our favorite setting in this group is the Media Autoplay switch, which normally is set to allow any site to start playing a video or audio clip when you arrive. Go to edge://settings/content/mediaAutoplay and change this setting from its default, Allow, to Limit. You’ll thank us. To adjust settings for a specific site, click the padlock icon at the left of the address bar, then click Site Permissions.
Protecting your privacy
Unless you go to extraordinary lengths, such as using a virtual private network for every browser session, simply connecting to a webpage reveals information about your PC, your internet service provider, and your general location. When combined with other details, even a single, seemingly harmless visit to a webpage can become part of your permanent online profile, used by companies and organizations you’ve never heard of. You can’t completely disappear online, but you can take some commonsense precautions to cover your tracks and avoid disclosing too much about yourself.
Clearing your browser history and other personal information
Your browser keeps a copy of webpages, images, and media you’ve viewed recently. This cached information is saved to generally inaccessible locations, but even so, it might give other people who have access to your computer more information than you might want them to have—especially when combined with cookies, saved form data, saved passwords, and other details.
To wipe away most of your online trail in Microsoft Edge, open the Privacy, Search, And Services tab in Edge Settings. Then, under the Clear Browsing Data heading, click Choose What To Clear. These steps take you to the set of check boxes shown in Figure 8-19.
Figure 8-19 Use the options under Clear Browsing Data to specify which elements of your browsing history you want Microsoft Edge to erase.
Before specifying the types of data you want to clean and prune, you can restrict the data to be cleared by choosing one of the options on the Time Range menu: Last Hour, Last 24 Hours, Last 7 Days, Last 4 Weeks, or All Time. If you were researching possible birthday gifts for a household member who occasionally uses your computer, for example, you might want to delete all or part of your browsing data for that period to avoid accidentally spoiling the surprise.
In addition, be aware that if you’re signed in and syncing data to a Microsoft account, the data you clear here may also be removed from other devices that sign in to that account. To remove only local data, sign out first. After attending to those details, you can choose from the following types of data to clear:
Browsing History This is simply a list of sites you’ve been to since you last cleared your history, whether you went to them directly or followed another site’s hyperlinks. You can also view this list from the History list and delete individual entries there. (For details, see “Finding previously visited pages in History,” earlier in this chapter.)
Download History This is the list that appears on the Downloads page. Deleting this history here (or clicking Clear All at the top of the Downloads list) does not remove the downloads themselves, which remain where you put them.
Cookies And Other Site Data A cookie is a small text file that enables a website to store persistent information on your hard disk. Cookies, particularly first-party cookies, are generally benign and useful. Note that removing cookies via this option does not block their arrival in the future. (To do that, see “Blocking cookies” later in this chapter.)
Cached Images And Files These are local copies of pages and media content from sites you visit. The browser saves local copies of this data to speed up its display on subsequent visits.
Passwords As we discuss earlier in this chapter (see “Using the built-in password manager”), there are pros and cons associated with saving sign-in credentials for websites. If you switch to a third-party password manager after you’ve allowed the browser to store some credentials, you can erase the data here.
Autofill Form Data (Includes Forms And Cards) Your browser allows you to store some address information—for example, your shipping or email address—as well as credit card details. Using this saved information makes it more convenient to fill out forms. This option erases saved entries for the selected period.
Site Permissions When you visit a webpage, it can request permission to perform specific actions, such as delivering notifications, switching to full screen, or using your location for personalization. Click this check box to remove all saved permissions, or click Manage Permissions to review and modify these settings on a per-site basis.
Hosted App Data When you install a website as an app, it has permission to store some data for its own use. The text beneath this entry lists each of the apps that are capable of storing app data.
All Data From The Previous Version Of Microsoft Edge This option is available only on devices that have been updated from legacy Edge to the new Chromium-based Edge. After clearing this data, the option is no longer available.
After making your selections, click Clear. To automatically clear a specific type of browsing data every time you shut down the browser or sign out, go back to Edge Settings and click Choose What To Clear Every Time You Close The Browser. That leads to a page with on-off switches for each of the data types listed above.
Squelching history temporarily with InPrivate browsing If you want to cover your local tracks only for a particular browsing session, don’t bother fussing with history settings or clearing items after the fact. Instead, open an InPrivate window. During an InPrivate session, Microsoft Edge keeps all your browsing data (including history, cookies, and cached images) in temporary storage, which is cleared when you close all InPrivate windows. You can access favorites, saved passwords, and form data, and any files you download are retained, although the download history is cleared.
To open an InPrivate window, click Settings And More > New InPrivate Window, or use the keyboard shortcut Ctrl+Shift+N. Any additional InPrivate windows you open are part of the same session. When you close the last InPrivate window, the browser ends the session and deletes browsing data it stored (session cookies and other temporary files, for example), and no record of the visit is saved in history.
Be aware that browsing privately is not the same as browsing anonymously. Sites you visit can record your IP address, and your network administrator or internet service provider (which includes anyone in control of a public Wi-Fi hotspot) can see which sites you connect to and can capture any unencrypted information you transmit or receive.
You can allow or prohibit the use of extensions in InPrivate mode on a per-extension basis, as we describe in “Adding and using extensions,” earlier in this chapter.
Blocking cookies
Cookies—small bits of information that websites store on your hard disk—come in two flavors. First-party cookies are used by the site you’re currently visiting, generally for such purposes as personalizing your experience with the site, storing shopping-cart information, and so on. Thirdparty cookies are used by a site other than the one you’re visiting—such as an advertising network or social media service that has placed an ad or a sharing button on the site you’re currently visiting.
Cookies do not carry executable code (they’re text files), and they can’t be used to spread viruses or malware. A cookie can provide a website only with information you supply while visiting the site; a cookie has no access to the Windows file system and can’t read your address book or financial records, for example. The information a cookie gathers can be read only by pages in the same domain as the one that created the cookie.
Nevertheless, privacy concerns arise when advertisers and web-analytics companies begin to correlate the information from third-party cookies to build a profile of your activities. Because it’s not always obvious who’s sending you a cookie and what purposes that cookie serves, some people are understandably wary about allowing cookies on their systems.
The most effective way to block this form of tracking is with the use of the Tracking Prevention feature in Microsoft Edge (described earlier in this chapter), or with third-party ad-blocking software. You can, however, set global cookie policies from the Site Permissions page in Edge Settings. To review and allow or block cookies from the current webpage, click the padlock icon to the left of the address bar, then click Cookies. That opens a dialog box like the one in Figure 8-20.
Figure 8-20 The cookie management tools in Microsoft Edge are interesting for developers and security experts, but for most everyday uses, the Tracking Prevention feature is a better option.
Controlling Flash content
Historically, one of the most problematic parts of any browser, from the standpoint of security and reliability, is a reliance on third-party add-ins. Microsoft Edge has historically included support for Adobe’s Flash Player, but as of December 2020, this capability is being retired. To view the relatively small number of websites that still insist on using Flash, you’ll need to find an option other than Microsoft Edge.
MAKING WEBPAGES EASIER TO READ
Microsoft Edge provides easy ways to make text and graphics on a webpage larger or smaller. If you’re working on a touchscreen or on a device with a precision touchpad, you can zoom in and out with the standard touch gestures. Spread two fingers on a page to make the content larger; bring two fingers together to make it smaller.
The Zoom command on the Settings And More menu allows you to increase or decrease the size of the page in logical increments. With a wheel mouse, you can zoom in or out by holding down the Ctrl key as you roll the wheel forward or back. Zooming with the mouse wheel has the advantage of maintaining the position of whatever object you’re pointing to when you begin zooming. Suppose, for example, that you’re zooming in to get a better look at a graphical element lying near the right edge of the screen.
If you use other zooming methods, the element you care about will eventually drift out of the window. However, if you zoom in by pointing to it and rolling the wheel, the element retains its position relative to your mouse pointer as it gets larger.
If a mouse is not at hand, hold down Ctrl and press + (the plus key, typically found to the left of the Backspace key) to increase magnification; hold down Ctrl and press – (the minus sign, or hyphen) to zoom back out. To return to normal (100%) magnification, press Ctrl+0.
Changes to display magnification are persistent on a persite basis, so if you nearly always require a certain zoom level at a particular address, you can set it once and not have to worry about it again. To change Zoom settings globally, go to edge://settings/appearance and choose a magnification percentage.
Zooming in is an excellent way to make small text easier on the eyes. But for more improvement in reading comfort, try the Immersive Reader in Microsoft Edge.
This view removes distracting elements from a webpage and reformats the text so that you can focus on what you’re trying to read. Immersive Reader is especially useful on pages that are cluttered with ads and where the designer has used type that’s too small or has contrast problems with the background. To display a page in Immersive Reader view, click the Enter Immersive Reader icon, which resembles an open book; it’s located near the right end of the address bar.
An easier option is to press the keyboard shortcut, F9. If Immersive Reader is not available (because the page is not suitable for that kind of display), the icon will not be available. (To switch back to normal view, click the Immersive Reader icon again or click Back.) Figures 8-21 shows the same page in normal display and in Immersive Reader.
Figure 8-21 Press F9 to turn a cluttered webpage into a streamlined version with text reformatted for readability.
A toolbar appears at the top of the window in Immersive Reader view. (Move the mouse pointer to the top of the window if you don’t see it; click the pushpin icon to fix it in place so it doesn’t automatically hide.) Click Text Preferences to reveal options to help change the appearance of the page, as shown in Figure 8-22.
Figure 8-22 In Immersive Viewer, you can adjust the font size and spacing, and you can select a color scheme for the text and background.
Use the Text Size buttons to increase or decrease the font size. Slide the Text Spacing switch to the On position to widen the spacing to make it more readable. Under Page Themes, you’ll find five options controlling the background and foreground colors. If reading is still a challenge, you can ask Reading View to read to you. Turn on your speakers or plug in your headset and click the Read Aloud button on the toolbar. (The Read Aloud option is also available in PDF files.)
USING MICROSOFT EDGE TO READ AND EDIT PDFS
On a clean installation, Windows 10 sets Microsoft Edge as the default reader for PDF files. When you download a file in PDF format, it opens in the Edge window with a toolbar like the one shown in Figure 8-23. You can use those tools to rotate, zoom, print, save, and annotate the file.
Figure 8-23 The drawing tools in the native Edge PDF viewer work best on a PC with pen support.
Current versions of Edge do not include the ability to fill in forms, but you can use the tools on the PDF toolbar to draw on the document (good for adding signatures) and highlight portions of the document using a digital marker in one of five colors. Use the Save and Print icons to preserve the web file in a format that doesn’t require a browser window.