


Apps and Software Troubleshooting in windows 10 and windows 11

Apps and Software Troubleshooting
Software is probably one of the most complex and convoluted aspects of a modern PC as there’s just so much variety now supported. You can run a DOS script from 1981, a 32-bit application from Windows 95, a 64-bit program that was written a week ago, or a Windows Store app that was introduced with Windows 8. Now it’s even more complex with the addition of Android apps installed from the Amazon Appstore. If we add the ability to run programs and scripts designed for GNU/Linux and the BASH command line, then things get more complex still.
Why Windows is so cross-compatible is an easy question to answer, and that answer comes in two parts. With regard to the legacy software, Microsoft collects telemetry (completely anonymously) that tells it what aspects of the operating system are being used, how often, and on how many PCs. Much of this telemetry will come from corporate customers, many of whom still have older, legacy software that in many if not most cases was written specifically for them to perform a role crucial to the business. Microsoft will simply not remove anything from the operating system that breaks functionality still being used by customers.
The people that wrote that code however will have long since moved on and left the company or even retired in some cases. In other cases, the original source code will no longer be available, won’t be complete, will be undocumented, and will be messy and difficult to discern (delete as applicable). The third reason is that executive boards will just not see the benefit in investing money into replacing this software when what they already have still works. These aren’t technically minded folks, and so they don’t see the challenges it all throws up for the system administrators that have to keep things running smoothly.
With regard to the more modern code, such as the addition to Windows of the Subsystem for Linux and the Subsystem for Android, these aren’t just things that Microsoft chucked in because they wanted to. The Subsystem for Linux was first introduced to encourage more software development on Windows. Microsoft learned the hard way with Windows 8 and Windows Phone that an operating system lives or dies on the volume and quality of apps and software that is available for it, and they could see a large number of developers abandoning the platform and buying Apple Mac computers so they could instead develop for iOS, which was seen by many as being more ucrative for them.
With the additions that Apple made to iPadOS in 2019 that allowed for multitasking and windowed apps, there was now a much more credible competitor to Windows laptops and the Microsoft Surface Pro devices. Microsoft had to do something and embraced software development in a big way. Bringing the BASH shell, a scripting environment favored by many software developers, to Windows was just the start, and they followed this up with the ability to run Linux GUI (Graphical User Interface) apps and then with the purchase of the online developer platform GitHub. Android apps on Windows came out of a development project for Windows Phone.
Microsoft had tried, unsuccessfully, to launch their new app development platform UWP (Universal Windows Platform) with its own app store with Windows 8 and Windows Phone, and it turned into an unmitigated disaster for them. Firstly, developers were simply not interested in redeveloping apps they’d already written for iOS and Android for a third platform, and especially when Windows Phone was so late to the market and consequently had such small market share. Secondly, Microsoft shot themselves squarely in the foot with the apps they released for Windows 8 which looked like they’d been programmed by a complete novice with zero user interface knowledge. So Microsoft spent a while looking into bringing Android apps to Windows Phone instead to try and revive the platform. Nobody knows the real reason why it never happened. The best known story is that it worked too well, and from this one of two things could have happened. Most people believe that Microsoft’s higher-ups thought it would damage development of Windows apps even more, but there’s a chain of thought that Google objected to the idea.
This is given more credence when you consider that the original sliding panel design of Windows Phone in its first iteration, which brought all your social media, contacts, messaging, and photos from different platforms into sideways-scrolling aggregated panels, and which was utterly brilliant, was later removed from the OS after complaints from companies, including Google and Facebook, that wanted people using their own apps instead so they could collect tracking and usage data and push advertising to them.
Microsoft is known though for not completely abandoning good technologies, and even though they may sit on them for some years, development is often picked up again somewhere down the line. When Microsoft thought about opening their app store to third parties, with the Epic Games Store being first in line, Android seemed like a good fit. Microsoft couldn’t come to terms with Google, but Amazon stepped in with its own, somewhat limited but still useful Android app store.
With the addition in Windows 11 of Microsoft allowing not just UWP apps to be distributed through the Microsoft [App] Store but also Win32 apps, and those made using other technologies such as PWAs (Progressive Web Apps), Microsoft sought to reestablish itself as the platform to develop apps for once again. And so we end up with this slightly complex, slightly messy application environment that is Windows 11. For the most part though, the new app platforms, with apps delivered through the store, take care of themselves. However, this doesn’t help the beleaguered system administrator that has to make sure a program written before they were born still operates as it was intended.
Managing Legacy App Compatibility
Which brings us neatly onto the subject of software compatibility as Windows 11 will not run 16-bit apps that were designed for Windows 3.1, but it will still run apps designed for Windows 95, and that operating system was released 26 years before Windows 11 was announced.
Program compatibility begins with installation, and this is where we start to see some of the legacy issues with Windows itself. You might remember me mentioning earlier that for custom apps developed by companies and corporations, the original code might be messy, undocumented, or simply unavailable; well it’s a similar case with Windows.
In order to make sure that legacy features still work in the operating system, many of them have been left as-is. Sometimes, this is because the code really is undocumented, sometimes it’s because the code is messy, sometimes it’s because the original developer has long since left the company/retired/passed away (etc.), but often it’s because as different programming languages have been developed over the years, different Windows features have been written in different languages, and sometimes it’s best to just leave well enough alone.
When you install a program in legacy compatibility mode, then you have a hoop to jump through. The first step is to right-click the installer to bring up a menu of options. Then however, whereas you might normally select Properties from the menu, you instead need to click Show more options (see Figure 12-1).
Figure 12-1. Some see the “dumbing down” of the Windows 11 interface as a retrograde step
This will reveal a second menu that looks completely different from the Windows 11 interface, because it’s an older Windows component that was written in a different programming language in a different time (the desktop interface of menus, Start Menu, and Taskbar in Windows 11 is all new code). You have two options with this menu, either click Troubleshoot compatibility (see Figure 12-2) or click Properties.
Figure 12-2. There are two ways to install a legacy program in Windows 11
The Program Compatibility Troubleshooter
So let’s start with the first of these, the Program Compatibility Troubleshooter. This is something that can be run at any time for even an installed program, I’ll show you how in a while, and that can help you solve compatibility issues if you’re unsure what are the best settings to use.
You’re first asked if you want to use the recommended settings (which likely won’t fix the problem) or if you want to troubleshoot the program. Choosing this option will then talk you through a series of options. You’re first asked what type of issue it is that you’re having (see Figure 12-3).
Figure 12-3. The Program Compatibility Troubleshooter asks a series of questions
It asks if the program worked in earlier versions of Windows but doesn’t work now, if it opens but won’t display correctly, or if it requires administrator privileges to run.
If you select the first option, you are then asked in which version of Windows did the program work perfectly before (see Figure 12-4). For the Program Compatibility Troubleshooter however, this only goes back to Windows XP.
Figure 12-4. You are asked in which version of Windows the program worked before
If the problem is how about the program not displaying properly when it is run, you are asked if you get an error message or if the program just doesn’t display correctly (see Figure 12-5).
Figure 12-5. Windows asks what happens when a program won’t display correctly
With the questions answered, Windows will set what it thinks are the best compatibility settings and then ask you to test the program (see Figure 12-6), before asking again if things worked.
Figure 12-6. The Troubleshooter asks you to test the program to see if it now works
Manually Configuring Compatibility
If you need to set compatibility for a program manually, you first need to get access to its Properties panel. If the program’s icon is on the desktop or is pinned to the Taskbar, then right-click it and select Properties from the menu that appears.
This option doesn’t appear though for anything pinned to the Start Menu or in the All Apps list. Here, you should right-click the program, then from the menu that appears, select the More option and finally Open file location (see Figure 12-7).
Figure 12-7. Accessing the Properties panel for a program in the Start Menu is complex
The next step is either going to work for you, or it won’t as the results can vary depending on what software it is you are troubleshooting. File Explorer opens with a link to the “shortcuts” for the program in the Start Menu. You can then right-click the program and select Properties to get to the compatibility options (see Figure 12-8).
Figure 12-8. You can right-click a program’s shortcut icon
If this doesn’t work, then you’ll need to navigate in File Explorer to the actual location on the disk, most likely in the C:\Program Files (x86) folder where the program resides. The Properties panel for the shortcut might tell you where this is if you won’t know.
From the Program Files (x86) folder, you can then right-click the program icon and select Properties to get to the compatibility options (see Figure 12-9).
Figure 12-9. You can access a program’s properties from the C:\Program Files (x86) folder
When you have the program’s Properties panel open, click the Compatibility tab, and you will see various options (see Figure 12-10).
Figure 12-10. The program compatibility properties contains more options than the troubleshooter offers
The first of these options is to select which version of Windows the program previously worked in, and it is here that you can select an OS version going all the way back to Windows 95 (see Figure 12-11).
Figure 12-11. You can select an OS the program worked under all the way back to Windows 95
Additionally, and if the program is not displaying correctly on the screen, you can select a different color mode for it to be displayed in such as 8-bit (256 colors) and 16-bit (65,536 colors) (see Figure 12-12). By default, Windows displays in 32-bit or sometimes 48-bit color depending on your graphics capabilities and monitor.
Figure 12-12. You can select a color mode for the program to run in
Then you will see additional settings and options such as locking the program to a 640 by 480 pixel resolution, disabling the ability to run the program full screen, and always running it as an administrator, which will require authorizing a User Account Control (UAC) prompt whenever the program is run, something to consider if an administrator password has to be entered.
Register this program for restart will autostart the program after restarting or starting the PC and signing in to an account, and ICC color management might be required by some older photo and video programs.
Something new with Windows 11 is support to manage legacy programs for high DPI (dots per inch) displays. It is very common now for desktop monitors and laptops to come with very high-resolution screens. My Microsoft Surface Laptop Studio has 2400 by 1600 pixels squeezed into just a 14-inch panel (see Figure 12-13).
Figure 12-13. Some small screens can have very high resolutions
Thus, I have to run this screen at 125% scaling, effectively making the perceived resolution smaller; otherwise, everything is too small to see and read for me, even with my glasses on.
Some legacy programs will misbehave when desktop scaling is used, and so in the compatibility options, you will see a Change high DPI settings button. Clicking this will display (if you’ll excuse the pun) options for managing the legacy program when desktop scaling is being used (see Figure 12-14).
Figure 12-14. You can manage compatibility when desktop scaling is used in Windows 11
Lastly at the bottom of the dialog is a Change settings for all users button. Compatibility settings for an app are stored in the Windows Registry and loaded when the program runs. If you have more than one user account on the PC and they also need to use this program, clicking this button will also set the compatibility options in their own Registry files, and in Chapter 19, we’ll look at how and why each user on the PC has their own Registry files.
Repairing Win32 Desktop Programs
If you have a problem with a win32 program installed in Windows, often the only way to fix that problem is to completely uninstall and reinstall the program. This is because it creates its own Registry entries, adds its own files to the Program Files folder, and installs its own services and dynamic link library files. If a program flatly refuses to run or badly misbehaves it can be very difficult to figure out where that problem lays, and often a complete reinstall is the best and only way to ensure everything is reset to the way it should be.
Some programs do have a repair option however, and this can be found either within the program itself (if it’s working) or alternatively from the Programs and Features applet in Control Panel.
Click the offending program, and with a bit of luck, a Repair option will appear in the toolbar across the top of the program list (see Figure 12-15).
Figure 12-15. The excellent Dopamine music player comes with a self-repair option
If a repair option doesn’t appear, you may see one called Change. This exists to allow you to install and uninstall optional features for the program, but in some cases, such as with Microsoft Office, it will allow you to repair the installation, either from a local backup or from an online source (see Figure 12-16).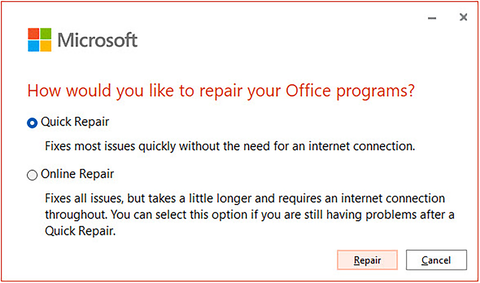
Figure 12-16. Microsoft Office comes with a self-repair option
Managing Microsoft Store and Third-Party Store Apps
Microsoft Store apps can also be repaired, and there are a few ways to achieve this, depending on whether it’s just the app malfunctioning or if it’s a problem that’s being caused by the store itself such as preventing the app from auto-updating.
If it’s an app itself you need to repair, open Settings and then Apps and Apps & features. Here, you will see a long list of every app and program installed on the PC. Scroll down the list until you find the offending store app and click the three dots icon to its right. This will reveal a menu that includes an Advanced options link that you can click to repair the app (see Figure 12-17).
Figure 12-17. You can repair Microsoft Store apps from Settings
At the next screen, you will see the information Windows has about the app, from its version number to the amount of space it consumes on the PC and how much Internet data it has used. At the bottom of this page are four options you can use to manage and repair the app (see Figure 12-18).
Figure 12-18. Settings offers different options for repairing store apps
- Terminate can be used if the app has hung and isn’t responding. You can also terminate apps from the Task Manager, and I’ll show you how to do this later in the chapter.
- Repair will attempt to repair the app without deleting any of your user and configuration data. This should be the first thing you try to get an app working again.
- Reset will completely reset the app, effectively reinstalling it. This will however delete all of your user and configuration data for the app, including any sign-ins and preferences.
- Uninstall will remove the app from the PC, and it can later be reinstalled from the Microsoft Store.
If it is the Microsoft Store you need to repair, there are two ways to do so. In Settings, click System and then Troubleshoot, and you will see an Other trouble-shooters button. Here, you will see a Windows Store Apps button, see Figure 12-19 (note this may be renamed in the future to Microsoft Store Apps). Clicking this will run a troubleshooter that will reset the store to its default settings.
Figure 12-19. You can reset the Microsoft Store from Settings
To reset the Microsoft Store using scripting, open a Command Prompt window, you do not need to do this as an Administrator for this task though you will need to be signed in as an Administrator, and type the command wsreset. This will reset the Microsoft Store and then open a Store window for you (see Figure 12-20).
Figure 12-20. You can reset the Microsoft Store from the Command Line
Note:With third-party stores such as those from Amazon and Epic, you can reset those stores in the same way I described resetting Microsoft Store Apps, as they are effectively installed apps themselves. The apps they install may also appear in the Apps & features panel, though depending on the store they may not. These stores may, or again may not, have their own mechanisms for repairing and resetting apps, and this will vary from one store to another.
Managing Apps with Task Manager
The Task Manager in Windows 11 is incredibly useful and full-featured, and we have and will continue to look at different aspects of it throughout this book. You can manage programs and apps using it however. The easiest way to open Task Manager is to rightclick the Start Button and click it when it appears in the pop-up menu. You can also open it from pressing the Windows key + X to open the administration menu, or from a Ctrl + Alt + Del key press. You need to be running the full Task Manager, so make sure you click the More details button in the bottom-left corner if there is one.
Note:It’s possible by the time you read this that Microsoft will have reversed their decision to remove running Task Manager from a right-click anywhere in a blank space on the Taskbar. To be honest, this is something I don’t care about at all, but it certainly seemed to be the number one complaint from IT Pros and power users after Windows 11 launched in 2021.
We’ll begin with Microsoft Store apps. Click the App history tab in Task Manager, and you will see recorded usage data for installed store apps from the last 30 days (see Figure 12-21).
Figure 12-21. Windows records store app data for 30 days
This data includes information on how long the app has been running, how much network and Internet bandwidth it has used, and how much of that has been used on a metered (cellular) network. We can ignore the Tile updates column as Windows 11 doesn’t support live tiles, and this will inevitably be removed in the future.
The data this panel provides is heat-mapped, with any especially high usage appearing as either an orange or a red highlight. If you have a store app that you feel is monopolizing your processor time or bandwidth, this can be a useful place to find it. For all programs and apps, navigate to the Processes tab. Here, and again all heatmapped so you can easily see high CPU, memory, disk, and network usage, is a list of all the running processes on the PC. This will include any currently running apps and also any background processes that are running (see Figure 12-22).
Figure 12-22. You can view a list of all running processes on the PC
To the left of each app is an arrow, and clicking it will reveal a sublist of all the dependent processes for that app (see Figure 12-23). This includes any open file(s) and, in the case of the following example, any plug-ins and extensions that are running.
Figure 12-23. You can view any dependent processes for running apps
Again, you have CPU, memory, disk, and network usage for these subprocesses, helping you to determine if, for example, a DLL has crashed or if an extension is using too much disk time.
There are other useful features for managing and troubleshooting processes in Task Manager, and we will look at this in detail in Chapter 13.
Managing Startup Apps and Programs
One more aspect of managing apps and programs is keeping a lid on everything that wants to start automatically when you start or sign in to your PC. This used to be managed, in years gone by, from the msconfig panel, which we’ll look at in Chapter 18, but in Windows 11, it’s managed in Task Manager.
Clicking the Startup tab in Task Manager reveals all the apps and programs that are currently running at Startup or that have previously run at startup and that have since been disabled (see Figure 12-24).
Figure 12-24. You manage startup apps and programs in Task Manager
To set an app or program to automatically run, or not run at startup, all you need to do is select the item and then click the Enable or Disable button that appears in the bottom-right corner of the Task Manager window.
You will see though that each item has a Start-up impact score. This is a measure of how long it takes the app to start and how much it might slow the PC. For a fast, high-end desktop like my own, with a 16-Core AMD Ryzen and 64GB RAM, I don’t worry about such things, but for a low-end laptop, a high score here can make the difference between a quick startup time to the desktop and a slow one.
Summary
If you think there’s a lot in Windows 11 to help you manage processes and running programs, we haven’t even got started yet. In the next chapter, we’ll look at the more advanced tools in Task Manager for managing running processes and how processes interact with and are dependent on Windows services (and of course we’ll examine what services are).
You can also manage and troubleshoot processes and services with PowerShell just in case you were disappointed that I missed scripting tools in this chapter. The best tools for managing and troubleshooting processes and services though come as part of the Microsoft Sysinternals suite, which I first mentioned in Chapter 2. We’ll look at what’s available to help with processes and services and how to get the best from those tools.