


Configuring Windows 11 for speed and security windows 10

Configuring Windows 11
A hugely important part of configuring a PC so as to make it as bombproof as possible is in the initial setup and making sure that your user accounts and overall configuration are managed in such a way so as to help avoid problems occurring later on.
In the previous Article, we looked at some of this, such as using the Group Policy and Security Policy editors to set appropriate restrictions for users, such as hiding specific Control Panel items you don’t want them to have access to. There are other parts of the Windows installation though that you should know about, if only so that you can find them quickly if you suspect a problem with one has arisen.
Using Group Policy to Manage Configuration and Settings
When Microsoft first created the Settings panel with Windows 8, the aim was to have an area where nontechnical users could access and tweak options for how their desktop looks and operates, without exposing them to anything else that an administrator might not want them to change or risking their accidentally changing something that could interfere with the smooth operation of the PC or their software.
While Settings in Windows 8 was pretty basic, with just a small handful of options that still required end users to need to delve into the Control Panel for many things, the feature was expanded over the lifetime of Windows 10, and in Windows 11 it is pretty full-featured.
Slowly but surely, all the items in the Control Panel are being moved either into Settings or into the Windows Tools folder (previously known as Administrative Tools).
Settings therefore is becoming a place where any end user can change configuration options to their heart’s content, with no risk of causing problems with the OS… or so you might believe.
The truth is somewhat different, as there are actually a great many options that can cause issues with the PC. Let’s take the example of an end user I’ll call “the Tinkerer.”
We’ve all met this person; you may have even been one yourself in the past. This is a nontechnical user who believes that they can fix problems because “they’re easy, it’s not a complicated job” when all they’re really going to do is make matters worse.
Two of the best examples of how this can happen are with printers and Bluetooth devices, both of which are controlled entirely from Settings. Let’s say the Tinkerer isn’t able to print a document from their laptop and they decide that the printer is mis-configured, so all they need to do is remove the printer in Settings and reinstall it.
This could have the desired effect, especially if the print queue is snarled with a failed job, but it’s very likely to make matters worse overall. The name, IP address, or sharing assignment of the printer on the network would be reset, and every other user who then needs to use that printer can suddenly find that it’s not available to them.
Then we come to a Tinkerer who uses a Bluetooth headset as part of their workflow for online meetings. One day, they discover the headset isn’t working, so the obvious, to them anyway, solution is to remove it in settings and reinstall it. Bluetooth devices can often be problematic, and for as much as the solution can largely be restarting the device or the laptop, or just checking the Bluetooth device is charged in the first place, removing a Bluetooth device doesn’t guarantee that it’ll successfully install again afterward, such is the nature of the technology and the fact that Windows has always had a problem with Bluetooth devices.
Clearly then you’ll want to disable changes to some items using Group Policy. The options for Settings in Group Policy are still labelled as Control Panel. Whether this will change in the future is anybody’s guess, but I would assume not.
Hiding Settings
There are two areas where policies can be found for Settings, Computer Configuration ➤ Administrative Templates ➤ Control Panel and User Configuration ➤ Administrative Templates ➤ Control Panel.
To be honest, it’s pretty much everything in these policy areas you’ll want to consider changing, perhaps with the exception of the Personalization policies, as you’ll only want to enforce those if your organization insists its own desktop wallpaper is used (something I’ve also found a bit totalitarian personally).
In Figure 4-1, you’ll see the policies pertaining to printers, including being able to block the deletion and installation of printers on the PC.
 Figure 4-1. Group Policy options for Settings are still named Control Panel
In both Computer Configuration ➤ Administrative Templates ➤ Control Panel and User Configuration ➤ Administrative Templates ➤ Control Panel, you will see a policy called Setting Page Visibility. This enables you to hide whole areas of the Settings panel, such as hiding the Bluetooth options completely (see Figure 4-2).
 Figure 4-2. Group Policy makes hiding applets straight forward
You use this policy with the show only: and hide: commands, and you can choose what to display such as hide:bluetooth to hide all the Bluetooth controls from all users on the PC. A complete list of Uniform Resource Identifier (URI) codes to use with this policy can be found on the Microsoft Docs website.
Hiding Control Panel Items and Windows Tools
Similarly, and using the same URI list, you can hide specific Control Panel items. The policy for this can be found in User Configuration ➤ Administrative Templates ➤ Control Panel and is configured in the same way as that for the Settings panel. You do have two separate policies here however, Hide specified Control Panel items and Show only specified Control Panel items.
Tip:If you want to completely block all access to the Control Panel and Settings for a specified user, use the policy User Configuration ➤ Administrative Templates ➤ Control Panel ➤ Prohibit access to Control Panel and PC settings. Do note however that this will remove all access users might want to accessibility, and time, date, and region options they may require.
What you might also want to hide from the end user is the Windows Tools panel, as this clearly includes administrator-level tools the user does not need to be accessing. In User Configuration ➤ Administrative Templates ➤ Control Panel, you need to open the Hide specified Control Panel items policy and add Microsoft. Administrative Tools to the list of hidden items.
Using the Registry to Restrict Windows Tools Access
You can also achieve this with a Registry change, by navigating to HKEY_CURRENT_ USER\Software\Microsoft\Windows\CurrentVersion\Explorer\Advanced and adding a DWORD called StartMenuAdminTools to which you assign a value of 0 (zero).
There are additional options here that mirror those in Group Policy, such as being able to hide specific drives in Explorer and setting overrides for desktop and Taskbar animations and configuration.
Managing Programs and Apps
In addition to hiding Settings and Control Panel items, you will also want to manage what users can do with apps. If we go back to our Tinkerer, they could decide that an app doesn’t need to be installed or that one of their favorite apps from home should definitely be on the PC.
Computer Configuration ➤ Administrative Templates ➤ Start Menu and Taskbar and User Configuration ➤ Administrative Templates ➤ Start Menu and Taskbar are where you will find the main options for policies such as hiding the All Apps list and preventing users from customizing the Start Menu (useful for a dedicated PC that is to be used by different people).
In User Configuration ➤ Administrative Templates ➤ Control Panel ➤ Add or Remove Programs, you can Prevent uses from uninstalling applications from Start which is certainly a good policy to enable. It is also possible here to remove specific items from the Start Menu power options, such as preventing a user from shutting down the PC, which is useful if you undertake updating and auditing overnight.
In both Computer Configuration ➤ Administrative Templates ➤ Windows Components ➤ Store and User Configuration ➤ Administrative Templates ➤ Windows Components ➤ Store, you can disable the use and installation of apps from the Microsoft Store (which is where your users might want to install some games from) or even disable the Microsoft Store entirely on the PC.
You will also see a policy here where you can Turn off the offer to update to the latest version of Windows, which you will certainly want to do if you strictly test and control the deployment of Windows Updates, Feature Packs, and new versions of the operating system.
Managing User Accounts
In Computer Configuration ➤ Administrative Templates ➤ System ➤ User Profiles and User Configuration ➤ Administrative Templates ➤ System ➤ User Profiles, you will find options to manage user accounts, such as forcing the implementation of local or roaming profiles.
There are other ways of managing users on a PC however, and one of these is to assign users on a PC or a network to “groups.” These groups of users can have different access to files and shares, and different privileges on the PC, and because the permissions are assigned to the group, any user that you later add to that group will automatically inherit the same permissions.
You use the Local User Manager (search for lusrmgr.msc in the Start Menu) to create and manage both users and groups on the PC (see Figure 4-3). This is standard Microsoft Management Console fare, with main categories in the left panel, context-sensitive menu options in the right panel, and the meat and potatoes information in the center.
 Figure 4-3. Local User Manager is where you can manage user groups
The main view shows a list of all the user accounts configured on the PC. This includes some that are hidden by default, including Guest, which is a legacy hangover from earlier versions of Windows that supported a Guest account, and DefaultAccount, which is used by the operating system as the template for new accounts when they are created.
Double-clicking an account displays additional options for it (see Figure 4-4), including password policies, which user group(s) the account is a member of, and specifying that a script must be run on the PC each time that user signs in.
 Figure 4-4. You can set specific options for individual user accounts
Clicking Groups in the left panel displays a list of all the user groups defined on the PC, and there are a lot of them in the default setup (see Figure 4-5). This panel is really only useful for adding users to specific groups, as there are no configurable permissions defined here.
 Figure 4-5. You can modify permissions for user groups and create new groups
Permissions in Windows are defined on different objects, these being files, folders, and disks, and we’ll look at these permissions in detail in Chapter 10.
Another useful tool for managing user accounts is the Network Places Wizard (search for netplwiz in the Start Menu). This provides additional options for the user accounts configured on a PC (see Figure 4-6).

Figure 4-6. You can manage user accounts further using netplwiz
Click the Advanced tab at the top of the Network Places Wizard, and you’ll get more options such as Advanced user management which takes you to the Local User Manager window. Perhaps the most useful option here for organizations is a simple check box requiring users on the PC to use a more secure sign-in method, by having to press Ctrl + Alt + Del at sign-in (see Figure 4-7).
 Figure 4-7. You can force users to sign in using Ctrl + Alt + Del
Click the Manage Passwords button, and the Windows Credential Manager will open.
It is here you can create and manage locally stored passwords and security certificates for network resources, installed software, and web and intranet sites (see Figure 4-8).
 Figure 4-8. The Credential Manager is where locally stored passwords can be managed
It is here that you can make backups of or restore the password and certificate database and also where you can add organization-specific passwords and security certificates. To the right of each item in the list is a small down arrow. Click this to manage the password or certificate.
Local vs. Roaming
If you have your user accounts connected to a domain, then the user profile will be stored on a server, or in Azure AD in the cloud, and pulled to the PC at the time of signin. This enables users to be able to work from any PC with the same profile being used.
These roaming profiles can be extremely helpful in business, but there are times too when you might need, or it might just be preferable, to have the user account held locally on the PC, perhaps because it’s a dedicated workstation for video production or engineering design, and you only have one or two of these machines.
The setting to switch a user account between local and roaming profiles still resides in the Control Panel. It’s difficult to judge at this stage whether it will ultimately move to Settings or Windows Tools, but the latter perhaps seems more likely.
In Control Panel, open User accounts and you will see links on the left side of the window to Configure advanced user profile properties and to Change my environment variables. Click the former link and you will be presented with a dialog in which you can change the account profile type for the currently signed-in user (see Figure 4-9).
 Figure 4-9. You can switch accounts between local and roaming profiles
User Environment Variables
Sometimes, though, you need far more granular control of a user profile, such as change the default shell user folders. This is where you click the Change my environment variables link. You are then presented with a dialog containing settings for the user account’s user and system variables (see Figure 4-10).
 Figure 4-10. Some user environment variables can be changed from Control Panel
Moving the Shell User Folders
Not all environment variables can be changed here however, and the system variables cannot be changed at all for many accounts. To change all the shell user folders (Documents, Pictures, etc.), you need to use the Registry Editor, type regedit in the Start Menu, or run Registry Editor from Windows Tools.
With the Registry Editor open, navigate to HKEY_CURRENT_USER\Software\ Microsoft\Windows\CurrentVersion\Explorer\User Shell Folders, and you will see Registry keys for all the currently signed-in user’s shell folders (see Figure 4-11).
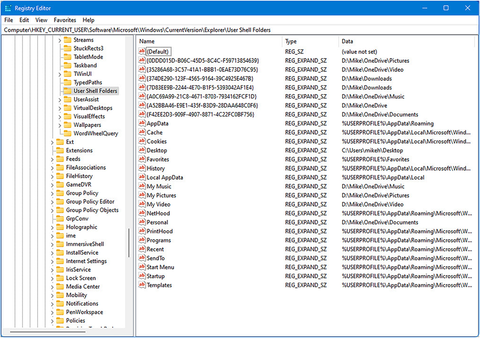 Figure 4-11. You can change a user’s shell folders using the Registry Editor
Double-clicking any of these Registry values allows you to change them, which is useful for the currently signed-in user, but what about other users on the PC? We’ll look in depth at the Windows Registry in Chapter 19, but if you have HKEY_USERS selected in
the left panel, a Load Hive option becomes available from the File menu. This will allow you to temporarily load Registry files for other users on the PC.
You will need to have Show hidden files, folders and drives selected, which you can do in File Explorer by clicking the menu icon in the toolbar and then clicking Options from the menu that appears, which will display a dialog in which you can select the appropriate Hidden files and folders option.
When you click Load Hive, you should navigate to the %USERPROFILE% folder for the user you want the Registry hive for, which can be found in the C:\Users\ folder on the PC. It is the NTuser.dat file you should open. You will be prompted for a key name. This will help you identify that Registry file in the Registry Editor, so perhaps name it after the user account name you’re editing.
With that done, under HKEY_USERS you will now see Registry entries for the name you have just specified, Jake in Figure 4-12, and you can navigate to the User Shell Folders keys to make the necessary changes.
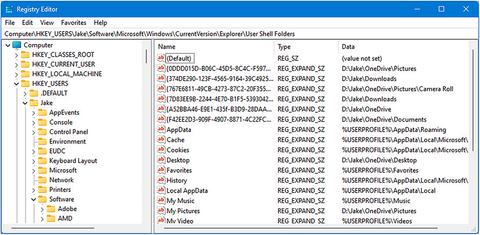 Figure 4-12. You can edit the Registries of other users on the PC
There are a couple of other ways for changing the locations of the Shell User Folders, but the relevant account must be signed in at the time. Right-clicking one of the folders in File Explorer, I have chosen Documents in Figure 4-13, presents a dialog in which you have a Location tab.
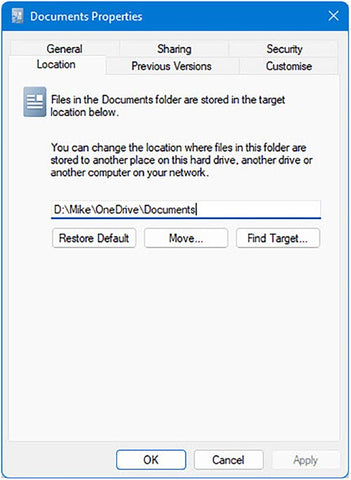 Figure 4-13. You can change a user folder location in File Explorer
If you then click the Move button, you can select a new location on the disk for the user folder. With this done, Windows 11 will ask if you want to move all the files and folders in the old location to the new one, and unless you have already moved them manually, it will do the job for you.
One of the downsides to this approach, apart from the fact that the user has to be signed in at the time, is that you have to do it one user folder at a time. It is possible however to use File Explorer to move multiple shell user folders at once, and it’s so devilishly simple and straightforward you’ll wonder why it’s not more obvious.
This method involves selecting the shell user folders you want to move and using a simple cut and paste operation to move them to the new location. Windows knows what you’re doing when this happens, and it will automatically update all the appropriate Registry keys for you on the fly.
Managing Home and Hybrid Workers
Everything I’ve detailed so far is great for workers at your own premises, or where they use company-provisioned laptops when out and about, but what about hybrid and home workers using their own PCs?
These workers can present a challenge as not only do you have no real control over the computer they use, it could be shared with their children who use it for playing games as an example, you don’t have any real control over what type of operating system it runs in the first instance.
This is where Mobile Device Management (MDM) and Microsoft Endpoint Manager come into play. You can find all manner of excellent resources about this on the Microsoft website, but suffice to say that most modern operating systems support MDM, including Mac OS, iPad OS (see Figure 4-14), ChromeOS, and Android, and it’s most helpful because if your employee is happiest using a keyboard with their iPad Pro when that’s what they should be able to use, rather than forcing them to buy a laptop they’ll probably hate, or for your organization to provision a laptop for them that they’ll probably hate too.
 Figure 4-14. MDM is supported on many devices, seen here on an iPad
What MDM does is it allows your organization to set and manage certain security and privacy policies for any type of personal device, from a Windows 10 PC to a Chromebook. These policies include minimum security requirements, that is, that the computer must have up-to-date anti-malware and security provisioned and that if the person leaves your organization, any files and documents of yours they still have residing on their personal device can be remotely wiped.
With Intune and MDM correctly provisioned, the hybrid or home worker can use their own personal device while still having full access to company cloud services, documents, and shared resources, such as Teams chats and company calendars. It is frankly an essential set of tools for any business that supports remote workers, even if they’re using company-provisioned laptops.
Creating Sustainable PC Systems
In my book The Green IT Guide (Apress, 2021), I wrote A LOT about sustainable computing, from our smartphones and laptops to powerful desktop systems, and cloud and online hosted services, and how you can make smarter purchasing decisions in all of these areas with a little bit of help and research. It’s a good book, genuinely, and I’m not just saying that because I wrote it!
When you are provisioning computers for any of your workers, sustainability ought to be high on your priority list. Currently, the amount of ewaste produced is estimated to be around 50 million tons annually, of which only 20% is currently recycled.
In the book, I detail a whole host of ways in which still working IT equipment can be reused when it’s retired, from donating it to projects helping the school-age children of low-income families to veterans and schools in the developing world.
One of the biggest challenges at the moment though is around a subject you might have heard of called “Right to Repair.” This is a movement that’s gaining significant traction around the world and covers everything from our laptops and smartphones to John Deere tractors and McDonald’s ice cream flurry machines.
For a device to meet Right to Repair standards, it should comply with four basic principles:
- The device should be constructed and designed in a manner that allows repairs to be made easily.
- End users and independent repair providers should be able to access original spare parts and tools (software as well as physical tools) needed to repair the device at fair market conditions.
- Repairs should be possible by design and not hindered by software programming.
- The repairability of a device should be clearly communicated by the manufacturer.
This means that computers where the memory and SSD (solid-state disk) are soldered to the motherboard and not removable without breaking the whole thing should not be purchased, with businesses and consumers instead favoring devices where components can be swapped out and where batteries and screens can be easily replaced in smartphones.
The problem has been caused in recent years by the trend of devices getting thinner and thinner, whereby traditional screws to hold them together have been replaced entirely by strong glue, making a great many devices completely unrepairable. You can check the repairability scores for thousands of laptops, smartphones, and other devices online at www.ifixit.com.
So when choosing new IT equipment, it’s a good idea to keep Right to Repair in mind as this is not only good for the environment and reducing the amount of ewaste that ends up in landfill, with all the resultant chemical pollution that brings and there are some very nasty chemical and metals in our devices, but it means that the device will have a much longer potential lifespan in your organization, which brings with it the happy coincidence of reducing your overall costs.
Summary
Clearly, there’s a lot you can do to correctly provision Windows 11 PCs for your workforce, and a lot of choices to be made, especially with Group Policy, balancing security and user experience. There are whole books on Group Policy and Mobile Device Management in the Apress catalogue and more resources still available on the Microsoft Docs website.
In the next chapter, we’ll look more at hybrid workers and the processes of actually supporting local and remote users. You’ll learn how you can take the end user with you on the journey to help reduce repeat problems occurring and how you can establish appropriate and effective IT training.