


Hardware and Peripherals Troubleshooting for windows 10 and windows 11

Hardware and Peripherals Troubleshooting
I have some Bluetooth headphones; they were pretty expensive too being high-end Bowers and Wilkins affairs costing almost $400 each (I actually own two of these), and that price was got in a sale. The sound quality from them is astonishing, but as I also purchase 24-bit audio versions of all my favorite albums (digitally pure and uncompressed, unlike 16-bit CD quality), I’d be a bit dim to then try and use cheap headphones to listen to them.
I also purchased a USB high-definition Bluetooth streaming dongle, to ensure the highest bit rate to said headphones, an Avantree Leaf Pro, and the whole affair works brilliantly. The audio is crisp and clear, I can hear all of the high-end and low-end notes, and the overall experience makes paying such a high price for the kit worthwhile.
You can imagine then how frustrating it is to switch on the headphones to discover that something that worked perfectly well the day before suddenly doesn’t want to work again. This is, of course, the issue with what has always been a fairly creaky Bluetooth stack in Windows. It’s not just Windows of course as Bluetooth can be creaky on any operating system, failing to connect a device that worked perfectly well only the day before.
Bluetooth isn’t the only hardware technology that can cause problems though, as we all know. When USB (Universal Serial Bus) first appeared in PCs running Windows 95, it was seen as a revelation. I remember (showing my age now) having to modify the contents of driver .ini files for serial and parallel devices, to tell the PC which port they were plugged into and what BAUD rate they should communicate at, and fighting and struggling for hours sometimes just to get the damn thing to work. I am extremely thankful that I never had to deal with token ring network cables (shudder!). Even USB devices can cause the occasional problem.
I remember, when writing my Windows 8 troubleshooting book, having an argument with a senior engineer at Microsoft. I’d written that sometimes when you plugged in a USB device such as a printer, the device wouldn’t be recognized, but the solution was to plug it into a different USB port, one on a different bus on the motherboard instead which would force Windows to reload the driver.
Said engineer swore blind this wasn’t a thing because Microsoft had never heard of it. I argued that just because Microsoft had never heard of it didn’t mean it wasn’t a thing and that he should now consider himself informed. Anyway, a couple of versions of Windows later and think the issue got fixed as I’ve not seen it for a while.
Let’s Start with a Top Tip
Seeing then as how much of this chapter will deal with stuff that simply refuses to work, I think we should start on a high note with a top tip. If you’ve ever had a problem where you’ve needed to use an old version of a driver, perhaps for stability reasons, perhaps because it’s an older piece of hardware and there’s only one version of the driver that’s actually known to work, then you’ll probably have run into the problem that comes with single file drivers.
This is effectively an app that you click to run a driver installer. The alternative and, fortunately, more common approach is for a hardware manufacturer to provide the driver as a folder containing a whole bunch of all the files that constitute the driver.
Well, what can sometimes happen with these single file driver installers is that they can perform a version check on your installed copy of Windows, and if they don’t like what they see, they’ll just say “No, not doing it!” and the driver installer won’t run.
“But,” I hear you cry, “I thought this was supposed to be a top tip, not a depressing reality.” That single file installer is really just an executable zip file. You might remember back in the early days of ZIP files that you could set the zipped archive to automatically run something or automatically unpack when it was double-clicked. Well, this practice still exists, and it’s what these driver files use.
To get around this, you need a third-party archival program such as WinRar, which you can download from www.winrar.com, and then use that to open the installer file; note that you will need to tell WinRar to open “All file types” as otherwise it won’t see it in the file open dialog.
Here, you will see that the installer is really just a plain ZIP file, and you will be able to see the folder and file structure within (see Figure 15-1). If you then unzip these files and folders to your hard disk, you will be able to completely bypass the Windows version check and manually install the driver from the correct .INF file.
Figure 15-1. You can unzip and access sealed single file driver installers
Caution:Never download any software or ISO file from a general file repository website where there is an official source, as these files can sometimes be injected with malware.
Best Practice for Managing Physical Hardware
So how often have you, or someone you know or worked with, tripped over a cable? This can cause all manner of problems, and it would be remiss of me not to mention how important good cable management is. Plugs and cables can be caught and snagged and often broken.
If you trip over a network or a power cable, the results can be pretty devastating. Not only can you pull and break the cable and the plugs on either end of it, you can damage the sockets the cables are plugged in to. This could include an Ethernet socket on your PC or laptop.
Tripping over a laptop power cable can often cause the laptop to come crashing to the floor, and this is of course why Apple’s MagSafe chargers proved so popular, being connected to a MacBook only by magnets and not by being physically plugged into a socket.
Even USB cables can get caught and snagged, and I’m pretty sure you’ll have seen a broken USB port on a laptop at some point in your life. It’s very difficult to fix problems like this, and sometimes the solution can run to replacing the whole laptop, especially if the case is cracked or the motherboard damaged.
This is, of course, something I personally feel very strongly about. In my book The Green IT Guide (Apress, 2022) (see Figure 15-2), I wrote a lot about the problems of ewaste and how currently of the 50 million tons produced worldwide each year, only 20% of it is recycled, with the rest going to landfill with all the unpleasant consequences of the metals and chemicals contained within soaking into the ground and water table.
Figure 15-2. If you want to find out how to make your IT more sustainable, my Green IT Guide can help
If you’ve not read the book yet, I would urge you to add it to your reading list as one of my primary motivations for writing it was that I couldn’t find a similar book having been written before, not for more than a decade anyway. Oh, and if you happen to know Morgan Freeman, please ask him to narrate the Audible version.
Anyway, there are a huge number of reasons why good cable management is essential. It’s a way to save vast volumes of cash on broken equipment and computers, it’s a huge time saver as routing and installing new cable and sockets can be enormously time-consuming, and it’s also a great way to avoid clumsy Eric from accounts from falling over in the office for the seventh time in a week.
Managing Hardware and Drivers in Settings
If you used Windows 8 and 8.1, then you might remember the Settings “app” (I prefer to call it a panel personally) didn’t let you do much more than change the desktop wallpaper. This changed considerably with Windows 10, but when that launched in 2015 if you wanted to do anything more technical than end-user interface stuff, then you had to revert back to the Control Panel.
These days, things are different. I’ve written a lot about how Settings is slowly getting stuffed (perhaps a little overstuffed in places) with current and former Control Panel applets. This means that there’s actually quite a lot you can do to manage devices and drivers in Settings.
Managing Bluetooth Devices
I began this chapter bemoaning how flaky the Bluetooth stack is in Windows. In fairness, it’s always been flaky for some reason though it’s considerably better than it used to be.
You manage Bluetooth devices from Bluetooth & devices funnily enough, and it’s a straightforward affair. In fact, this is now the only place within Windows 11 to manage Bluetooth devices, as the old Bluetooth applet in Control Panel has been removed, and the Devices and Printers applet doesn’t display Bluetooth devices. With Bluetooth devices, it’s a simple affair of adding them and removing them. Click the big Add device button and tell the dialog that appears what type of device you’re connecting (see Figure 15-3).
Figure 15-3. It’s simple to add Bluetooth devices to Windows
You can click the View more devices button to see all of the devices connected to the PC, but these sadly are not organized by Bluetooth, USB, etc., but by device class, Input, Audio, and so on.
You can also remove a Bluetooth device by clicking the three dots icon to its right and then clicking Remove device, but really that’s about it for managing the devices themselves unless you have a Bluetooth device that comes with its own third-party control panel, and this will most likely sit in the System Tray.
Speaking of the System Tray, Windows 11 does also have a Bluetooth icon that resides there, which allows you to perform actions such as adding a Bluetooth device, sending and receiving files from a Bluetooth device, and opening Settings (see Figure 15-4).
Figure 15-4. You can manage some Bluetooth features from the System Tray
At the bottom of the Bluetooth & devices ➤ Devices Settings page are a few additional options. Show notifications to connect using Swift Pair can help you connect to discoverable Bluetooth devices when they’re in range (see Figure 15-5).
Figure 15-5. Additional Bluetooth settings are hidden at the bottom of the devices list
Below this are options to Send or receive files via Bluetooth which opens a wizard and which is one of those Windows features like Storage Spaces and File History where I don’t know anybody that’s ever used it.
Below this is a More Bluetooth settings link which, as I write this, pops out a more traditional dialog, but we can probably expect this to be folded more into Settings at some future point. This dialog (see Figure 15-6) has three tabs.
Figure 15-6. A “few” extra Bluetooth Settings can be found in a pop-out
The first tab, Options, is where you’ll find the actual settings. There’s not much as you can see from the screenshot, and the Restore Defaults button sadly won’t reset the Bluetooth stack in the event of a problem, it just unchecks and rechecks some of
the boxes. Some apps and programs, especially older software, require a COM (Serial) port to communicate with a Bluetooth device. This can be especially common for GPS software.
You can add and manage virtual Serial ports from the COM Ports tab (see Figure 15-7). When you select an outgoing port, you can choose which already installed Bluetooth device will be assigned to it.
Figure 15-7. You can add virtual serial ports for software that requires them
Under the Hardware tab, you will see the different Bluetooth hardware and software drivers you have installed. If you are having difficulty with a device, you can select it and click its properties button. Then, under the Events tab, you can see any error events that have been pulled from the Event Viewer (see Figure 15-8).
Figure 15-8. You can get error details for Bluetooth devices
I am actually having problems with two Bluetooth devices that have been ongoing for a while now, which just goes to show how flaky the Windows Bluetooth stack can still be. One is the error seen in Figure 15-8, and the other is a “Generic Bluetooth Radio” device that I’ve plugged in just for demonstration. This is a USB Bluetooth 5 dongle that flatly refuses to work no matter what I do with it, but it was a cheap thing from China, so I can hardly expect it to be brilliant when it only cost $5 to begin with.
Managing Printers and Scanners
The term paperless office can be traced back to an article in Business Week in 1975. The idea was that office automation would make paper redundant for general tasks like record-keeping. When the desktop computer came into existence, and more documents could be stored electronically, people got very excited about the concept, and this was further fueled when Adobe created the Portable Document Format (PDF) file in 1991.
So that went well then, as printers are still everywhere and trees are still being cut down so that documents that could very well be sent by email or messaging are printed so that Derek in the office can read it once, scrawl on it a bit, and then recycle it (sigh!).
Tip:My top tip for reducing paper usage is to switch to bamboo. It’s much more sustainable (i.e., incredibly quick to grow), can be used for any type of paper from printer paper to kitchen roll and toilet paper, and is indistinguishable from paper made from wood… even the loo roll!
If you’re interested, in the early days of writing this book, I fed back to Microsoft some suggestions for how to encourage people to use less printer paper. This included separating “Digital Documents” and “Paper Documents” in the Windows and Office Print dialogs and adding quick “Print and send digitally” options for messaging services such as Teams. You can read more about this on my website at https://pcs.tv/3Oo7KZD, and I genuinely hope they build these suggestions into Windows.
It's always a good idea to encourage people to use digital documents anyway, though when I was feeding back my ideas to Microsoft I asked an open question to the attendees at that event, “How many people have had to print a document, so you could sign it, only to scan it in again and email it?” Alas, more than half the people in the room put their hand in the air. For this, I can highly recommend the use of a service such as www.docusign.com.
Printing is another of those areas where everything is being shifted into Settings. There’s actually not much extra you can do outside of settings now that’s worth it, but there are a few administrator-level options you will find useful, and I’ll detail these shortly.
Open Settings and Bluetooth & devices, and you will see a Printers & scanners link. This will take you to a page where your physical and digital printers are listed (see Figure 15-9) and where there is an Add device button to add a new printer to the PC.
Figure 15-9. You can manage printers from within Settings
When you click a printer, there are various options available for it, such as making it the default printer, for the PC. Most of these still currently open older Control Panel applets, but everything is accounted for and available from Settings more easily than it is from the Control Panel itself (see Figure 15-10).
Figure 15-10. You can access all options for printers in Settings
Setting Your Default Printer
While setting your default printer is highly useful for a static, desktop PC where there is only one printer and you don’t want Windows to occasionally change it back to send to fax or some other esoteric option, there is also a great way to manage printers.
We’re all moving about these days, for as much as international crises allow us to anyway, which means that it’s hugely common now for mobile workers to use their laptop between two, three, or even multiple sites. Windows has for some years now included a setting that accommodates this.
In Settings under Printers & scanners is an option to Allow Windows to manage my default printer (see Figure 15-11). With this set, Windows keeps a record of what printer you use at different sites, and it separates them by their different wired or Wi-Fi networks.
Figure 15-11. Windows can manage different default printers for different sites
The upshot of this is that when you move to a different location, the OS should remember what printer you used the last time you were there and offer you that when you want to print something next. This is highly effective, but I caveat it with a “should” as we all know what will happen if I were to say “oh yes, it’ll definitely remember what printer you used last time.”
Using Print Servers
You may have a system in your office where a single PC, perhaps an older one, is configured as a file and print server, and the printer is plugged into that PC via USB or perhaps an older connection standard, which I will come to later.
Should this be the case, at the bottom of the Settings and Printers & scanners page is a Print server properties option. Click this and you can manage all aspects of the print server including what printers it manages and what users can have permissions to print documents and manage the printer(s), etc. (see Figure 15-12).
Figure 15-12. You can run a print server from a Windows 11 PC
Managing Printing Preferences
The way you choose to print documents on your printers isn’t really a subject for troubleshooting. I wanted to cover it though for two reasons. The first of these is to highlight that this is one area of Windows where you will get very different experiences depending on what printer you have installed and the manufacturer of that printer.
Figure 15-13 is a good example of this as I have both Canon and Brother printers on my home/office network. Microsoft has for many years now allowed printer manufacturers to customize their driver interface applets. The reason for this is that different printers support different features, and, frankly, it was just easier for Microsoft to do things the way they have than try and make a catch-all interface for Windows itself.
Figure 15-13. Different printer manufacturers have different management interfaces in Windows
In Chapter 5, I wrote about some of the challenges you can have supporting end users and the importance of not wanting to make any assumptions about them or the situation they’re in. This is a very good example because the print settings are something an end user might want to and even need to adjust and change from time to time. If you are providing phone support, they may not be able to describe to you what they are seeing, and the end result is that this can be a good time to request remote access, as I detailed in Chapter 6, so you can help them more quickly and effectively.
Managing Printer Properties
Of more use to a system administrator though is the Printer properties dialog, again available on a button in Settings when you click a printer. There are various options here that you can set to help make sure printers aren’t overused, are only used by the correct people in the correct way, and that you can also use to help save paper and ink as part of your own sustainability policies.
Under the General tab, you will see basic information about the printer, such as its IP address on your network, which can be useful for troubleshooting (see Figure 15-14).
Figure 15-14. You can get the IP address of a network printer
Below this is a Preferences button. This will display the same Printing preferences dialog I detailed just a moment ago, but whereas that is set on a per-user basis, here you can set it globally for all users. This means you can mandate that the default printing settings should be duplex (no both sides of the paper) if your printer supports it, in black and white only, on draft mode to save ink, automatically watermarked with the company logo or message, etc.
The Sharing tab will allow you to share a printer that is plugged into a USB port on a PC with other PCs on the network. You can also use this option for PCs already on the network, but let’s be honest, why would you want to? You can load additional drivers for the printer too should they be needed, such as those for the ARM version of Windows 11 or where a 32-bit (x86) version is needed for an older serial or parallel printer (see Figure 15-15).
Figure 15-15. You can load other drivers for different Windows installations
The Ports tab is where you will connect older Serial or Parallel printers, such as those required for specialist roles like payroll (see Figure 15-16). Click the Add port button to add a port if it does not automatically appear in the list to add a new port, though this method isn’t as filled with options as the one I will detail later in this chapter for adding and managing legacy hardware.
Figure 15-16. You can assign Serial and Parallel ports to printers
Tip:Some specialist laptops, especially ruggedized editions such as the Panasonic Toughbook and Dell Ruggedized ranges, often come with Serial ports as standard. This is because these are often needed for specialist engineering and scientific equipment. Serial and Parallel plug-in PCIe cards are also available online for $20 or so. Additionally, you can also find inexpensive USB to Serial and Parallel adapters online.
It is with the Advanced tab that things begin to get interesting as here you can get full administrative control over the printer. You can specify the hours in which the printer is permitted to be used or whether a Separator page is required by your organization (see Figure 15-17).
Figure 15-17. You can specify usage times for printers
If you work in an environment where color accuracy is of the utmost importance, such as print, advertising, or media, you can load and manage printer (and monitor) color profiles under the Color Management tab (see Figure 15-18).
Figure 15-18. Some specialist use cases require accurate color profiles for screens and printers
The other tab where you will find administrative options is Security. This is where you can specify what different users and user groups can use and configure with printers (see Figure 15-19). You might want to only allow specific groups of users, such as creatives or sales teams, access to color printers, or you might want people in small remote offices to be able to manage printers, where those in larger offices don’t have a need. In Chapter 10, I wrote about managing users and groups, and it works exactly the same way with printers.
Figure 15-19. You can specify user and group permissions for printers
Adding Older and Less-Compatible Printers
Windows 11 is very good at discovering and adding Wi-Fi, networked, and USB printers that it finds and automatically installing the correct driver (an Internet connection is always required for this), but sometimes you have an older or a less-compatible printer you need to install, such as the Serial and Parallel printers I mentioned earlier.
When you click the add printer button in Settings, if no printer is found you will be offered an Add manually option. This will allow you to specify where the printer is, by its IP address or name on the network, or if it requires manually installing (see Figure 15-20). We will look more at adding legacy hardware later in this chapter.
Figure 15-20. You can manually add a printer to Windows 11
Tip:If you need more control, and for as long as it remains in Windows 11, opening Devices and Printers from the Control Panel has an Add a printer button which will also search for a printer but give you quick access to this advanced dialog.
Managing Scanners
This section was called “Managing Printers and Scanners,” so we can’t let scanners get off without a mention. Scanners are fairly basic machines, so there’s not a lot of configuration available for them. If you have a multifunction device as most scanners are nowadays, then you will see a Scanner settings tab when you click your printer. This will provide links to download a scanner app, which at the time of writing open a Microsoft Store link to the Windows Scan app, and to access properties for the scanner (see Figure 15-21).
Figure 15-21. You can manage scanner properties from Settings
There’s really not much here, and a dedicated office document or image scanner will come with its own management and usage applications in any case.
Managing UEFI Systems
You won’t find any Windows 11 systems running on a PC with a traditional BIOS firmware. This is because Microsoft specified that the minimum installation requirements for a Windows 11 PC must include a TPM 2.0 (Trusted Platform Module) security and encryption chip, and these can only be found in newer UEFI (Unified Extensible Firmware Interface) firmware.
UEFI is much more secure and robust than BIOS and depending on the motherboard can include useful features such as an automatic dual backup copy of the firmware that the system can boot from if the main copy is corrupt or becomes infected with malware.
There are still some instances however where UEFI can need some attention. This can happen after events such as an update to the UEFI firmware, which will almost always reset it to its default state, and some electrical events like lightning storms can occasionally wreak havoc and cause firmware to reset.
Caution:Some desktop PC systems have a firmware reset button on the back panel that can occasionally and accidentally be pressed when a PC is moved.
There are four main areas that you might need to reconfigure after a UEFI firmware corruption or reset.
The Boot Order
When Windows is installed, the boot system will be set to load the operating system from the Windows Boot Manager (see Figure 15-22). Occasionally though, this can become a secondary boot device, and the primary might be set as LAN PXE (Local Area Network Preboot eXecution Environment) which is most commonly used by system administrators when provisioning new PCs on the corporate domain.
Figure 15-22. You can modify the boot order in the firmware
Bitlocker
It’s very common for a TPM chip to be disabled after a firmware reset or upgrade. This doesn’t mean the contents of the chip itself will be deleted, though there are circumstances in which this does happen that I will detail, but you will find that you will be nagged at startup for your 50-digit Bitlocker decryption key until you reactivate it.
Where the TPM can become wiped is if you use an fTPM (Firmware TPM) on the PC. This is where the TPM is built into the firmware itself, rather than residing on a separate chip on the motherboard. If you use an fTPM and also use Bitlocker to encrypt the drives in the PC, it is best practice to decrypt the drives before upgrading or resetting the firmware.
Your firmware will tell you if you have a physical TPM or a firmware TPM (see Figure 15-23). For my own desktop PC, for which I chose the components and built it myself, the motherboard came with an fTPM but also had a full TPM slot into which I plugged a module. I naturally choose to use the latter so that I don’t have to decrypt the drives every time I upgrade the firmware.
Figure 15-23. You might need to reenable the TPM or fTPM
Virtualization
Virtualization works differently in the firmware for Intel and AMD chips. This is because the different chip makers have their own proprietary ways to make virtualization work. With Intel, this is much more smooth, and you will find that a PC running on a Core or Xeon processor will just have virtualization work automatically. On an AMD processor though, you might need to enable their SVM (Secure Virtual Machine) feature in the UEFI firmware (see Figure 15-24).
Figure 15-24. You often need to enable SVM mode on AMD boards to support virtualization
Fast Boot
Fast Boot is a firmware system that Windows 11 uses to start a PC to the desktop more quickly (see Figure 15-25). What Fast Boot does is save a hibernation snapshot of the PC’s status when it is shut down and resumes this at startup. Generally, this is great, but if you have an operation running that requires a full startup operation to run, such as a driver install, Fast Boot can sometimes prevent the operation from running.
Figure 15-25. Fast Boot can interfere with some startup operations
I tend to turn off Fast Boot on my desktop PC as it can prevent you from accessing the UEFI firmware at startup should you need to. If you get stuck in a boot loop where the PC won’t start because you need to change something in the firmware, but you can’t get into the firmware because Fast Boot keeps bypassing the screen where you can access it, a firmware reset is often the only way out, and that’s not an ideal solution just to shave a few seconds of a cold boot time.
Windows Device Manager
Okay, so you were wondering when I was going to get to this, and I’ve kept you waiting for most of the chapter. Device Manager is currently accessed through the Control Panel, though we can expect this to be moved to Windows Tools during the life of Windows 11. The default view in Device Manager displays installed hardware according to groups such as Human Interface Devices, Display Adapters, and Network Adapters (see Figure 15-26). You click the arrow to the left of a category to see the specific devices contained within it.
Figure 15-26. Device Manager groups installed devices by type
There are other ways to view the devices however, and Windows 11 includes options that weren’t available with Windows 10. These include being able to view devices by their driver name (see Figure 15-27). This can help you quickly find and troubleshoot a driver if you have seen its name appear in an event log or a Blue Screen of Death.
Figure 15-27. You can view devices by driver name in Windows 11
Additional views include Resources by Connection which lets you view devices sorted according to the memory channels, input/output (I/O) ports they are using, or the processor IRQs (Interrupt Requests) they are using (see Figure 15-28). This can be useful when looking for older devices that are causing conflicts with other devices.
Figure 15-28. You can view devices by IRQ, I/O Port, or Memory Allocation
I say older devices here because it’s been a long time since IRQ conflicts have caused problems in Windows, but some older drivers may not fully accommodate the way in which Windows 11 assigns IRQ channels.
Note:IRQs are a signal sent to the processor that interrupts the current operation and allows a different operation to take place. They were useful for older, singlecore processors on which multiple programs had to be run simultaneously. IRQs are still used by Windows but on modern processors are much less of an issue than in the past.
You manage drivers in Device Manager by right-clicking them, and from the menu that appears, you can either Update [the] driver, Disable [the] device, Uninstall [the] device, Scan for hardware changes, or open the Properties panel for the device (see Figure 15-29). These options are also available from the Action menu at the top of the Device Manager panel.
Figure 15-29. You manage drivers from a right-click
Managing Device Driver Properties
There are some aspects of the device driver properties panel that we have already covered in this book, such as the Events tab where you can view any events logged by Windows pertaining to the device, such as errors and failures, and the General tab where any errors will be displayed in the Device status box.
Under the Driver tab, you can see the name of the driver publisher, the date the driver was written/released, the driver version number (this is especially useful if you know a specific driver version is more stable than the one you may be using), and whether the driver has been digitally signed and by whom.
There are also buttons you can use to get further details about the driver, more on this shortly, update the driver from Windows Update or manually, or disable and uninstall the device.
One especially useful feature is being able to Roll Back [the] Driver (see Figure 15-30). If you have updated a driver, perhaps through Windows Update, and now find that the new driver is unstable, you can roll back to the previous version of the driver and then pause updates until you find a better, more stable driver to install. Note that this feature requires you to have System Restore activated on the PC.
Figure 15-30. You can update, roll back, and disable a device driver
Manually Uninstalling/Reinstalling Drivers
One of the problems with drivers, especially with some more specialist hardware, is that you sometimes need an older version of a driver. Windows can prevent this by telling you a “newer version of the driver is already installed.” Should this happen, you need to manually remove and reinstall the correct driver version. In the device properties, you can click the Driver Details button. This will display a list of all the files that constitute the driver and in which folder(s) they can be found (see Figure 15-31).
Figure 15-31. You can view a list of all the files that constitute a driver
To manually remove the driver, you should not at this point delete those driver files from the PC. While it would probably be perfectly fine to do so, you run the risk of creating two bigger problems. The first of these is a raft or pop-up error messages every time you then start to the desktop telling you that the driver cannot be loaded and also that other devices might also malfunction as drivers can sometimes share their files.
This is where you need Microsoft’s Sysinternals suite and its Autoruns tool. Within Autoruns, click the Drivers tab and you will see a long list of all the drivers that start with Windows (see Figure 15-32). You can safely uncheck each one associated with the installed hardware because if you do uncheck something that makes the PC unstable, you can run Autoruns again and recheck it.
Figure 15-32. Autoruns allows you to disable drivers at startup
If you are concerned that a device driver is used by more than one device on the PC, it’s possible to check, and this is one of the useful features that has been added since Windows 10. In Device Manager, select the Devices by driver view. Here, you can select the driver you are concerned about and see if there is just a single or multiple devices attached to it (see Figure 15-33).
Figure 15-33. Device Manager can tell you if a driver is used by multiple devices
Before you restart the PC, you should go back to the driver properties, and from the Driver tab, you should Uninstall [the] Device, or at the very least Disable [the] Device (see Figure 15-34).
Figure 15-34. You should uninstall a driver before installing a different version
When you uninstall a device driver from the PC, you will sometimes, but not always, see an option to Attempt to remove the driver for this device (see Figure 15-35). What this will do is delete the driver files so that they cannot be automatically reinstalled. Not all drivers support this option, but it’s very useful at the times you need it.
Figure 15-35. Some drivers will offer to delete driver files
Tip:At the beginning of this chapter, I detailed how you can bypass the Windows version check for some device driver installers. This can be useful when you need to install an older version of a driver to maintain stability and compatibility.
Identifying Unknown Devices
Sometimes, you will see a device listed in Device Manager as Unknown. This is unhelpful as you need to have some idea what the thing is so you can choose the correct driver to install (see Figure 15-36).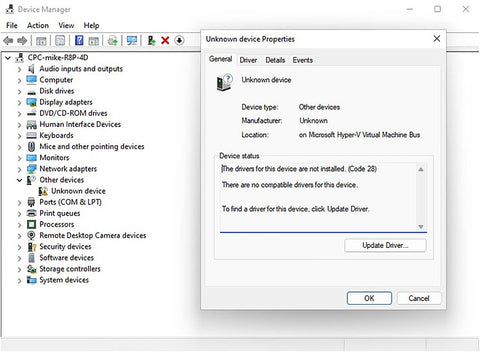
Figure 15-36. Unknown devices can be annoying, but can still be identified
This isn’t an issue however as it’s still possible to identify the device. In its Properties panel, open the Details tab, and from the Hardware IDs option in the drop-down menu, check the codes available. In Figure 15-37, they are VID_0A12&PID_0001&REV_2520. You may also see VEN_ (Vendor) and DEV_ (Device) codes for many devices, and a search online will help you quickly identify the device and, if necessary, download the correct drivers for it.
Figure 15-37. You can identify an unknown device from its Hardware IDs
Additional Driver Options
Some drivers will come with additional configuration options. This is especially common for network and storage devices and can include options for power management, caching, and advanced security and configuration (see Figure 15-38). These additional options will always appear as extra tabs within the driver properties panel should you need them for specific configuration purposes, such as preventing a device sleeping automatically if it is not waking properly and causing a problem.
Figure 15-38. Some drivers come with additional configuration options
Displaying Hidden Devices
Not all devices on a PC are immediately visible to you in Device Manager, as Windows 11 hides some devices that it believes you don’t need to see or interact with. These include devices that are set to be hidden by the vendor, devices that are set to have no overall class, and devices that have been removed but where the Registry entries remain, such as unplugged USB devices.
It is possible to view all these devices though. From the View menu in Device Manager, select Show hidden devices. These devices will now appear slightly grayed out in Device Manager to help you identify them (see Figure 15-39). This can be useful if, to give one example, a USB device causes Windows to become unresponsive or unstable when it’s plugged in.
Figure 15-39. Some devices are hidden in Windows
Installing Legacy Devices
Earlier in this chapter, I talked about installing legacy printers, such as those on Serial and Parallel ports, and how you can install the ports themselves in Windows. These ports and devices don’t have the firmware identification that comes with USB devices, and so all need manual configuration.
There are many other legacy devices that you might need to install in Windows 11 though, from specialist medical and engineering devices to analogue sensors, firewire devices, and dial-up modems. You can install legacy devices from Device Manager by opening the Action menu and clicking Add legacy hardware.
It’s fairly pointless checking the option for Windows to auto-detect the hardware as firstly legacy hardware doesn’t tend to be detectable, and also if it could be detected, Windows would have probably done so already.
Windows separates the devices into categories, helping you add and configure the hardware (see Figure 15-40). This is because different types of hardware will require different setup and configuration.
Figure 15-40. You can add legacy hardware by choosing its device category
When you select a device type, you will be presented with a list of drivers that are already available within Windows 11. This list isn’t anywhere near as long as it has been with previous Windows editions and just includes the main and most common hardware that Windows’ telemetry has told Microsoft is used (see Figure 15-41). If you do not see a compatible driver listed and you have the correct driver to hand, click the Have Disk button to install it on the PC.
Figure 15-41. Windows comes with drivers for some legacy hardware types
Blocking Driver Installs from Windows Update
If you are using a PC that includes specific hardware required for a critical role, you might not want Windows Update to find new versions of drivers and install them automatically, when these new drivers might cause the device to become unstable or unresponsive.
You can disable the automatic installation of new drivers by opening Settings, clicking System and then About, and then clicking the Advanced system settings link.
This will open a panel where, under the Hardware tab, you can click Device Installation Settings (it’s fairly well hidden then; Ed) and then choose to not automatically install new driver versions on the PC (see Figure 15-42).
Figure 15-42. You can choose to not install new drivers from Windows Update
Backing Up the Driver Store
As you might imagine, all the installed drivers in Windows are placed in a folder on the C: drive. There are two folders involved with this, and both can be copied and backed up should you need them. The advantage of doing so is that, if you need to reinstall Windows on the PC later, you can either just copy everything back from your backup or point Windows to your backup folder and tell it to get on with reinstalling your devices.
These folders can be found at C:\Windows\System32\DriverStore and C:\Windows\ System32\Drivers. It’s not always a good idea though to just copy the drivers from the backup back to these two folders in a new installation, as you may be inadvertently overwriting newer versions of drivers that Windows has downloaded or that exist in a newer Windows installer file. As a general way to keep a backup of critical driver files though, these folders can be very helpful.
Summary
Good device driver management on a PC is crucial to ensuring the smooth operation of the PC and especially specialist and legacy hardware. Anybody using a PC in a missioncritical role, such as manufacturing, medicine, or for scientific or engineering work, will tell you just how crucial it is that everything just works, all of the time.
We don’t always live in that type of world though, and the interconnectedness of our IT systems, the Internet, cloud services, and communications and electrical infrastructure can create its own problems, especially when you’re trying to diagnose and repair PCs.
In the next chapter then, we’ll look at this interconnectedness as we progress onto more advanced topics. We’ll look at where the kinks in the chain can cause problems, how to identify them, and how climate change can affect our PC use into the future.