


How to Fix Microphone on Laptop Windows 11?
Are you having trouble getting your laptop’s microphone to work on Windows 11? Don’t be frustrated! This guide is here to help you get your microphone working in no time. We’ll provide step-by-step instructions on how to troubleshoot and fix any microphone issues on your Windows 11 laptop. So whether you’re having trouble making audio recordings, video conferencing, or streaming, you’ll be able to get your microphone working again with ease. Let’s get started!
- Check your laptop’s sound settings: make sure the microphone is not muted and the volume is turned up.
- Update your audio drivers: open the Device Manager, right-click your audio driver, select Update Driver.
- Check the microphone’s hardware: make sure the microphone is connected properly to your laptop.
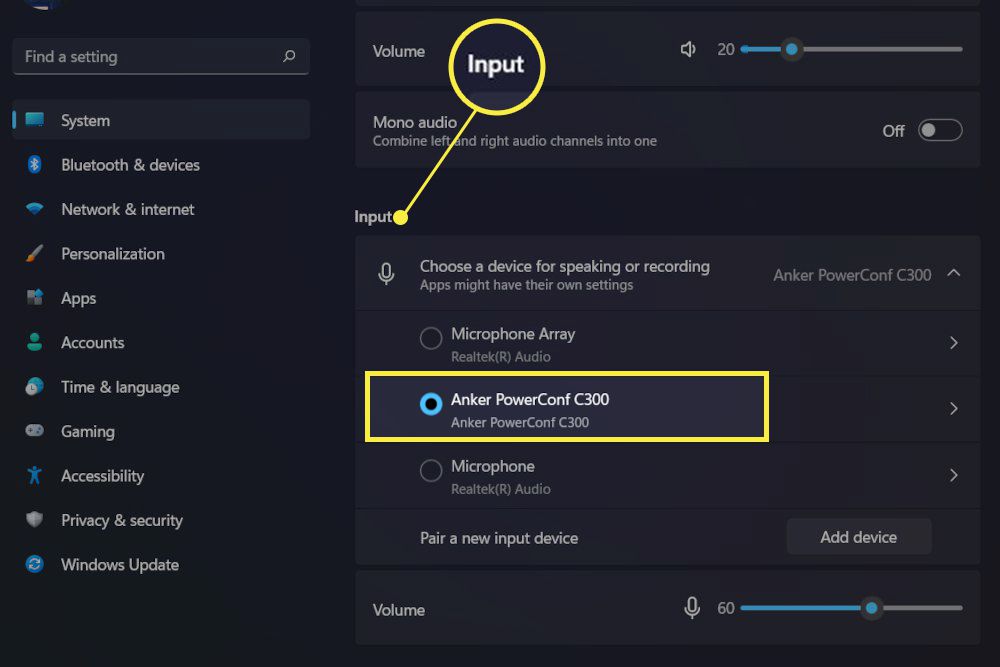
- Configure your microphone settings: open the Sound control panel and make sure the microphone is set as the default recording device.
- Check the microphone’s software: open Recording Devices and make sure the microphone is enabled and the volume is set to maximum.
Checking for Faulty Hardware
Starting with the most basic troubleshooting steps, it is important to check if there is a fault with the hardware of your laptop’s microphone. To start, you should make sure that the microphone is plugged in and connected properly. If the microphone is external, check the connection between the laptop and the microphone. If it is built into the laptop, check if the connection within the laptop is secure. Additionally, you should check that the device is properly enabled in the settings.
If the microphone still does not work, you should check if the microphone is working on other devices. If the microphone is not working on any other device, then there may be a hardware issue with the microphone itself. In this case, you may need to replace the microphone with a new one.
Finally, if the microphone works on other devices but not on your laptop, then there may be an issue with the laptop’s sound card. In this case, you may need to update the sound card’s drivers or replace the sound card.
Updating the Audio Drivers
If the hardware appears to be functioning properly, then the next step is to check that the audio drivers are up to date. Outdated drivers can cause a variety of issues, including microphone problems. To update the drivers, you can use the Device Manager in Windows 11. Simply open the Device Manager, find the audio drivers, and select the option to update them.
Alternatively, you can visit the manufacturer’s website to download the latest drivers. You should make sure to select the correct model and operating system so that you can download the correct drivers. Once you have downloaded the drivers, simply follow the instructions to install them.
Setting the Default Microphone
If the drivers are up to date and the microphone still does not work, then you should check the sound settings to make sure that the correct microphone is selected as the default. To do this, open the sound settings and select the option to set the default microphone. Then, select the microphone that you want to use and apply the changes.
If the microphone is still not working, you can try adjusting the microphone’s settings. Open the sound settings and select the option to adjust the microphone’s settings. Then, you can adjust the microphone’s volume, boost, and noise cancellation.
Checking for Software Issues
If the hardware and drivers appear to be functioning properly, then the next step is to check for any software issues. First, you should check if the microphone is muted or disabled. To do this, open the sound settings and make sure that the microphone is enabled and not muted.
If the microphone is enabled and not muted, then you should check if there are any background applications that are interfering with the microphone. To do this, open the Task Manager and select the option to view all running applications. Then, you can disable any applications that may be interfering with the microphone.
Finally, if the microphone is still not working, you can try resetting the sound settings. To do this, open the sound settings and select the option to reset the settings. This will reset the sound settings to their default values, which may help to fix the microphone issue.
Uninstalling and Reinstalling the Audio Drivers
If none of the above steps have worked, then the next step is to try uninstalling and reinstalling the audio drivers. To do this, open the Device Manager and find the audio drivers. Then, right-click on the drivers and select the option to uninstall them.
Once the drivers have been uninstalled, restart your laptop and open the Device Manager again. Then, select the option to scan for hardware changes. This will reinstall the audio drivers, which may help to fix any issues.
Using Troubleshooters
If all else fails, then you can try using the built-in troubleshooters in Windows 11. To do this, open the settings and select the option to find and fix problems. Then, select the option to troubleshoot audio devices.
The troubleshooter will then scan your device and suggest any changes that may help to fix the issue. If the suggested changes do not work, then you may need to contact the manufacturer for further assistance.
Using Third-Party Software
Finally, if none of the above steps have worked, then you can try using third-party software. There are many third-party programs that can help to fix microphone issues, including Driver Booster and Driver Easy.
These programs can scan your device for outdated drivers and automatically install the latest versions. Additionally, they can scan for any other potential issues that may be causing the microphone to not work properly.
Conclusion
If your laptop’s microphone is not working properly, then there are several steps that you can take to try and fix the issue. You should start by checking for any hardware or software issues. If that does not work, then you can try updating the audio drivers, setting the default microphone, and using troubleshooters. If none of these steps work, then you may need to use third-party software.
Top 6 Frequently Asked Questions
How to troubleshoot the microphone on a laptop running Windows 11?
Answer:
The first step in troubleshooting the microphone on a laptop running Windows 11 is to ensure that the microphone is connected properly. Make sure the microphone is plugged into the correct port on the laptop. Next, open the Settings app and go to the “Sound” section. Here, you can check that the microphone is enabled and set as the default recording device. Additionally, you can adjust the microphone level, as well as enable noise suppression. If the microphone still does not work, try uninstalling and reinstalling the audio driver from the laptop manufacturer’s website. If that doesn’t work, then you may need to replace the microphone.
How to check if the microphone is enabled on Windows 11?
Answer:
To check if the microphone is enabled on Windows 11, open the Settings app and go to the “Sound” section. Here, you can see if the microphone is enabled and set as the default recording device. Additionally, you can adjust the microphone level, as well as enable noise suppression. If the microphone is not enabled, you can click the toggle switch to enable it.
How to adjust the microphone level on Windows 11?
Answer:
To adjust the microphone level on Windows 11, open the Settings app and go to the “Sound” section. Here, you can adjust the microphone level. Additionally, you can enable noise suppression if you need to reduce background noise. You can also check that the microphone is enabled and set as the default recording device.
How to enable noise suppression on Windows 11?
Answer:
To enable noise suppression on Windows 11, open the Settings app and go to the “Sound” section. Here, you can enable noise suppression by clicking the toggle switch. You can also adjust the microphone level, as well as check that the microphone is enabled and set as the default recording device.
What should I do if the microphone on my laptop running Windows 11 does not work?
Answer:
If the microphone on your laptop running Windows 11 does not work, first try uninstalling and reinstalling the audio driver from the laptop manufacturer’s website. If that doesn’t work, then you may need to replace the microphone. Additionally, check that the microphone is connected properly and enabled in the “Sound” section of the Settings app. You can also adjust the microphone level, as well as enable noise suppression.
What should I do if the microphone level is too low on Windows 11?
Answer:
If the microphone level is too low on Windows 11, open the Settings app and go to the “Sound” section. Here, you can adjust the microphone level. Additionally, you can enable noise suppression if you need to reduce background noise. Check that the microphone is enabled and set as the default recording device. If the microphone level is still too low, try uninstalling and reinstalling the audio driver from the laptop manufacturer’s website. If that doesn’t work, then you may need to replace the microphone.
How to Fix Microphone on Windows 11 Microphone Not Working Windows 11
If you are experiencing microphone problems in Windows 11, you now know the most effective solutions. Trying to fix the microphone on your own can save you time and money by avoiding costly repairs or replacements. We recommend you to try the solutions provided above. However, if you are still not able to fix the microphone, you should consult a technician or a professional to get the best results.