


How to Personalize Windows 10 and Windows 11?

How to Personalize Windows 10 and Windows 11
Like every previous version of Windows, Windows 10 offers you innumerable options for personalizing your workspace. These are the choices that make your computing device feel like it’s truly your own, embodying your own design preferences as well as choices that make your interaction with Windows work for you. These customizations might not affect your productivity directly, the way that, say, pinning shortcuts to the taskbar does. But creating a visually satisfying workspace makes you more comfortable with your PC, and when you’re more comfortable, you’re more productive.
With that goal in mind, we introduce the extensive lineup of personalization features in Microsoft Windows 10. Many of the features we discuss in this chapter will be familiar from earlier Windows versions, but a few are genuinely new, including the capability to use the same image on both the sign-in screen and the lock screen.
SETTINGS VS. CONTROL PANEL
We begin with an overview of what you will find at Settings > Personalization. Nearly all your personalization can be accomplished there; that is, the migration of customization choices from Control Panel to Settings that has characterized all recent versions of Windows is nearly complete.
Although you’ll find personalization options in both Settings and Control Panel, the latter now contains just a handful of legacy settings. The far more complete selection is in Settings, where Personalization is one of more than a dozen top-level categories. In this chapter and throughout this book, you’ll find that most of the time we’re directing you to Settings. Usually you can find whatever configuration option you need by opening Settings and using its search box.
CUSTOMIZING THE VISUAL APPEARANCE
The most obvious way to personalize your Windows experience is to customize its visual appearance—the desktop background, lock screen picture, accent colors, and so on. These options are neatly arranged under the Personalization heading in Settings.
Selecting the desktop background
You can perk up any desktop with a background image. Your background can be supplied by a graphics file in any of several common formats: BMP, GIF (static only, not animated), JPEG, PNG, and TIFF. If you can’t settle on a single image, set up a slide show of images instead. And if you find pictures too distracting, just pick a background color. (That last option might prove especially useful if you like to populate your desktop with files and shortcuts to programs; these icons might be easier to recognize without the distraction of a background image.)
To select any of these options, go to Settings > Personalization > Background. The Background dropdown menu offers the three options shown in Figure 4-1.
Figure 4-1 The options on the Background page change, depending on which of these three options you select.
Here’s what you can do with each of the options in this list:
- Picture displays a single image of your choice, scaled to fit the resolution of your display. Windows 10 includes a default selection of images, and PC makers often include additional selections. Click Browse to choose one of your own pictures.
- Solid Color covers the background with a color you select from a palette of two dozen shades. You can also create a custom color, and that color then becomes the twenty-fifth item in your palette. Click Custom Color, and then click or tap the color picker that appears, to specify the color you want:

- Slideshow is like the Picture option, but with a twist: At an interval you select (at one of six preconfigured intervals ranging from 1 minute to 1 day), Windows changes the desktop background to a new picture from the folder you specify. Unless you specify otherwise, Windows uses the Pictures library (which includes the Pictures folder in your user profile and its counterpart on OneDrive) as sources for the slide show. For best results, we recommend that you select a group of properly sized images, copy them to their own folder, and then click Browse to replace the default choice with your custom folder.
After you choose an image or set up a slide show, select one of the six Choose A Fit options to let Windows know how you want to handle images that are not exactly the same size as your screen resolution:
- Fill stretches or shrinks the image so that it occupies the full screen, cropping the image in one or both dimensions so that no blank space remains on the sides or the top and bottom.
- Fit reduces or enlarges the image to exactly the width or height of the display, without changing its aspect ratio or cropping the image; this option might result in letterbox bars (using the current background color) on either side or above and below the image.
- Stretch reduces or enlarges the image so that it fits both dimensions, distorting the image if necessary. If there’s a significant mismatch between the aspect ratios of the image and the display, the effect can be unpleasant.
- Tile repeats the image at its original size to fill all monitors. This option is most effective for abstract backgrounds or for simple, small images where the repeated design looks like a pattern.
- Center displays the image at its original size in the center of the screen, without stretching. If the image is smaller than the display resolution, this can leave blank space on the sides or at the top and bottom; if the image is larger than the display, some parts of the image might be cropped away to fit.
- Span works like Fill to display a single image across multiple monitors. On a singlemonitor PC, this option is the same as Fill.
Here are some other ways to change the desktop background:
- Right-click an image file in File Explorer and choose Set As Desktop Background.
- Open any image file in Paint, open the File menu, and choose Set As Desktop Background. A submenu lets you choose the Fill, Tile, or Center picture position.
- Use the Photos app to open an image file, click or tap the ellipsis at the right side of the menu bar, tap or click Set As, and then choose Set As Background.
Selecting colors
With a beautiful desktop background in place, your next personalization step might be to visit the page at Settings > Personalization > Colors. Here you can choose between dark mode and light mode for modern apps, including Settings, and for various elements of the Windows user interface, such as the taskbar and Start:
With the Choose Your Color drop-down menu set to Custom, separate Light and Dark options can be applied to Windows interface elements and to apps. The dark mode options might be useful for conserving battery life on portable devices, but the more important benefit is to prevent eyestrain, especially in dim or dark environments. By changing the selection in the dropdown menu from Custom to either Light or Dark, you can apply those mode choices to both Windows elements and apps. Setting the Transparency Effects switch to On allows display elements behind the foreground window to bleed through faintly.
With the remainder of the page at Settings > Personalization > Colors, you can select a complementary accent color and specify where and how to use it. If you’re coming to Windows 10 directly from Windows 7, this group of settings represents a major change. In Windows 7, you can assign separate colors to dozens of different pieces of the Windows interface. In Windows 10, you choose one systemwide accent color from a palette of 48 solid colors (plus an additional color of your own making if you click Custom Color), or you can allow Windows to choose a color that matches your desktop background, as shown in Figure 4-2.
Figure 4-2 Use the first check box to specify that you want Windows to match the accent color to your background automatically.
The Automatically Pick An Accent Color From My Background option is the best choice if you configured a slide show for the desktop background. With this setting on, the accent color changes each time the background picture changes, minimizing the chances that a particular image will represent a poor contrast with a background color you choose manually. On the other hand, be prepared to see shades of purple, pink, and yellow, depending on the image.
The accent color you choose appears in some places automatically—the background of tiles that don’t assign a custom color, text links in modern apps, and on the desktop when a background image doesn’t fill the display fully.
Turning on the Start, Taskbar, And Action Center option applies the accent color as a background to the taskbar and to Start and Action Center, when they’re visible. With this option turned off, those areas have a neutral background. A separate Title Bars option turns color on or off for the title bars in desktop programs and modern apps that don’t specify a custom color.
Customizing the lock screen and sign-in screen
The lock screen is a security precaution that prevents someone from seeing or accessing your account when you step away from the computer while you’re signed in. To display the lock screen, click Start, and then click your account picture, where you’ll find Lock on the menu of available options. Of course, the much faster way to lock the screen is with a keyboard shortcut—Windows key+L.
Just as you can customize the desktop background, you can change the lock screen to your liking by adding custom images and specifying which notifications appear on the lock screen when you’re away. Go to Settings > Personalization > Lock Screen to see your options, as shown in Figure 4-3.
Figure 4-3 The Windows Spotlight option changes the lock screen background at regular intervals, using visually compelling images from Microsoft’s vast collection.
These settings closely resemble those for the desktop background. In fact, under the Background menu, you’ll find Picture and Slideshow options that work exactly like those under the Background headings, so we won’t repeat the detailed instructions here.
The Windows Spotlight option supplies a continually changing assortment of background images along with captions to identify the image location, occasional helpful tips, and the option to indicate whether you like or dislike a particular image—that feedback goes into the algorithm that serves future images to you.
Turning on the Show Lock Screen Background Picture On The Sign-In Screen option makes it possible for you to clear the lock screen—by clicking, swiping, or tapping any key—and see the box to enter your credentials with the same image behind it.
You can allow one or more apps to display their current status—such as the number of new email messages, upcoming appointments, and so on—on the lock screen.
You can also see alarms and reminders here. Depending on your personal preferences, these notifications are either a convenience or a potential privacy issue; if you don’t want anyone who passes by your desk to see notifications, go to Settings > System > Notifications & Actions. Under Notifications, turn off Show Notifications On The Lock Screen and Show Reminders And Incoming VoIP Calls On The Lock Screen.
If you choose to use lock-screen notifications, you can configure a single app to display detailed status messages (the time, title, and location of your next appointment, for example) and up to seven additional apps to show quick status information. Status icons appear in the order you specify here.
Tap one of the app icons to change the app assigned to that position; tap a plus sign to add a new notification to that position. In either case, you’ll see a list of apps that support status notifications, as shown here.

FINE-TUNING VISUAL OPTIONS
Windows 10 contains a handful of legacy customization options that give you fine-grained control over small aspects of the user experience. Most of the options we discuss in this section are in the classic Control Panel, and there’s a possibility that some will not survive the transition to the newer Settings app in a future upgrade. So, enjoy the following features while they last.
Customizing mouse pointers
As we noted at the beginning of this chapter, personalization options have been moving from the classic Control Panel to the new Settings app over time. Options to change the appearance of the mouse pointer offer a particularly good example of how this transition is happening.
For example, you might want to change the size and color of the mouse pointer to make it easier to see, especially on a large, high-resolution display where the default white pointer is so small, you might find it hard to make it out against light backgrounds.
To quickly change the pointer size and color, go to Settings > Ease Of Access > Mouse Pointer, where you’ll see the options shown in Figure 4-4. Adjusting the slider control changes the size of the mouse pointer, whereas the boxes below it change the pointer color. Choosing the fourth box reveals a row of seven bright colors (and a Custom Pointer Color option); in our experience, the fluorescent pink and bright blue options work surprisingly well at helping you find a pointer even on a large display,
Figure 4-4 A larger pointer, especially one in a bright color, can be easier to pick out on a large display.
Meanwhile, you can find a completely separate entry point to a closely related group of options by going to Control Panel > Ease Of Access > Ease Of Access Center > Make The Mouse Easier To Use. Figure 4-5 shows the resulting options.
Figure 4-5 The options at the top of this dialog box are an alternative entry point to the same options in the Settings app.
All but one of the options on this page are available on the Mouse Pointer page in Settings. The exception is the Activate A Window By Hovering Over It With The Mouse check box, which you’ll find as a switch in Settings > Devices > Mouse, under a slightly more descriptive name: Scroll Inactive Windows When I Hover Over Them. This behavior, sometimes known as “focus follows mouse,” will be familiar to those who’ve used Linuxbased operating systems. Although it takes some getting used to, we’ve found that it can eliminate constant clicking between windows.
Elsewhere in Control Panel, some old-style mouse pointer options are still available—at least for now. If you think an hourglass depicts the passage of time more unambiguously than a rolling doughnut, you can easily bring back the Windows XP–era shape. You can customize the entire array of pointer shapes your system uses by going to Settings > Personalization > Themes > Mouse Cursor, which opens a dialog box like the one shown in Figure 4-6.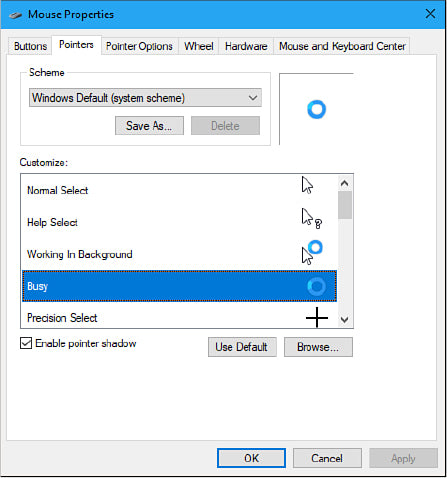
Figure 4-6 Use the options at the bottom of this dialog box to customize the predefined mouse pointer schemes.
On the Pointers tab of the Mouse Properties dialog box, you can select a scheme from the list at the top. For those who are keeping score, this is a third way to set the size and color of the pointer.
What makes this entry point different is the list of options at the bottom, where you can change the pointer associated with specific actions, such as resizing and selecting. Windows wraps up a gamut of pointer shapes as a mouse-pointer scheme. The system comes with an assortment of predefined schemes, making it easy for you to switch from one set of pointers to another as needs or whims suggest.
Pick a pointer from the Customize box and then click Browse to select an alternative pointer shape. (The Browse button takes you to %Windir%\Cursors and displays files with the extensions .cur and .ani. The latter are animated cursors.)
These legacy pointers included with Windows won’t win any cutting-edge design awards; some of them date back to an era when an hourglass actually was used for keeping time. If you’re inclined to roll your own mouse scheme (by using the Browse button to assign cursor files to pointer types), be sure to use the Save As command and give your work a name. That way you’ll be able to switch away from it and back to it again at will. And don’t be surprised if these options disappear in a future Windows 10 feature update. A few additional settings of interest are available on the Pointer Options tab, shown in Figure 4-7.
Figure 4-7 Use these pointer options to ease eyestrain by making the mouse pointer easier to spot as it moves.
If you sometimes struggle to find the mouse even after you’ve moved it slightly, consider turning on the Display Pointer Trails option. The last option on the page, Show Location Of Pointer When I Press The CTRL Key, provides a clever shortcut when you find yourself involuntarily playing “Where’s the pointer?” Tap Ctrl to see a series of concentric circles where the mouse pointer is currently hiding.
Making other small visual tweaks
Windows is alive with little animations, such as when you open or close a window. Along with other effects, these can help to direct your focus to the current window or activity. But some folks find them annoying, and an argument can be made that they do take a small bite out of your computer’s performance. So, if you don’t like them, turn them off!
In the search box of Settings or Control Panel, type performance and then choose Adjust The Appearance And Performance Of Windows. The Performance Options dialog box looks like the one shown next, and you can use it to control animations and other effects on a granular level.
On modern hardware with even a moderate graphics processor, these options make little or no difference in actual performance. The loss of animation can be disconcerting, in fact, as you wonder where a particular item went when you minimized it. These options offer the most payoff on older devices with underpowered graphics hardware.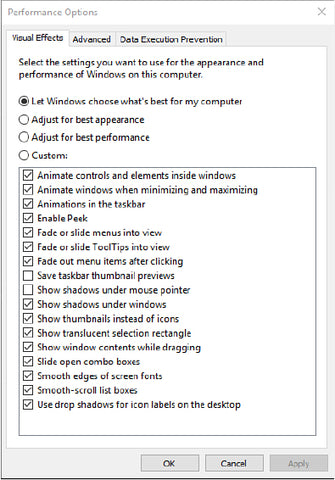
SELECTING SOUNDS FOR EVENTS
To specify the sounds that Windows plays as it goes through its paces, go to Settings > Personalization >Themes > Sounds. Custom sound schemes were extremely popular in the early days of Windows, with collections of beeps, gurgles, and chirps that Windows and various apps played in response to various system and application events. Whimsical sounds were typically included in packaged themes that also set up desktop backgrounds and animated cursors. Those sound schemes have gone the way of Pet Rocks, Beanie Babies, and other once-popular fads, but they live on in the Sound dialog box shown here:
A new installation of Windows comes with only a single scheme, called Windows Default. If you can find and install a custom sound scheme, you can choose it from the Sound Scheme list, or you can customize the current sound scheme to match your preferences.
To see which sounds are currently mapped to events, scroll through the Program Events list. If an event has a sound associated with it, its name is preceded by a speaker icon, and you can click Test to hear it. To switch to a different sound, scroll through the Sounds list or click Browse. The list displays .wav files in %Windir%\Media, but any .wav file is eligible. To silence an event, select None, the item at the top of the Sounds list.
If you rearrange the mapping of sounds to events, consider saving the new arrangement as a sound scheme. (Click Save As and supply a name.) That way, you can experiment further and still return to the saved configuration.
PERSONALIZING WITH THEMES
A theme is a named collection of personalization settings, encompassing background, color, sounds, and mouse cursor. Any time you arrive at a configuration of settings that pleases you and that you might want to return to later (while you continue experimenting, for example), you can make it a theme by simply naming it. To do this, go to Settings > Personalization > Themes. Near the top of the page, you’ll see a summary of your current settings and a Save Theme button.
Themes are saved as a .theme file in your %LocalAppData%\Microsoft\Windows\Themes folder. (A .theme file is a standard text file that describes all the theme settings. Visit https://docs.microsoft.com/windows/desktop/Controls/themesfileformat-overview for complete details about .theme files.
Perhaps more important than the ability to name your own customizations, Settings > Personalization >Themes gives you free access to hundreds of beautiful themes created by professional and amateur photographers all over the world. Most of these are slideshows; a few include sounds as well. If you apply a theme as a slideshow, you can configure the change interval at Settings > Personalization > Background, just as you would for a slideshow of your own photos. The page at Settings >Personalization > Themes shows thumbnails of all the themes that are currently installed and available; to apply one, simply click it. Hundreds more can be found in the Microsoft Store. (Click Get More Themes In Microsoft Store to see what’s there.) Click a theme in the store to install it, and then apply it by selecting it at Settings > Personalization > Themes.
CONFIGURING DESKTOP ICONS
A fresh, cleanly installed Windows 10 desktop (as opposed to one generated by an upgrade installation) includes a single lonely icon—Recycle Bin. If you want to display other system icons, go to Settings > Personalization > Themes > Desktop Icon Settings. The resulting dialog box, shown next, provides check boxes for five system folders—Computer, User’s Files (the root folder of your own profile), Network, Recycle Bin, and Control Panel.
If you’re really into customization, you can change any of the five icons that appear in the large box in the center. Note that the Control Panel icon does not appear in this center box even if you select its check box; Windows doesn’t provide a way to change it.
To change an icon, select it in the center box and click Change Icon. By default, the Browse button displays the selection of alternative icons from the file %Windir%\System32\Imageres.dll. (Be sure to use the horizontal scroll bar to see them all.) If none of these suits you, try browsing to %Windir%\System32\Shell32.dll.
After you populate your desktop with icons, you might want to control their arrangement. If you right-click the desktop, you’ll find two commands at the top of the shortcut menu that can help in this endeavor. To make your icons rearrange themselves when you delete one of their brethren, click View > Auto Arrange Icons. To ensure that each icon keeps a respectable distance from each of its neighbors (and that the whole gang stays together at the left side of your screen), click View > Align Icons To Grid. And if you don’t want desktop icons to get in the way of your gorgeous desktop background image, click View and then clear the check mark to the left of Show Desktop Icons. (Return to this option if you decide you miss those desktop icons.)
To change the sort order of desktop icons, right-click the desktop and click Sort By. You can sort on any of four attributes: Name, Size, Item Type, or Date Modified. Sorting a second time on any attribute changes the sort order from ascending to descending (or vice versa).
ELIMINATING DISTRACTIONS WITH FOCUS ASSIST
Focus Assist, formerly known as Quiet Hours, is a feature designed to minimize aural and visual interruptions from your computer at crucial times—for example, when a task requires maximum concentration, or when you’re playing a full-screen game or giving a presentation. The feature has been around, under its former name, in previous versions of Windows 10, but its configuration options have steadily improved. To see and configure Focus Assist, visit Settings > System > Focus Assist, shown in Figure 4-8.
Figure 4-8 You can use the three option buttons at the top of this page to turn Focus Assist on and off, although it might be quicker to do this in Action Center. The Automatic Rules section of the page gives you considerable control over when the feature will be activated.
As the option buttons at the top of the settings page suggest, Focus Assist can be in three states—Off, Priority Only, and Alarms Only. Choosing Alarms Only blocks all interruptions except those generated by an alarm clock.
To allow some but not all notifications to sound or appear, choose Priority Only, and then click Customize Your Priority List. The Priority List page, shown in Figure 4-9, gives you considerable control over what interruptions you will accept—and from whom.
Figure 4-9 On the Priority List page, you can set up your system to allow notifications from your phone, contacts, and apps
The first two check boxes on this page provide a way for Focus Assist to pass incoming phone notifications and reminders.
Options under People permit particular contacts to interrupt you. On the assumption that those contacts you have pinned to your taskbar are particularly important, Windows provides a check box to give them all a blanket pass. Below that check box you can click Add Contacts to make additional allowances.
The bottom of the settings page lists apps that are allowed to interrupt. Click Add An App to expand the list. The Automatic Rules options shown at the bottom of Figure 4-8 provide additional control over Focus Assist.
By default, the feature swings into action whenever you are projecting your screen or playing a game. You can also set a range of hours during which you want your focus to be assisted. Clicking During These Times takes you to a page where you can specify starting and ending times, a repeat pattern (Daily, Weekends Only, or Weekdays Only), and a focus level (Priority Only or Alarms Only).
To use Focus Assist on an ad hoc basis, you can return to Settings > System > Focus Assist and turn it on or off. A quicker and easier approach is to display Focus Assist in the Quick Actions section of Action Center. (If you don’t find it there, visit Settings > System > Notifications & Actions, and then click Edit Your Quick Actions.) Clicking Focus Assist in the Quick Actions panel cycles the feature from Off through Priority Only and Alarms Only.
CHOOSING A SCREEN SAVER
Screen savers don’t save screens, and they certainly don’t save energy compared to simply blanking the display.
In the distant past, when screens were invariably CRTs and many offices displayed the same application at all hours of the working day, having an image move about during idle times probably did extend the service life of some displays. Today, this legacy feature is strictly for nostalgia buffs who want to compute like it’s 1999.
By default, Windows 10 does not configure a screen saver, although it includes a handful of old favorites. To see what’s available, go to Settings > Personalization > Lock Screen, scroll to the bottom of the Lock Screen page, and then click Screen Saver Settings. In the Screen Saver Settings dialog box (shown next), select an option under Screen Saver. Some screen savers have additional configuration options; click Settings to review your choices.

SETTING DATE AND TIME, CURRENCY, AND OTHER REGIONAL OPTIONS
A personalized experience requires Windows to know some things about where you reside, including basic information about how other people in your part of the world display the date and time, currency symbols, and preferred number formats, such as whether to use a comma or a period as a separator.
In Windows 10, some language options are determined by the base Windows version. Windows configures additional regional settings using your location (with your permission).
In most cases, Windows 10 picks the right regional settings. You might need to customize some of these options if you prefer settings from one region (your home, typically) but Windows insists on applying settings for a different region, such as one you’re visiting. Your first stop is Settings > Time & Language, where you can change time zones and make other time-related settings, as shown in Figure 4-10.
Figure 4-10 The two automatic options at the top of this Settings page usually get the time and date right. Slide either option to Off if you need to make adjustments.
If you have an always-on internet connection, we recommend leaving the top two options enabled. Windows 10 periodically synchronizes your computer’s clock to an internet-based time server, fixing any “drift” if your PC’s clock isn’t working correctly. You can also manually set the PC’s time zone here if it’s not detected properly. (On a domain-based network, this setting is controlled by the domain server.)
Windows uses your country/region and language settings to provide some personalized content and for regional formats such as the way dates, times, and numbers are displayed and the preferred measurement system.
For additional date and time settings, click Settings > Time & Language > Date & Time > Region, where you can select a country or region, as well as format settings relevant to the selected country. For still more options, you can click Additional Date, Time & Regional Settings. This last click takes you to the legacy Control Panel app, where fine-grained control is available.
If you frequently communicate with people in other time zones, you might want to click Add Clocks For Different Time Zones, under the Related Settings heading at Settings > Time & Language > Date & Time. This opens a dialog box in which you can add one or two clocks to the top of the calendar that appears when you click or tap the clock in the notification area, as shown next.
The agenda section at the bottom of that calendar displays appointments from any account you connected to the Windows Calendar app, as well as reminders you set using Cortana.
Current versions of Windows 10 also support the Traditional Chinese and Simplified Chinese lunar calendars. To install either, go to Settings > Time & Language > Date & Time, and then choose which lunar calendar you want from the list below Show Additional Calendars In The Taskbar. Your calendar will then display the lunar dates below the corresponding Gregorian dates, like this:

OVERCOMING CHALLENGES
Microsoft has a longstanding commitment to making computing accessible and easier to use for persons with vision, hearing, or mobility impairments. Windows 10 groups these options into the Ease Of Access section of Settings. (Alternatively, you can press Windows key+U to open this page directly.) Additional options are available in the Ease Of Access Center in Control Panel.
The options at Settings > Ease Of Access are organized in three groups: Vision, Hearing, and Interaction. Any of the settings can be used alone or in conjunction with others.
Vision options include the following:
- Display On this page, you can adjust the size of text and other visual elements, increase or decrease the brightness of your display, and configure several other visual aspects of the Windows user interface. For example, if you find the normal animations of windows a distraction, you can turn them off here.
- Mouse Pointer Here you can change the pointer size and color.
- Text Cursor On this page, you can change the thickness of the text cursor. You also can add and customize an additional marker that makes it easier to find your current text position.
- Magnifier This tool enlarges part of the screen, making it easier to see small text, icons, or other elements. To turn Magnifier on from anywhere in Windows, press Windows key+Plus. To turn it off, press Windows key+Esc.
- Color Filters These are designed to help users with colorblindness. Available filters include Grayscale, Inverted, Grayscale Inverted, Red-Green (Green Weak, Deuteranopia), Red-Green (Red Weak, Protanopia), and Blue-Yellow (Tritanopia).
- High Contrast This tool configures Windows to use a highcontrast color scheme (by default, white text on a black background) that makes it easier for visually impaired users to read the screen.
- Narrator This tool converts on-screen text to speech and sends it to your computer’s speakers. This option allows people who are blind or have severe vision impairments to use Windows.
Hearing options include an Audio page, where you can turn on monaural audio, or configure visual behavior to accompany audio alerts. For example, you can choose to make the title bar of the active window, the entire active window, or the entire screen flash in response to an audio alert. Also in the Hearing section is a Closed Captions option, which lets you configure the appearance of closed captioning in videos.
The Interaction section includes the following:
- Speech On the Speech page, you can enable speech recognition by setting the switch under Turn On Speech Recognition to on. With speech recognition enabled, you can dictate text, system commands, and editing commands by speaking instead of typing. When you first enable this feature, a wizard will guide you through some simple setup steps and will lead you to a Microsoft support page where, among other things, you can view and print a table of recognized editing commands.
- Keyboard This collection of tools provides alternate means for Windows users with impaired mobility to enter text using a pointing device. Options that appear when you click Options in On-Screen Keyboard let you control how it works—you can choose whether to select a letter by clicking, for example, or by allowing the pointer to pause over a key for a specific amount of time. Other tools on the Keyboard page allow users with impaired mobility to more easily deal with key combinations and repeated keystrokes.
- Mouse This page enables the numeric keypad to move the mouse pointer so you don’t have to use a mouse.
- Eye Control Version 1709 introduced support for eye control, allowing users to manipulate the mouse and keyboard, and to turn narration on or off, by means of the eyes. (Support is currently provided for the Tobii Eye Tracker 4C and the EN-US keyboard layout. Support for additional keyboard layouts and hardware devices is promised for the future.) Version 1803 extended the eye-control feature set with better support for scrolling; improved mouse control; quick access to Start, Timeline, and Settings; and the ability to hide the launchpad as needed to avoid accidental clicking.
The easiest way to configure your computer for adaptive needs in one fell swoop is to open Ease Of Access Center in Control Panel and then click Get Recommendations To Make Your Computer Easier To Use, a link near the center of the page. The link launches a wizard, shown here, that walks you through the process of configuring accessibility options:
If you want accessibility options to be available at all times, even before signing in to the computer, click the Change Sign-In Settings link in the left pane of Ease Of Access Center in Control Panel. This option (shown next) applies any changes you make to the sign-in desktop. If you choose not to enable this option, you can still turn accessibility features on or off at the sign-in screen; click the small Ease Of Access icon in the lower-right corner of the sign-in screen to display a list of available settings, as shown next. Press the Spacebar to enable each one.
SYNCING YOUR SETTINGS BETWEEN COMPUTERS
When you sign in using a Microsoft account or an Azure Active Directory account, Windows 10 offers the capability to synchronize settings between computers you use. When you sign in on a new PC using that account, Windows retrieves those personalized options from Microsoft OneDrive and applies them to the new device.
To manage synchronization options, go to Settings > Accounts > Sync Your Settings. Figure 4-11 shows the window that appears.
Figure 4-11 You can enable or disable all sync settings with a single setting, or control settings individually. By not syncing themes, for example, you can maintain a unique visual identity for each of your PCs.
The settings available for synchronization include the following:
- Theme This group of settings includes the desktop background, accent color, sound scheme, screen saver, desktop icons, and mouse pointers.
- Passwords This group includes passwords you saved for access to secure websites and other network computers.
- Language Preferences These settings are from the Time & Language page in the Settings app.
- Ease Of Access Any accessibility options you set using Ease Of Access in Settings are in this group.
- Other Windows Settings This group includes settings that don’t fit into other categories, including printers, mouse options, File Explorer settings, notification preferences, and more.
If you have used earlier versions of Windows 10, you might notice that browser settings are no longer synced with your Windows account. To configure settings synchronization in Internet Explorer, visit the Advanced tab of the Internet Options dialog box. Under Browsing, select Enable Syncing Internet Explorer Settings And Data. To configure synchronization in the new Microsoft Edge, open Settings > Profiles > Sync.
Note that settings are synced on a per-user basis. Settings that apply to all users at your computer, such as screen resolution, are not included in the current theme or other synchronized settings. Also, settings associated with a local user account are not synchronized with other computers.