


Installing and Restoring Windows 11 home or professional

Installing and Restoring Windows 11
It’s becoming increasingly rare that anybody installs a copy of Windows these days. The largest number of installs will be corporations upgrading their desktop machines from Windows 10, but even that’s not a clean install, it’s an upgrade. IT departments reimaging a PC after a problem isn’t a clean installation either, it’s restoring a backup image. For consumers and the rest of society, Windows 11 will come preinstalled on a new PC or laptop, and those moving from Windows 10 to Windows 11 will perform an in-place upgrade that’s rolled out through Windows Update, so that’s not a clean installation either.
I performed a clean installation of Windows 11, but I’m weird, when I built myself a new workstation/work/gaming desktop PC in 2021; a beast of a machine running an, at the time, top of the line unlocked AMD Ryzen 9 processor with burst speeds up to 4.9GHz, 64GB DDR4 RAM, itself running at 4GHz, three 2TB Samsung PCIe 4 M.2 SSDs with speeds up to 7000MB/s, and an ASUS Radeon RX6800 graphics card with 16GB RAM and a clock speed of 1980MHz (see Figure 22-1).
Figure 22-1. I’m weird because I still clean install Windows
All of this is running on a Gigabyte X570 Aorus Master motherboard with a Corsair RMx 1000 Watt PSU, in a Be quiet! Silent Base 802 case on a sesame seed bun (you made the last bit up!; Ed).
It’s a beast of a machine that’s hardly taxed by my writing this book in Microsoft Word, recording a video course in Camtasia, or even pootling1 around the galaxy in Elite Dangerous (Cmdr Travers if you’re a fellow player), so you might wonder why I bothered spending more than $4000 on the thing. Actually, I address this in my book The Green IT Guide (Apress, 2022)… yes, you knew I was going to get in one last plug for it before this book was finished! The reasoning I use in that book though is to purchase the fastest, most powerful computer you can afford. The reason is that it will last you much longer than a cheaper PC, reducing the amount of chemicals, metals, and plastics going to landfill and polluting the environment. Choosing a 1000 Watt PSU over a more reasonable 600 Watt unit which would work nicely is also part of this idea. Power supplies lose some of their power over the years, just as a car engine does, so purchasing a more powerful one to begin with will also reduce the amount of tech going to landfill (ah, so that’s why you said you want an Aston Martin!; Ed).
I always build my own desktop PCs as I’ve found getting one from any system builder, even one with a great online configurator, inevitably means making compromises. Usually, the storage is slower, or the motherboard doesn’t support the new superfast storage technology you want, or the case is lacking a front-mounted USB-C port, etc. When this happens, you have no choice but to install Windows 11 yourself after building the thing, which is always tremendous fun. This leads me neatly into the first subject of this chapter…
Obtaining Up-to-Date Windows Installation Media
So where can you go to download fresh installation media for Windows that isn’t horribly out of date and will require 30,000 Windows Updates? One place you should certainly never download a Windows ISO from, or anything else for that matter, is a website or torrent site, as it’s all too easy for malware to be injected into the ISO file that’s installed right along with Windows.
If you have a volume licensing subscription to Microsoft, or a my.visualstudio.com account, then you can download an up-to-date ISO file from there, but you get better options from www.microsoft.com/software-download. This website will allow you to download ISO files for the currently supported versions of Windows, but it will also allow you to create a bootable USB Flash Drive from which Windows can be installed (see Figure 22-2).
Figure 22-2. The Microsoft Windows Download website is the best place to get Windows 11
Any ISO file you download from this website, or any installer USB Flash Drive you create, will be the latest version of Windows 11, so there will be much fewer Windows Updates to install later on. If you need to purchase a license to install Windows 11, you can do so on the following links:
- Windows 11 Home – https://pcs.tv/3AKu8ae
- Windows 11 Pro – https://pcs.tv/3q6XF8N
- Windows 11 Pro for Workstations – https://pcs.tv/3AFC0JZ
- Windows Volume Licensing – https://pcs.tv/3wKzgto
Tip:It is often much cheaper to purchase a valid license for Windows from a reputable PC magazine, where these sometimes resell discounted licenses, or from an in-store or online retailer during the Black Friday or end-of-year sales.
As is always the case, you should be very careful when purchasing a Windows license that you get it from a reputable source and not just some third-party reseller on Amazon or eBay. These can often be scams, selling a product key that has already been used or that isn’t valid at all.
Tip:If you have a Windows 10 product key that’s no longer in use on a PC, you ought to be able to use that product key during the Windows 11 installation process. If that doesn’t work, which it should frankly, then you can install Windows 10 from the download link I mentioned earlier and upgrade it to Windows 11 in place after activating it.
Managing Windows Activation and Changing Your Product Key
If you need to activate your copy of Windows, add a product key, or perhaps change your product key because, for example, you are upgrading from Windows 11 Home to Windows 11 Pro, you can do so in Settings under System and Activation (see Figure 22-3).
Figure 22-3. You can activate Windows and change your product key in Settings
Nondestructively Reinstalling Windows 11
Let’s say that everything’s gone horribly wrong, you don’t have a backup image of your installation, but you also need to reinstall the operating system without harming all of the files on the PC (accounts and applications will sadly have to be redone in the worst cases).
It is possible to nondestructively reinstall Windows however. You first need to boot your PC from your installation media, which is most likely the USB Flash Drive you created from the media creation tool on the Microsoft download website I detailed earlier in this chapter.
At the install screen, choose your language and country options and then click the Install now button, enter your product key, or if you already have a valid license on the PC that’s tied to your Microsoft Account, click I don’t have a product key. When you are prompted to choose how you want to install Windows, you will see an option to Upgrade: Install Windows and keep files, settings and applications (see Figure 22-4). This won’t work when booting from the installation media, but will reinstall Windows over the top of your existing installation, effectively refreshing the OS if you are able to run it from the desktop.
Figure 22-4. The Windows installer allows you to upgrade your installation
If you can’t boot to the desktop, perhaps because the existing installation has become too corrupt in some way. In this case, and again booting the PC from your Windows 11 installation media, click the Custom: Install Windows only (advanced) option.
When you choose this option, you will be presented with a dialog telling you that a previous installation of Windows has been found and that it will be moved to a Windows.old folder (see Figure 22-5).
Figure 22-5. Windows moves your old installation and files for you
Windows will be reinstalled on the PC, and your preexisting installation can then be found in the Windows.old folder it was moved to (see Figure 22-6). Within this, you will find a Users folder under which will be all of your saved files and documents from the standard Shell User Folders.
Figure 22-6. Your preexisting Windows installation will be found in the Windows.old folder
Caution:Note that any files, documents, and folders not stored in the shell user folders, but stored elsewhere on the Windows drive, will be wiped during the reinstallation.
Uninstalling Problematic Feature Updates
If it’s an annual “Feature Update,” what we used to call a Service Pack that’s caused Windows to go all screwy, you can boot the PC into the Recovery Console from pressing Shift + Restart at the Lock Screen or in the Start Menu or from a USB Recovery Drive and select Troubleshoot ➤ Advanced options ➤ Uninstall Updates and then click Uninstall the latest feature update (see Figure 22-7).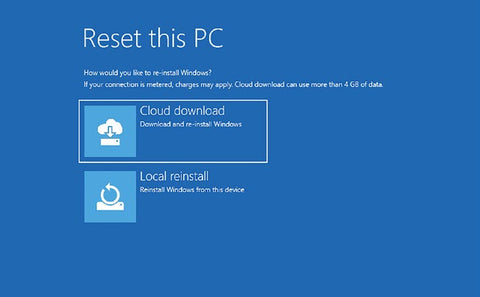
Figure 22-7. You can uninstall Feature Updates from the Recovery Console
Resetting Windows 11
Alternatively, if that’s not working for you, select Troubleshoot ➤ Reset this PC, and then click Keep my files. This will reinstall Windows from the backup image it keeps of itself that’s 30 days old, which will hopefully be before the Feature Update or other screwy Windows Update will have been installed (see Figure 22-8).
Figure 22-8. You can reset Windows from the Recovery Console
When you reset your Windows installation, you will be asked if you want to use the local image on the PC, this being the one that Windows creates itself and maintains. This is always 30 days old, the reason being that if the PC has worked perfectly well for the last 30 days, then that will be a stable position to reinstall to.
Alternatively, you can choose Cloud download (see Figure 22-9). This will download a fresh installation image of Windows from Microsoft’s servers and use that to reinstall the OS. This is most useful when the local image has become corrupt and can’t be reinstalled.
Figure 22-9. You can reset Windows from a cloud download
Caution:Not all laptops and tablets are compatible with cloud download. The PC has to include Wi-Fi drivers that work with the feature, so when you purchase new PCs, it’s worth asking the vendor if they provide these. As an alternative, connecting the PC to the Internet via an Ethernet cable, perhaps through a dongle in a USB-A port as Thunderbolt ports may also not be supported, will enable you to download a cloud image.
Creating Custom Installation Media for Windows 11
When you deploy a new operating system across an organization, it’s very common to preinject that OS image with the software and settings you need, as it’s considerably simpler to do this than to deploy a standard Windows 11 installation and then have to manually configure each PC afterward.
Microsoft provides a whole range of tools for its volume licensing customers which you can find on the Microsoft Docs website at https://pcs.tv/3TCoMpP. These include tutorials on how the whole process works, how to plan your deployment and rollout of Windows 11, and the various tools the company provides such as their Autopilot system.
This is fine for those with a Volume Licensing subscription, but what about everybody else? Well, one of the best third-party solutions on the Internet is the software called NTLite (see Figure 22-10), which you can download from www.ntlite.com. This is a full image creation tool that allows you to manage your different Windows images, install and remove language packs and Windows features, configure Registry keys and set Group and Security policies, install drivers and applications, and deploy these images using an unattended setup process.
Figure 22-10. NTLite can be used to create custom installation images
Windows OOBE
No, it’s not a Roy Orbison song, but the Windows Out-of-Box Experience, otherwise known as SysPrep. After Windows 11 has been installed, this can be used to change settings, install software, and install drivers. This is for changes made on a whole computer level and not a per-user level, so it can’t be used to pre-create user accounts.
This is because OOBE bypasses the Windows Out-of-Box installer, where a user is guided through signing into the operating system and setting their preferences for Windows features, such as OneDrive, and for privacy.
You activate SysPrep from the Out-of-Box Experience screen by pressing Ctrl + Shift + F3, and you will then be presented with a plain Windows desktop that you can use to make your changes (see Figure 22-11).
Figure 22-11. SysPrep can make changes to a new PC that affect all users
Tip:If the PC does not have an F3 key, you can run SysPrep from the C:\ Windows\System32\Sysprep folder, but you will first need to have created an account on the PC to reach this so it’s not ideal.
SysPrep is most useful when you have a new PC or laptop that is being given to a friend, family member, or employee where a few changes need to be made that aren’t or haven’t already been rolled out in a custom installation image for the operating system.
You should leave the SysPrep window open on your desktop, as you will need it when you are finished, but if you do accidentally close it, it can be run from the C:\Windows\ System32\Sysprep folder.
When you have made the changes you want to make and want to lock down the changes you have made to Windows, in the SysPrep window check the Generalize option and either Restart or Shutdown the PC (see Figure 22-12).
Figure 22-12. Any changes you “generalize” in SysPrep will apply to all new users on the PC
Now, when anybody creates themselves a new account from the Out-of-Box Experience, any changes you have made will automatically apply to the account(s) they create.
Installing Windows 11 in a Virtual Machine
Many people will want to install Windows 11 in a virtual machine environment, perhaps for testing or perhaps to give you a clean installation to reference. I have used Windows 11 virtual machines extensively for screenshots throughout this book.
Because the minimum installation requirements for Windows 11 have changed from Windows 10, you can’t simply install Windows 11, you first have to set some specific options. I will show you how to do this in Hyper-V because as you’re reading this it’s very likely you’ll be using a Windows PC anyway, but you will need to set the same options in whatever virtual machine software you’re using.
Hyper-V first needs to be activated on your PC, and for this, you will need the Pro or Enterprise version of Windows, as the feature does not exist in the Home edition. In the Start Menu, search for features and select Turn Windows features on or off from the search results.
In the dialog that appears, make sure you have both Hyper-V options checked (see Figure 22-13).
Figure 22-13. You need to have Hyper-V activated on your PC
Note:that if you are using an AMD processor on your PC, you will need to make sure that SVM (Secure Virtual Machine) mode is enabled in the firmware (see Figure 22-14). This is often disabled by default and will prevent Hyper-V or other virtual machine software from running on the PC. If you are using an Intel processor and don’t have virtualization enabled, you should enable VT-x in your UEFI firmware.
Figure 22-14. AMD processors need SVM mode enabled in the firmware
When you are creating your virtual machine in Hyper-V, there are two changes you need to make. The first is in the Security settings for the virtual machine. Check the box for Enable Trusted Platform Module (see Figure 22-15).
Figure 22-15. You need to enable a virtual TPM for the virtual machine
The second change you need to make is in the Processor settings. Here, you need to change the Number of virtual processors to at least two (see Figure 22-16). With these changes made, Windows 11 will happily install in the virtual machine.
Figure 22-16. Windows 11 requires a dual-core processor to install
Summary
It’s actually very difficult to break a Windows install these days. I tried it a few years ago for my Windows 10 troubleshooting books, repeatedly switching a machine off while the “Don’t switch off your PC” message was on screen, and Windows successfully recovered every single time.
So troubleshooting installation in Windows 11 really is just about configuring how you want it to be and sorting out updates and drivers that have caused problems and made the PC unstable. I talked a lot more about this in Chapter 9. The methods I have described in this book are by no means exhaustive. The problem with PCs is that while there are around a billion operating around the world, each of these has its own unique combination of installed software, hardware, and peripherals.
Being able to create an operating system that’s stable and reliable when faced with that level of customization is truly mind-boggling, and often I’m amazed that Microsoft has managed to pull it off at all.
This of course is why Chapter 21 exists in this book, to help you troubleshoot those really knotty problems that can occur from time to time. This is useful because whatever problem it is you are facing on your PC, it’s fairly likely you’re not the first person to do so and that you won’t be the last either.