


Windows 11’s Support Tools

Windows 11’s Support Tools
we are going to start looking in depth at the various utilities and tools within Windows 11 for diagnosing, troubleshooting, and repairing specific problems and problem areas, and there is indeed a lot to show! Having spent a little time discussing the end user however, I wanted to show you the support tools available in Windows 11, as there are more than you might think.
The best part of using the built-in tools is that some of them can be used by the end user, quite simply and easily, to help them demonstrate what the problem they’re facing is. This can often mean you can give them advice on how to rectify their situation in a quick message or email, rather than having to dive into a full and perhaps lengthy discussion and online or in-person support session.
Taking Screenshots in Windows 11
One of the easiest, and probably by far the most familiar, ways for an end user to show you what’s happening on their PC is for them to take a screenshot they can email to you. There are several ways to achieve this in Windows 11. There are a few different ways to do this.
Method 1: Using Print Screen
The oldest and likely most familiar way for somebody to take a screenshot is to use the Print Screen (PrtScrn) button on their keyboard. This will save a screenshot to the clipboard, and it can then be pasted into a graphics program, such as Paint, and saved as a JPG or other image file or pasted directly into an email or messaging app like Teams.
There are two downsides to using Print Screen. The first is that while it’s fine for keyboard warriors who are used to using shortcuts such as Ctrl + C (copy) and Ctrl + V (paste), the lack of an actual thing they can see might confuse them.
The other problem comes down to the different types of PC and computer the user might have. They could have a laptop that doesn’t have a PrtScrn button, or it could be mixed with the function keys row, and they need to press or to hold the Fn key to get it to work. This is something that can easily confuse a nontechnical user.
Then we have to consider if they’re using a PC at all. You could be troubleshooting a problem with a Windows 11 Cloud PC installation running from the Windows 365 service on a Chromebook or an iPad (see Figure 6-1). These computers will very likely not have a Print Screen button at all and will probably illicit memories of Homer Simpson desperately trying to find the “Any” key he was asked to press in the classic television cartoon series.
 Figure 6-1. You could be asked to support a Windows 11 Cloud PC running on an iPad
Method 2: Windows Key + Print Screen
If the computer is a PC though and it does have a PrtScrn button, then you can ask the user to press the keyboard combination Windows key + PrtScrn which will capture a screenshot and save it as a PNG image file to the user’s Pictures\Screenshots folder. The folder will be automatically created if it does not already exist.
This allows a completely nontechnical user to easily find the screenshot and send it to you in an email or Teams chat message, which is something they damn well ought to be able to do by that point anyway.
Method 3: Alt + Print Screen
These days, we have really large PC monitors, mine is an ultrawide affair with a resolution of 3840 by 1600 pixels, and finding screens with even greater pixel density is becoming more and more common. You might then just want the user to capture the current open window.
They can do this by, making sure the window they want to capture is selected, pressing Alt + PrtScrn on their keyboard. This works in exactly the same way as with just PrtScrn in that it saves an image to the clipboard that can then be pasted into Paint or directly into an email or Teams chat message.
However, Alt + PrtScrn only captures the currently selected window, which can make it much easier to quickly see what the end user is talking to you about.
Tip:If the user is using a tablet such as a Microsoft Surface Pro or Surface Go that doesn’t have a keyboard, perhaps because they’re a first-line worker, a screenshot will need to be captured using the physical buttons on the device. This will vary from one manufacturer’s tablet to another, but for a Surface, it is to press Power + Volume up at the same time. This will save the screenshot to the Pictures\Screenshots folder on the device. Bear in mind however that such a tablet is likely going to be locked to “Kiosk mode” in which only a single app can be run, and the desktop cannot be accessed. In this scenario, they can capture the screenshot but would be completely unable to send it to you.
Method 4: Xbox Game Bar
Okay, so this one is a little more strange. If you want the user to use Alt + PrtScrn but for the image to be automatically saved for them, you can ask them to use the Windows key + Alt + PrtScrn. This will save the image but will prompt the user to view it using the Xbox Game Bar (see Figure 6-2).
 Figure 6-2. Xbox Game Bar can be used to capture screenshots
The user can, if they’re an Xbox gamer familiar with such things, press the Windows key + G if they like to open the Xbox Game Bar, where they will be shown their captured screenshot. What’s easier though is to tell the user to navigate in File Explorer to Video (yes, really) and then Captures where their screenshot will be stored.
Method 5: Snipping Tool
The Snipping Tool has been built into Windows since XP Tablet Edition in 2005 and has been expanded in functionality and usefulness over time, with Microsoft adding features such as pen support for annotating screenshots. You can find the Snipping Tool in the Start Menu.
The user should select what Windows mode to use (see Figure 6-3) from rectangle, window, full screen, or free form, where the user can select an area with a pen or mouse.
 Figure 6-3. The Snipping Tool is a more flexible way to capture screenshots
Perhaps what is more useful however is the Delay mode. This allows the screenshot capture to be delayed by up to ten seconds and is very useful for capturing screenshots at times when it is otherwise very difficult or even seemingly impossible to do so, such as when the Lock Screen is active or a User Account Control (UAC) prompt is displayed (see Figure 6-4).
 Figure 6-4. Delay mode can be used to capture otherwise impossible screenshots
When the user is ready to capture their screenshot, they should press the + New button in the Snipping Tool window. If they have chosen a window, rectangle, or free-form screenshot, the screen will darken, enabling them to select the area to capture, and the screenshot will then appear in the Snipping Tool window.
Tip:You can quick launch the Snipping Tool and go straight into capturing a screenshot with the keyboard shortcut Windows key + Shift + S.
Problem Steps Recorder
Back in 2008 and early 2009, I was a member of Microsoft’s closed beta program for Windows 7, long before the company introduced the Insider Program. A small but significant part of this beta was something called the Problem Steps Recorder (or just Steps Recorder when you search for it in the Start Menu).
This was a tool created specifically for the beta that could be used by testers to demonstrate problems they encountered with the various OS builds that Microsoft released. So popular though was the Steps Recorder that it was kept in the final release of Windows 7 and still resides in Windows 11 today.
Tip:You can most easily find the Problem Steps Recorder by searching for PSR in the Start Menu.
With the Problem Steps Recorder open on the desktop, the user will see a small toolbar containing just four buttons (see Figure 6-5). These are Start Record, Stop Record, Add Comment, and Help which on a drop-down menu where you will find the Settings for the Steps Recorder, including the maximum number of images to capture in a recording session, the default is 25.
 Figure 6-5. The Problem Steps Recorder has a simple toolbar
When the user is ready to record what they do, they can click the Start Record button. You can tell them that they don’t need to rush as this isn’t recording a long video, just a series of images and some text.
The user should then run through the series of clicks and tasks that result in the error they are encountering. At any point during the proceedings, they can click the Add Comment button. This will display a text dialog in which they can type a message for you (see Figure 6-6) that will be saved in the appropriate place in the final file.
 Figure 6-6. The user can add text comments at any time
When they are finished, they should click Stop Record, and the Steps Recorder window will expand to display the full session of what they have captured (see Figure 6-7).
 Figure 6-7. The user should save the output Steps Recorder document
At this point, the user should either click the New Recording button if they feel they’ve made an error and wish to redo things or click Save and save the output file to their PC; by default, it will ask to save to the desktop.
This output file, which is in the ZIP format, should then by sent to yourself by email or messaging after which you can open it to view what the user experienced. You will see that every time something happened on the PC, or whenever the user clicked something or interacted with the desktop or an app, the appropriate item is highlighted with a green border (see Figure 6-8). You will also see any User Comments they made along the way.
 Figure 6-8. Screenshots are all annotated in the Steps Recorder
At the very bottom of the output file, you will find technical information about the session. This includes the filenames of programs, apps, and services being used and accessed by the user during the recording, along with version numbers (very useful for checking compatibility in a workplace) and verbose descriptions of what the user was doing for each step (see Figure 6-9).
 Figure 6-9. Technical details are provided for steps recorded
The Problem Steps Recorder is a truly great way for an end user to be able to demonstrate what it is they’re doing wrong, erm… sorry, for them to be able to demonstrate what it is that’s going wrong on their PC. It can be a great time saver for you, and it can also significantly alleviate the problems that can occur with a nontechnical user trying and failing to accurately describe what they’re doing, what they’re seeing, and what else is happening on their PC.
Quick Assist
You’ll have probably used a remote access tool on PCs at some point to take control of a user’s system so that you can troubleshoot and repair problems. While this is most likely Remote Desktop, which we’ll detail later in this chapter, Windows 10 introduced a new tool called Quick Assist. This tool is a simple-to-use and straightforward way for an end user to request assistance from you and for you to take full control of their PC, even allowing you to reboot it during a support session.
If you can’t find Quick Assist in the All Apps list of the Start Menu, or via a Start Menu search (it should be installed on all Windows 11 PCs), then you can download it from the Microsoft Store.
Note:In order to use Quick Assist, you will be asked to sign in with a Microsoft or Azure AD account. The person receiving assistance does not need an account to use the app.
When you launch Quick Assist, you are asked if you want to Get assistance, in which case you need to enter a six-digit code provided to you by the person giving assistance, or if you want to Give assistance where, unsurprisingly, you’ll be given the six-digit code (see Figure 6-10). Figure 6-10. Quick Assist has a straightforward and easy-to-use starting interface
Once the person receiving support has typed the six-digit code into their Quick Assist app, they should click the Share screen button (see Figure 6-11).
 Figure 6-11. The person receiving support needs to click Share screen
The next stage is very important as you will be asked if you want to Take control of the remote PC, and the person receiving support will need to accept (see Figure 6-12).
 Figure 6-12. You need to take control of the remote PC
With this done, a window will open on your desktop showing the full desktop, either full size or scaled to fit depending on the resolution and scaling on your own screen (see Figure 6-13).
 Figure 6-13. The remote session opens in a window on your desktop
At the top of this window are the main controls (see Figure 6-14). In a bar running along the top of the window, you will find controls for switching between multiple remote monitors, if the remote PC has more than one screen attached, annotating the screen to show or highlight something to the remote user, fitting and scaling the screen to the current support window, opening the instruction channel (more on this in a moment), restarting the remote PC while keeping the support session active, opening Task Manager on the remote PC, and finally refreshing the session, pausing the session, and ending the session.

Figure 6-14. Controls for managing the session are at the top of the window
The remote PC also has a command box that appears at the top center of their screen, which includes a pause button, an exit (end session) button, and a button to open the instruction channel (see Figure 6-15). This allows live chat to take place between both parties if you do not have a phone or other voice lines open at the time.
 Figure 6-15. You can open a chat window for both participants
If you restart the remote PC at any time during the support session, Quick Assist will automatically resume when the remote user signs in and the session will be restored (see Figure 6-16).
 Figure 6-16. The remote session will be restored after restarting the remote PC
Windows Remote Assistance
Windows Remote Assistance is less useful than Quick Assist overall, as it’s more limited in functionality and dates all the way back to Windows XP. It’s also possible, though unlikely, that this feature will be completely removed from Windows 11 at some point in the future.
There are a few minor advantages that Remote Assistance has over Quick Assist in the corporate space. Microsoft charges a fee for using Quick Assist to corporations, something which caused a right stink when it was first announced.Remote Assistance on the other hand is free.
Remote Assistance also doesn’t require you to be using a Microsoft or Azure AD account, making it slightly more flexible for people who use local accounts on their PC.
You need to make sure that Remote Assistance is activated on the PC that is being supported, and often it is disabled by default simply for reasons of maintaining good security. Search for Remote Assistance in the Start Menu, and an option to Allow Remote Assistance invitations to be sent from this computer will appear. Here, you can make sure there is a check in the Remote Assistance option (see Figure 6-17).
 Figure 6-17. You need to make sure Remote Assistance is enabled on the remote PC
You can also find this option in Group Policy via Computer Configuration ➤ Administrative Templates ➤ System ➤ Remote Assistance.
Like Quick Assist, Remote Assistance needs to be run on both PCs, and you are asked if you want to invite someone to help you or to help someone that has invited you (see Figure 6-18).
 Figure 6-18. Like Quick Assist, the Remote Assistance dialog is friendly
The person seeking advice is then asked if they want to Save [the] invitation as a file (see Figure 6-19), Use [an] email [app] to send an invitation which only appears if they have an email program such as Outlook installed on their PC, or sometimes to Use Easy Connect, which is a peer-to-peer system that is sometimes available if both parties are using a Microsoft or an Azure AD account.
 Figure 6-19. There are up to three ways for the person seeking support to request it
If you are the person providing support, you are prompted to either open an invitation file you have already received or to use Easy Connect if it is available (see Figure 6-20). Honestly though, it’s simpler to just open the invitation file when you receive it.
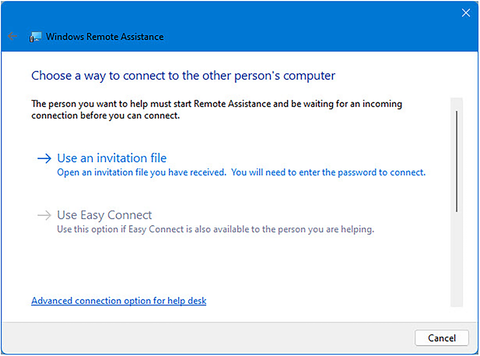 Figure 6-20. It is simpler for the person providing support to wait for the invitation file
With the invitation file open, you will be connected to the remote session and prompted to enter a password. This password appears on the screen of the remote PC (see Figure 6-21).
 Figure 6-21. The password appears on the screen of the Remote PC
Remote Assistance isn’t as friendly as Quick Assist where all permissions are obtained up front. The remote user must stay at their desktop for a while, as they have to permit the session once the password has been entered (see Figure 6-22).
 Figure 6-22. The person seeking control must give permission for the session
With the session now active, you will both see a toolbar on the remote PC containing options such as stopping and pausing the session, opening a chat window, and changing settings for the session.
In addition to this, you will have options in the top left of the support window for rescaling the remote desktop and, fairly crucially, for requesting control of the remote PC (see Figure 6-23).
 Figure 6-23. Once in the session, you must Request Control
The last part of interaction for the user of the remote PC is they need to permit you taking full control. You should tell them to also check the box saying “Allow [the support person] to respond to User Account Control Prompts,” which is something Quick Assist does automatically (see Figure 6-24).
 Figure 6-24. Control must be granted at the remote PC
Remote Desktop
The daddy of remote support tools in the enterprise is Remote Desktop, which has been a part of Windows desktop editions since Windows 2000, a version of the operating system for which I’ll always have fond memories. Remote Desktop needs to be activated on any PC receiving support, and you can do this in Settings under System and then Remote Desktop (see Figure 6-25). You can also enable Remote Desktop via Group Policy or Mobile Device Management (MDM).
 Figure 6-25. Remote Desktop needs to be enabled in Settings or via Group
Policy and MDM
Clicking the Remote Desktop users link will display a dialog in which you can choose which users are allowed to connect to a PC remotely, and again this can be achieved using tools such as MDM. If you click the Advanced button when searching for users, you can then click Find now to display a list of all users on the PC and crucially all user groups such as Administrators, which can make configuring the feature simpler (see Figure 6-26).
 Figure 6-26. You need to add authenticated users to the Remote Desktop permissions
With Remote Desktop activated on the PC you will be supporting, you will be given the name of that PC. This will be needed when you seek support (see Figure 6-27).
 Figure 6-27. You will need the name of the Remote PC to gain access
When you want to gain access to a remote PC, search in the Start Menu for Remote Desktop, and you will see Remote Desktop Connection appear in the search results. Here, you can type the name of the remote PC, along with the username of the user you wish to connect as (see Figure 6-28). Checking the Allow me to save credentials check box can also prove useful.
 Figure 6-28. You can enter and save login credentials for a remote PC
There are tabs along the top of the Remote Desktop Connection dialog that allow you to customize your remote experience. Display lets you set the display resolution you will connect at, and you might want to set this to be the same as the resolution of your own PC, unless you specifically want to open the session in a window on your desktop.
The Local Resources tab is by far the most useful; this allows you to configure audio settings and determine what happens when you press key combinations such as Alt + Tab and Ctrl + Alt + Del. In the Local devices and resources section however, you can choose which drives and resources, such as USB Flash Drives and printers, on your own machine will also be accessible from the remote PC (see Figure 6-29). This can be incredibly useful if you need to copy files to and from the remote PC.
 Figure 6-29. You can access local drives and resources from the remote PC
The Experience tab allows you to choose bandwidth options for the connection, but this is really a legacy feature and most useful now if a low-bandwidth connection such as cellular is being used. Lastly, the Advanced tab contains options for setting security and other connection options.
When you are ready to connect to the remote PC, click the Connect button, and you will be asked to trust the remote connection. A drop-down option will display what is permitted to be shared, and a Don’t ask me again for connections to this computer will save your preferences (see Figure 6-30).
 Figure 6-30. You will be asked to trust the connection to the remote PC
After entering the password for the remote account (you cannot connect to accounts that do not have a password), one more security dialog will appear displaying details of any security certificate attached to the remote PC (see Figure 6-31). Figure 6-31. You are shown the security certificate from the remote PC
With the connection to the remote PC established, in this case a virtual machine running in Hyper-V, you have full control including being able to restart the remote PC and maintain the connection (see Figure 6-32).
 Figure 6-32. Remote Desktop gives you easy and full control of the remote PC
Because you are already authenticated by the system, there is no involvement required by the remote user, though if they are using the PC at the time, you should let them know you are taking control of their account as they will be signed out on their own screen.
If you are using Remote Desktop full screen, you will see a toolbar at the top center of your screen containing options to check the connection quality, to minimize window, and to exit the remote desktop session (see Figure 6-33).
 Figure 6-33. A toolbar appears if you use Remote Desktop full screen
The Microsoft Remote Desktop App
I want to put in a note about the Remote Desktop app that is available for all platforms in appropriate app stores for Windows 10 and Windows 11, Mac OS, iOS, ChromeOS, and Android. This app is really for connecting to remote desktop and remote PC environments such as Microsoft Azure and Windows 365 (see Figure 6-34).
 Figure 6-34. Microsoft has a Remote Desktop app for cloud VMs
To connect to a remote PC or VM using this app, click the three dots menu icon in the top-right corner of the window, and click either Subscribe, which will allow you to connect to Azure or a similar service with your account credentials and often a QR code, or Subscribe with URL if you have been given a full web address for the VM you wish to connect to.
Third-Party Remote Support Tools
There are a huge variety of third-party remote tools, and you are by no means tied to the ones that are supplied with Windows 11. You may already have a subscription and a favorite tool or suite of tools to use. If you are unfamiliar with what is available, some of the best tools available include
LogMeIn Pro – www.logmein.com/pro
TeamViewer – www.teamviewer.com
ZOHO Remote Access – www.zoho.com
Chrome Remote Desktop – https://remotedesktop.google.com is useful if you ever need to connect to a Chromebook.
Summary
There are a great many highly effective and very useful remote access and remote management tools available in Windows 11, but for providing support, it really comes down to Remote Desktop (most useful for PCs on the same network) or Quick Assist (for remote PCs). If the user can walk you through the steps required to reproduce an error though, the Problem Steps Recorder can save you a lot of time, especially if the end user is doing something on the PC that you might not do yourself.
We’ll take support further in the next chapter and look at the methodology of providing high-quality technical support, covering subjects as managing user accessibility, setting up effective support systems, and how you create and manage reporting and auditing systems and paperwork.