How to Export Access to Excel?
Today, managing large amounts of data can be a challenge, but with the right tools, it doesn’t have to be. In this article, we will discuss the process of exporting data from Microsoft Access to Microsoft Excel, providing you with the steps you need to successfully transfer your data. Whether you are a professional database administrator or a casual user, this tutorial is a great way to learn how to easily export data from Access to Excel.
Exporting Access to Excel is easy. Here’s how:
- Open the Access database and select the table that you want to export.
- Go to the File menu and choose Export.
- Select the “Export to Excel” option.
- Name the Excel file and choose the location for it.
- Click “Save” and your data will be exported to the Excel file.

How to Export Access Data to Excel?
Exporting data from Microsoft Access to Excel is a quick and easy process. It can be done in few simple steps, allowing you to quickly and easily transfer and analyze data from Access to Excel. Here we will guide you through how to export Access data to Excel.
Step 1: Open Access Database
The first step is to open the Access database. To do this, go to the File tab and select Open. This will open a dialogue box that will allow you to browse for the Access database you want to open. Once you have located the database, select it and click Open.
Step 2: Select the Data to Export
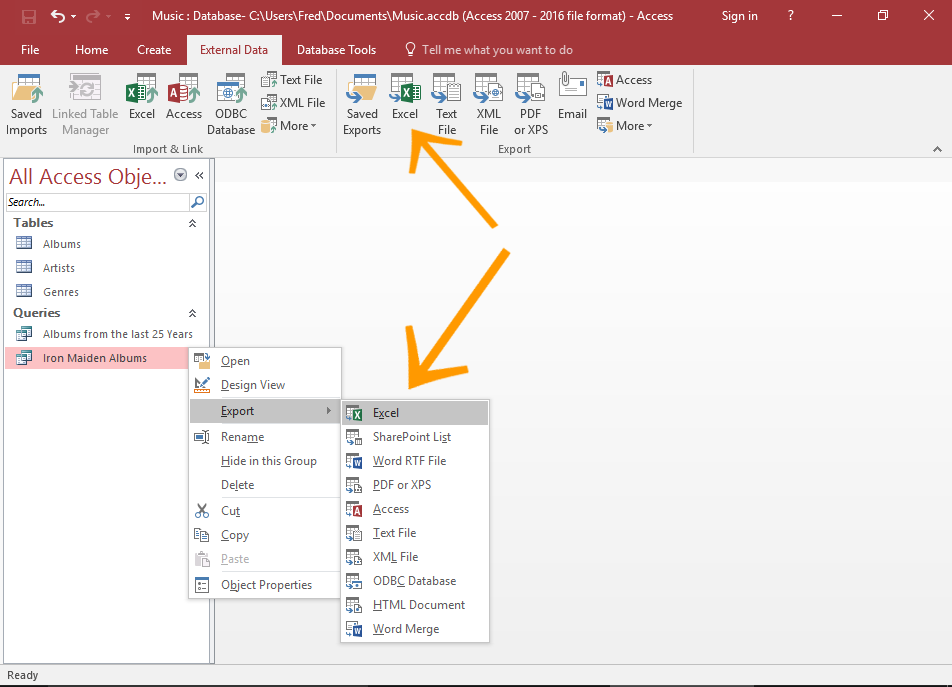
Once the Access database is open, you will need to select the data you want to export to Excel. To do this, select the table or query that contains the data you want to export and right-click on it. This will open a menu. Select Export and then select the type of file you want to export the data to. In this case, you will select Excel.
Step 3: Configure the Export Options
Once you have selected the type of file you want to export the data to, you will need to configure the export options. This will allow you to choose the specific data you want to export, such as fields, records, and formats. You can also choose to export the data in a new Excel file or in an existing Excel file. Once you have configured the export options, click OK.
Step 4: Specify the Location for the Exported File
The next step is to specify the location for the exported file. To do this, click the Browse button and select the folder where you want to save the exported file. Once you have selected the folder, click Save.
Step 5: Export the Data
Once you have specified the location for the exported file, click the Export button to begin the export process. This will export the data from Access to Excel. Once the export process is complete, you will be able to open the exported Excel file and view the data.
Troubleshooting Tips
If you encounter any errors or problems while exporting data from Access to Excel, there are a few troubleshooting tips you can try. First, make sure you have the latest version of both Access and Excel installed on your computer. Second, make sure you have the necessary permissions to export the data. Finally, make sure the data you are trying to export is compatible with Excel.
Related FAQ
Exporting Access to Excel is a great way to get the most out of your data and make it easier to analyze. With the right steps and tools, you can easily convert your Access data into a spreadsheet format, making it easier to share, present, or print. Whether you use Access for business or personal use, exporting to Excel can help you save time and money while taking advantage of the powerful features of both software programs.


