


How to Add Signatures in Outlook?

Are you looking for a way to show off your personality and brand when sending emails? Adding a signature in Outlook is an easy way to do just that! In this article, we’ll take a look at how to add signatures to your Outlook emails for a professional and personalized touch. We’ll also explore some of the customization options available to you. Let’s get started!
- Open Outlook and go to File > Options > Mail.
- In the Mail Settings, click on the Signatures button.
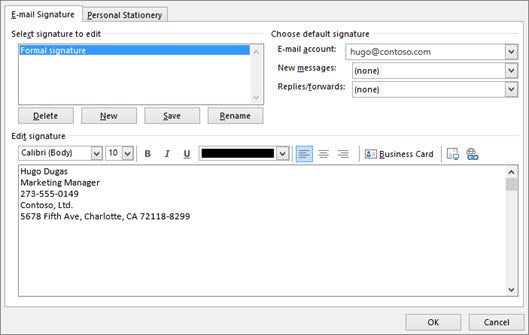
- Click on the New button to create a new signature.
- Name the signature and type the desired text.
- Add a desired image, if any.
- Select the default signature for new messages and replies/forwards.
- Finally, click on the OK button to save the changes.
Adding Signatures in Outlook
Adding a signature in Outlook can be a great way to make sure emails sent out from your account look professional and presentable. It is also a great way to make sure that your contact information is included with each email sent out. This article will discuss the process of adding a signature in Outlook and how it can help your emailing experience.
Create a Signature
The first step in adding a signature to Outlook is to create the signature itself. This can be done easily in the Outlook settings. Once you open the settings, select the Mail option and then create the signature in the Signatures tab. This can include text, a company logo, or contact information. Make sure that the signature looks professional and reflects your company well.
Format the Signature
Once the signature has been created, it is important to format it properly. This can include making sure the font and font size is consistent, and that the colors used match the colors used in the rest of the email. It is also important to make sure that the signature appears correctly on both desktop and mobile devices.
Apply the Signature
After the signature has been created and formatted, it is time to apply it to the Outlook account. This can be done by selecting the signature in the Signatures tab and then applying it to the emails. It is also possible to create different signatures for different email accounts within the Outlook settings.
Attach Signatures to Emails
Once the signature has been created and applied, it is time to attach it to the emails that you send out. This can be done easily in the Outlook settings. In the Mail section, select the Signatures tab and then select the signature that you want to attach. From here, it is just a matter of selecting the signature and then attaching it to the email.
Make Edits to Signatures
If you need to make any edits to the signature, such as change the font size or color, this can be done easily in the Outlook settings. Select the Mail option and then select the Signatures tab. Here, you can make any edits that you need to the signature.
Disable Signature
If you ever need to disable the signature, this can be done easily in the Outlook settings. Select the Mail option and then select the Signatures tab. Here, you can easily disable the signature for a particular email account or for all email accounts.
Conclusion
Adding a signature in Outlook is a great way to make sure emails sent out from your account look professional and presentable. It is also a great way to make sure that your contact information is included with each email sent out. This article has discussed the process of adding a signature in Outlook and how it can help your emailing experience.
Frequently Asked Questions
Question 1: How do I add a signature in Outlook?
Answer: To add a signature in Outlook, open your Outlook application and select File > Options > Mail. On the Mail tab, scroll to the bottom and select the Signatures button. Here, you can add a new signature, edit an existing signature, or delete a signature. To add a signature, click the New button, enter your signature information, and then select OK.
Question 2: How do I create different signatures for different accounts in Outlook?
Answer: To create different signatures for different accounts in Outlook, open your Outlook application and select File > Options > Mail. On the Mail tab, scroll to the bottom and select the Signatures button. Here, you can add a new signature and select the E-mail account associated with that signature from the dropdown menu. You can also edit an existing signature or delete a signature.
Question 3: How do I insert images into my Outlook signature?
Answer: To insert images into your Outlook signature, open your Outlook application and select File > Options > Mail. On the Mail tab, scroll to the bottom and select the Signatures button. Create a new signature or edit an existing signature, and then select the Insert Picture button. You can then select an image from your computer or paste an image URL and select Insert.
Question 4: How do I add a hyperlink to my Outlook signature?
Answer: To add a hyperlink to your Outlook signature, open your Outlook application and select File > Options > Mail. On the Mail tab, scroll to the bottom and select the Signatures button. Create a new signature or edit an existing signature, and then select the Insert Hyperlink button. Enter the URL of the page you would like to link to, and then select OK.
Question 5: How do I format my Outlook signature?
Answer: To format your Outlook signature, open your Outlook application and select File > Options > Mail. On the Mail tab, scroll to the bottom and select the Signatures button. Create a new signature or edit an existing signature, and then select the Formatting button. Here, you can change the font, font size, color, and alignment. You can also add bold, italic, or underline to your text.
Question 6: How do I save my Outlook signature?
Answer: To save your Outlook signature, open your Outlook application and select File > Options > Mail. On the Mail tab, scroll to the bottom and select the Signatures button. Create a new signature or edit an existing signature, and then select the Save button. Enter a name for your signature and select OK. Your signature will now be saved for future use.
How to Add Signature in Outlook
In conclusion, adding signatures in Outlook is an easy task. With this guide, you can now customize your Outlook emails with your desired signature. Just remember to save your signature as a template so you can use it repeatedly without having to type it out each time. With a few clicks of the mouse and a few keystrokes, you can now add a professional and eye-catching signature to your emails.