


How to Create a Nas Server With Windows?

Are you looking for a way to create a network attached storage (NAS) server with Windows? NAS servers can be used to store and manage data centrally, enabling you to share the same data across multiple computers and devices. Moreover, they can also be used to back up important data. Creating a NAS server with Windows is not as complicated as it might sound, and in this article, we will walk you through the steps of setting up a Windows-based NAS server. So, if you are ready to get started, let’s get to it!
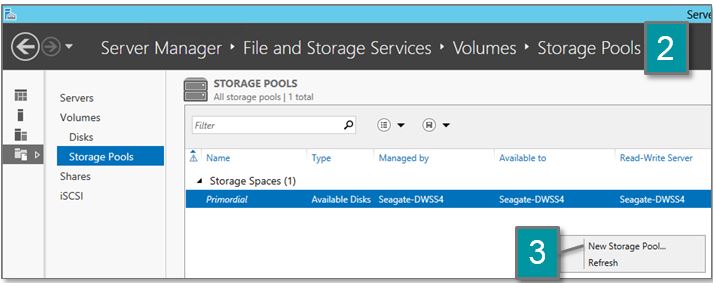
Creating a NAS server with Windows is relatively easy and can be done with the help of a few simple steps. First, install Windows Storage Server 2012 R2 on the server machine. Then, configure the Windows Server to allow for remote access. Next, set up the storage devices on the server by creating a storage pool. Finally, create a shared folder and configure the security settings for access.
- Install Windows Storage Server 2012 R2 on the server machine.
- Configure the Windows Server to allow for remote access.
- Set up the storage devices on the server by creating a storage pool.
- Create a shared folder and configure the security settings for access.
Introduction to creating a NAS server with Windows
Network Attached Storage (NAS) devices are becoming increasingly popular as a way to store large amounts of data. NAS devices are typically connected to the network and offer a great way to store files, photos, videos and other data. Creating a NAS server with Windows is a relatively simple process and can be done in just a few steps.
Requirements for Creating a NAS Server With Windows
In order to create a NAS Server with Windows, there are a few requirements that must be met. First, you will need a computer running Windows 10 or higher. Additionally, you will need a network connection and an external storage device such as a hard drive or USB flash drive. Finally, you will need to install a NAS software such as FreeNAS or OpenFiler.
Setting Up Windows 10
The first step in creating a NAS server with Windows is to set up Windows 10. This involves setting up the computer, installing any necessary drivers and configuring the network settings. Once the computer is set up and the network is configured, it’s time to install the NAS software.
Installing a NAS Software
Once the computer is set up and the network is configured, the next step is to install a NAS software. There are a variety of NAS software programs available, but the two most popular options are FreeNAS and OpenFiler. Both programs are free and can be easily installed on the computer.
Configuring the NAS Software
Once the NAS software is installed, it’s time to configure it. This involves specifying the network settings, setting up the storage devices, and creating users and groups. Once the NAS software is configured, the computer is ready to be used as a NAS server.
Connecting the Storage Devices
Once the NAS software is installed and configured, the next step is to connect the storage devices. This can be done by connecting the storage device to the computer via USB or by connecting it directly to the network. Once the storage device is connected, the NAS software will automatically recognize it and allow it to be used as a storage device.
Configuring User Access
Once the storage devices are connected, the next step is to configure user access. This involves creating user accounts and assigning permissions to them. This will allow users to access the NAS server and its data.
Testing the NAS Server
Once the user accounts are created and the storage devices are connected, it’s time to test the NAS server. This can be done by connecting to the NAS server from another computer and accessing the data. If everything is working properly, the data should be accessible.
Conclusion
Creating a NAS server with Windows is a relatively simple process and can be done in just a few steps. The first step is to set up Windows 10 and install a NAS software. Once the NAS software is installed and configured, the storage devices can be connected and user access can be configured. Once the user accounts are created and the storage devices are connected, the NAS server can be tested.
Frequently Asked Questions
1. What is a NAS Server?
A NAS (Network Attached Storage) Server is a storage device connected to a network that provides an easy and convenient way for users to store, share and access data from any device connected to the same network. A NAS Server is typically a file server with specialized software that allows multiple users to access files from anywhere on the network. It is also more secure than a traditional file server as data is encrypted and stored on the NAS Server.
2. What are the Benefits of Setting up a NAS Server?
The main benefit of setting up a NAS Server is that it provides a central location for users to store, access and share data. This means that data can be easily shared between multiple users and devices without having to manually transfer files. Additionally, NAS Servers are typically more secure than traditional file servers as they offer encryption and other security features to protect data. Finally, setting up a NAS Server can be a cost-effective way to store and share data as they are often cheaper than buying multiple hard drives or cloud storage solutions.
3. What are the Requirements for Setting Up a NAS Server?
The requirements for setting up a NAS Server will depend on the type of NAS Server you are using. Generally, you will need a computer with an available Ethernet port, a router, a NAS Server, and an operating system such as Windows or Linux. Additionally, you will need to configure the hardware and software settings to ensure that the NAS Server is properly connected to the network.
4. How Do I Set Up a NAS Server With Windows?
Setting up a NAS Server with Windows is relatively simple. First, you will need to download and install the necessary drivers and software for the NAS Server. Next, you will need to connect the NAS Server to the network and configure the settings. Finally, you will need to create the necessary user accounts and shared folders. Once the setup is complete, you will be able to access the NAS Server from any device connected to the same network.
5. What Are the Benefits of Using Windows to Set Up a NAS Server?
Using Windows to set up a NAS Server offers several advantages over other operating systems. First, it is a user-friendly platform that is easy to use and configure. Additionally, Windows offers a wide range of software and tools that can be used to manage and configure the NAS Server. Finally, Windows is compatible with a variety of devices, so it’s easy to access the NAS Server from any device connected to the same network.
6. What Security Measures Should I Take When Setting up a NAS Server?
When setting up a NAS Server, it’s important to take security measures to protect your data. First, you should create a strong password for the NAS Server and make sure to change it regularly. Additionally, you should enable encryption on the NAS Server to protect your data from unauthorized access. Finally, you should use a firewall to protect the NAS Server from external threats.
How to make a NAS on Windows 8/10 (No Permissions)
Creating a NAS server with Windows can be a great way to store and share your data. With just a few simple steps, you can have a reliable and secure storage system for your files. From setting up the hardware to configuring the server, you’ll be able to use the server to store and access your data. With a NAS server, you can also enjoy added features like automatic backups, remote access, and more. With the right setup, you can have a reliable and secure server that is perfect for any home or business.