


How to Create Outlook Signature?

Are you looking for an easy way to create an effective and eye-catching signature for your emails in Microsoft Outlook? Look no further! In this article, we will walk you through the steps to create an Outlook signature that will make your emails stand out and leave a lasting impression. By the end of this guide, you’ll have a professional, attractive signature that will make your emails look more polished and professional. Let’s get started!
How to Create Outlook Signature?
- Open Outlook and go to File > Options
- Under the Mail tab, select Signatures
- Select New to create a new signature
- Write your signature and format it using the Format Text tab
- Once you are done, click OK and you are ready to use your new signature
Creating an Outlook Email Signature
Creating an Outlook email signature allows users to present themselves professionally and efficiently. An email signature is typically a few lines of text that appears at the bottom of an email message. It contains information such as a user’s name, contact information, title, logo, or even a quote. Email signatures can be created in Outlook with ease and can be used to personalize and improve communication.
To create an Outlook email signature, users will need to open Outlook and access the main menu. From the menu, users should select the “New” option, followed by the “Signature” option. The user will then be prompted to create a new signature, which will allow them to type in their desired information. After the user has finished typing in their information, they should select the “Save” option and the signature will be saved.
Once the signature has been created, users will need to set the signature to be used by default. To do this, users should go to the “File” tab and select the “Options” option. In the “Options” menu, users should select the “Mail” tab and then the “Signatures” option. Here, users should select the signature they wish to use and click the “OK” button. The signature will then be set as the default signature for all emails sent from Outlook.
Adding Images and Links to Outlook Email Signatures
In addition to text, users can also add images and links to their Outlook email signatures. Images can be added to signatures by selecting the “Insert” tab, followed by the “Picture” option. Links can be added by selecting the “Insert” tab, followed by the “Link” option. In both cases, the user will be prompted to select the desired image or link to be added to the signature. Once the desired image or link has been selected, the user should click the “OK” button to insert it into the signature.
Adding Personal Photos
Users can add their own personal photos to their Outlook email signature. To do this, users should first select the “Insert” tab, followed by the “Picture” option. The user will then be prompted to select the desired photo from their computer. After selecting the photo, the user should click the “OK” button to insert it into the signature.
Adding Links
Links can be added to Outlook email signatures to direct users to a website or other online content. To add a link, users should select the “Insert” tab, followed by the “Link” option. The user will then be prompted to enter the URL of the desired link. Once the URL has been entered, the user should click the “OK” button to insert the link into the signature.
Formatting Outlook Email Signatures
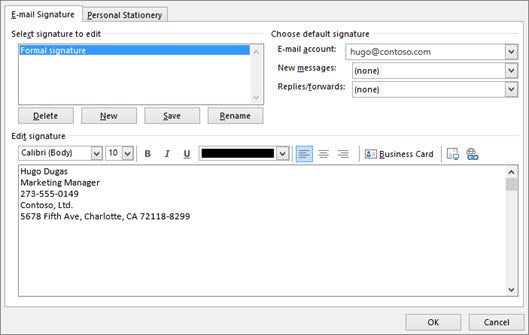
Outlook email signatures can be formatted to be more aesthetically pleasing or to better convey information. To format a signature, users should select the signature they wish to edit, followed by the “Format Text” tab. Here, users can customize the font, font size, alignment, and other formatting options. After the desired formatting has been applied, the user should click the “Save” button to save the changes.
Changing Fonts
Outlook email signatures can be formatted to use different fonts. To change the font of a signature, users should select the signature they wish to edit, followed by the “Format Text” tab. In the “Font” section, users can select from a variety of fonts to use for their signature. After the desired font has been selected, the user should click the “Save” button to apply the changes.
Changing Font Size
Outlook email signatures can also be formatted to use different font sizes. To change the font size of a signature, users should select the signature they wish to edit, followed by the “Format Text” tab. In the “Font Size” section, users can select from a variety of font sizes to use for their signature. After the desired font size has been selected, the user should click the “Save” button to apply the changes.
Few Frequently Asked Questions
What is an Outlook Signature?
An Outlook signature is an HTML signature that is automatically appended to the end of an email message when sent from Outlook. It typically includes contact information such as name, job title, company name, website address, phone number, and email address. It can also include a logo, photos, and other customizations. The signature can be used to add a personal touch to emails as well as provide additional information about the sender.
What are the Benefits of an Outlook Signature?
An Outlook signature can be used to make a professional impression on the recipient of an email. It can also be used to provide key contact information at a glance. It can also be used to promote a company’s website, products, or services. Additionally, an Outlook signature can be used to create an immediate, positive connection with the recipient.
How Do I Create an Outlook Signature?
Creating an Outlook signature is simple. First, open Outlook and select File > Options. Select the Mail tab on the left-hand side and then scroll down to the Signature section. Click the “New” button to create a new signature and enter a name for the signature. Once the new signature is created, click the “Edit” button to open the signature editor. Here, users can customize their signature with text, images, and hyperlinks. After the signature is customized, click “OK” to save the changes. Finally, select the signature from the drop-down menu and click “OK” to apply the signature to all outgoing emails.
What Are Some Tips for Designing an Outlook Signature?
When designing an Outlook signature, it’s important to keep it simple and professional. Avoid using images that are too large or distracting. Also, make sure that all information is up-to-date and accurate. It’s also a good idea to include a link to the company’s website or social media accounts to make it easy for the recipient to find more information. Additionally, consider using a template to ensure the signature is consistent across all emails.
Are There Any Security Considerations When Creating an Outlook Signature?
Yes. When creating an Outlook signature, it’s important to remember not to include any confidential or sensitive information. This includes passwords, financial information, or any other information that should not be shared with the public. Additionally, it’s important to be aware of any anti-spam regulations when including hyperlinks in the signature.
Can I Use an Outlook Signature on Other Email Clients?
Yes. An Outlook signature can be used on other email clients such as Gmail, Yahoo Mail, and Apple Mail. To do this, simply copy the signature from Outlook and paste it into the signature editor of the corresponding email client. However, it’s important to note that some formatting may be lost when transferring the signature to another email client.
How to Add Signature in Outlook
Creating an Outlook signature is a simple process that can help you make a great impression on your professional contacts. Whether you’re a business owner, freelancer, or a student, a professional signature will provide potential clients, colleagues, and employers with a good impression of you. By taking the time to customize your signature with your contact information, logo, and a personalized message, you can ensure your emails stand out from the rest. With these steps, you can quickly and easily create an Outlook signature that will make a lasting impression.