


How to Enable Remote Desktop in Windows 10

Are you looking for an easy way to get access to your Windows 10 computer from anywhere in the world? Remote Desktop is a powerful feature that lets you access your computer remotely, giving you the freedom to work from anywhere. In this guide, we’ll take you through the steps to enable Remote Desktop in Windows 10 so you can access your computer from any device with an internet connection.
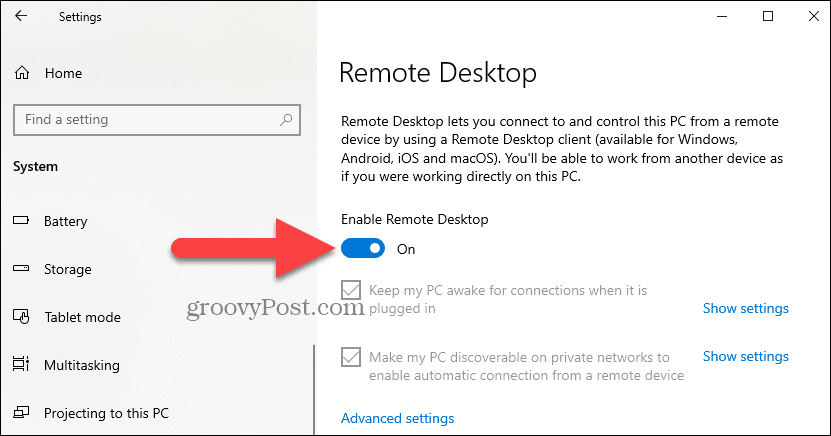
Enabling Remote Desktop in Windows 10:
To enable Remote Desktop in Windows 10, open the Settings app. Go to System > Remote Desktop and turn on Enable Remote Desktop. You can also adjust the port number and configure Network Level Authentication. You can also restrict access to specific users or groups.
- Step 1: Open Settings app by pressing Windows+I keys together.
- Step 2: Go to System > Remote Desktop.
- Step 3: Turn on the toggle switch for Enable Remote Desktop.
- Step 4: You can also configure Network Level Authentication, adjust the port number, and restrict access to specific users or groups.
Enabling Remote Desktop on Windows 10
The Remote Desktop Protocol (RDP) is a Microsoft technology that allows a user to remotely access and control another computer. Windows 10 includes a feature that allows users to access their PCs remotely. This feature is known as Remote Desktop and it can be enabled in Windows 10 by following the steps outlined below.
Step 1: Enable Remote Desktop in Windows 10
The first step in enabling Remote Desktop in Windows 10 is to open the Control Panel. To do this, press the Windows key + R, type in control and press the Enter key. This will open the Control Panel and from here, select the System and Security option. Under this option, click on the Allow remote access option.
From the next window that appears, select the Allow remote connections to this computer option. This will enable Remote Desktop in Windows 10.
Step 2: Configure Firewall Settings
The next step is to configure the Windows Firewall settings to allow Remote Desktop connections. To do this, select the Windows Firewall option from the Control Panel. Then, select the Advanced Settings option from the navigation pane on the left.
Next, in the Inbound Rules section, locate the Remote Desktop – User Mode (TCP-In) rule and right-click on it. Select the Enable Rule option to allow Remote Desktop connections.
Step 3: Configure Network Settings
The last step is to configure the network settings. To do this, open the Network and Sharing Center by pressing the Windows key + R and typing in ncpa.cpl. Then, select the Change adapter settings option from the left pane.
Right-click on the active network connection and select the Properties option. Under the Networking tab, select the Internet Protocol Version 4 (TCP/IPv4) option and click on the Properties button.
Step 4: Configure IP Address
In the Properties window, select the Use the following IP address option and enter the IP address, subnet mask and default gateway. Then, click on the OK button to save the changes.
Step 5: Test the Remote Desktop Connection
Once the network settings have been configured, the next step is to test the Remote Desktop connection. To do this, open the Remote Desktop Connection application by typing in mstsc in the Run dialog box.
In the Remote Desktop Connection window, enter the IP address of the computer that you want to access remotely and click on the Connect button. If the connection is successful, you will be able to access the computer remotely.
Step 6: Add Additional Security
Although the Remote Desktop connection is now enabled, it is recommended to add additional security to protect the connection. To do this, open the System Properties window by typing in sysdm.cpl in the Run dialog box.
On the Remote tab, select the Allow connections only from computers running Remote Desktop with Network Level Authentication option and click on the OK button. This will ensure that only authenticated users can connect to the computer.
Step 7: Enable the Remote Desktop Service
The final step is to enable the Remote Desktop Service. To do this, open the Services window by typing in services.msc in the Run dialog box.
Locate the Remote Desktop Services option and right-click on it. Select the Start option to enable the Remote Desktop Service.
Step 8: Verify the Remote Desktop Connection
Once the Remote Desktop Service has been enabled, you can verify the connection by attempting to connect to the computer remotely. If the connection is successful, you will be able to access the computer remotely.
Top 6 Frequently Asked Questions
What is Remote Desktop?
Remote Desktop is a Windows feature that allows users to access their computers remotely over a network connection. It is useful for working from home, providing tech support to family and friends, and accessing files from another computer. With Remote Desktop, you can take control of another computer from any location and use it as if you were sitting in front of it.
How do I enable Remote Desktop in Windows 10?
To enable Remote Desktop in Windows 10, first open the Start menu and type “remote settings” into the search bar. Click on the “Allow remote access to your computer” option, which will bring up the “System Properties” window. In the Remote tab, click on the “Allow remote connections to this computer” option and then click Apply. You will then be prompted to enter the credentials of the user you want to give remote access to. Once you have entered the credentials and clicked OK, Remote Desktop will be enabled.
How do I connect to a remote computer?
Once Remote Desktop is enabled, you can connect to the remote computer using the Remote Desktop Connection application. To do this, open the Remote Desktop Connection application and enter the IP address or host name of the remote computer. You will then be prompted to enter the credentials of the user you want to access the remote computer with. Once you have entered the credentials and clicked OK, you will be connected to the remote computer.
Are there any security risks with Remote Desktop?
Yes, there are some security risks associated with using Remote Desktop. It is important to ensure that the remote computer has an up-to-date antivirus and firewall installed and that the user you are connecting with has strong passwords. Additionally, you should always encrypt your connection to the remote computer and keep your Remote Desktop client up-to-date with the latest security patches.
What are the system requirements for using Remote Desktop?
In order to use Remote Desktop, both the local and remote computers must be running Windows 10. Additionally, the Remote Desktop Connection application must be installed on the local computer. Both computers must also be connected to the same network, either directly or through a VPN connection.
Can I access a remote computer from my mobile device?
Yes, you can access a remote computer from your mobile device using the Remote Desktop app. The app is available for both Android and iOS devices and allows you to connect to a remote computer. You will need to have the IP address or host name of the remote computer and the credentials of the user you want to access the remote computer with. Once you have entered the credentials and clicked OK, you will be connected to the remote computer.
How to enable remote desktop connections in Windows 10
Remote Desktop in Windows 10 is a great tool to access your computer remotely and securely. It is easy to setup and use, and provides a secure connection that keeps your data safe. With the help of this guide, you can now easily enable Remote Desktop in Windows 10 and enjoy the benefits of a remote connection. With Remote Desktop, you can now work from anywhere and stay connected to your work computer. So, take advantage of this great tool and start working remotely today!