


How to Setup Signature in Outlook?

Are you tired of manually typing out your email signature each time you send an email? Do you want to streamline the process and make sure that your contacts always know who they are communicating with? If so, setting up a signature in Outlook is the perfect solution. With this guide, you’ll learn how to easily set up a signature in Outlook and customize it to your liking. By the end, you’ll be able to create a signature that reflects your professional credentials and brand. So let’s get started.
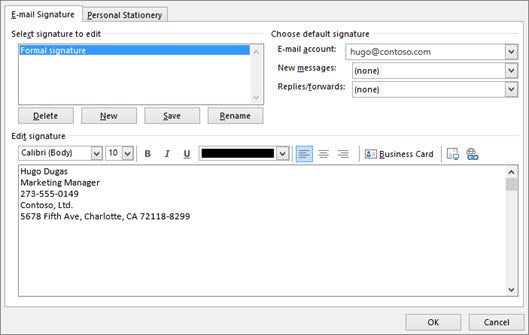
Setting up a signature in Outlook is easy. Follow these steps:
- Open Outlook and click on the File tab.
- Click on Options and select Mail.
- Under Mail, click Signatures.
- Click New to create a new signature.
- Enter a name for the signature.
- Type the text you would like to be included in the signature.
- When you’re finished, click Save.
What is an Outlook Signature?
An Outlook signature is an automated text, image, or logo that is added at the end of your emails. It usually contains your name, contact information, job title, or other information that you want to add to your emails. This allows you to quickly and easily personalize your emails without having to manually type out the same information over and over again.
Creating a signature in Outlook is quick and easy. By following the steps outlined below, you can have your signature set up in no time.
Steps to Setting Up Your Outlook Signature
Step 1: Open Outlook
The first step in setting up your Outlook signature is to open Outlook. Once you have the Outlook window open, click on the File tab located in the top left corner. This will show a drop down menu with a variety of options. Click on the Options tab to open the Outlook Options window.
Step 2: Open the Mail Settings
In the Outlook Options window, click on the Mail tab in the left sidebar. This will bring up a list of settings related to your Outlook mail account. Scroll down to the section labeled Signatures.
Step 3: Create Your Signature
Once you have found the Signatures section, click on the New button to create a new signature. You will be asked to enter a name for your signature, which you can choose whatever you’d like. Once you have entered the name, you can begin creating your signature.
Step 4: Enter Your Signature Information
In the signature editor, you can enter any text or images that you would like to appear in your signature. You can also choose to have your signature appear at the top or bottom of your emails, as well as apply formatting options such as font size and color.
Step 5: Set Your Signature as Default
Once you have finished creating your signature, you can set it as the default signature for your Outlook mail account. To do this, simply click on the drop down menu next to the Default Signature option and select the signature that you created.
Step 6: Save Your Changes
Once you have finished setting up your signature, click on the OK button to save your changes. Your signature will now automatically be added to the bottom of all your emails.
Additional Tips
Tip 1: Use HTML
Using HTML in your Outlook signature allows you to add more styling options than what is available in the signature editor. You can use HTML to add images, change font sizes and colors, and even add links.
Tip 2: Use a Logo
If you have a logo for your business or organization, you can easily add it to your Outlook signature. Simply upload your logo to a web hosting service, and then copy the URL of the image and paste it into your signature.
Tip 3: Keep It Professional
When creating an Outlook signature, it’s important to keep it professional. Avoid adding too much information, as this can be overwhelming for the reader. Stick to the basic information such as your name, contact information, and job title.
Few Frequently Asked Questions
Q1: What is an Email Signature?
An email signature is a personalized signature that includes your name, contact information, and possibly a logo or other details. It typically appears at the end of your emails, providing a way to easily communicate your contact information and other relevant information to the recipient. Email signatures can be used to help recipients quickly identify who you are and how they can contact you, making it an essential part of any email communication.
Q2: How Do I Setup an Email Signature in Outlook?
Setting up an email signature in Outlook is relatively straightforward. First, open the Outlook application and click on the File tab. In the left pane, click on Options and then go to the Mail tab. Next, scroll down to the Signature section and click the Signatures button. From there, click the “New” button to create a new signature, and then type in the text for your signature. You can also add images and other formatting as needed. Once you’re done, click OK and your email signature will be added to Outlook.
Q3: Is There a Limit to How Many Signatures I Can Have in Outlook?
No, there is no limit to the number of signatures you can have in Outlook. You can create as many signatures as you need and switch between them easily. When composing a new email, you can select which signature you want to use for the message. This allows you to use different signatures for different emails, depending on the recipient or the content of the message.
Q4: Are There Any Special Considerations When Setting Up an Email Signature?
Yes, there are a few important considerations to keep in mind when setting up an email signature. First, you should make sure to use a professional font and font size that is easy to read. You should also make sure that you include all of your relevant contact information, such as your phone number, email address, and website URL. Finally, you should make sure that your signature isn’t too long or too cluttered.
Q5: Can I Add HTML Code to My Signature?
Yes, you can add HTML code to your signature in Outlook. This allows you to add formatting and images to your signature, making it more visually appealing. To add HTML code to your signature, click the Insert tab and then click the HTML Code button. You can then paste in the HTML code for your signature and click OK.
Q6: Can I Use the Same Signature for All of My Email Accounts?
Yes, you can use the same signature for all of your email accounts in Outlook. To do this, click the File tab, then click Options and go to the Mail tab. Under the Signatures section, select the signature you want to use and then click the “Set As Default” button. This will make the signature the default signature for all of your email accounts.
How to Add Signature in Outlook
Setting up a signature in Outlook is a great way to make sure your emails look professional, organized, and consistent. It’s easy to set up, and can save you a lot of time when sending emails. Whether you’re an individual user, or a business owner, a signature will make sure your emails look professional and uniform. With a few simple steps, you can easily set up your own email signature in Outlook, and make sure your emails are on point.