


How to Sort in Excel by Column?

Excel is an incredibly powerful tool for organizing data. With its sorting capabilities, you can quickly and easily sort through large amounts of data to find the information you need. In this article, we’ll cover how to sort in Excel by column so you can quickly find the data you need. We’ll walk you through the steps to sort your data, as well as provide tips and tricks to help you get the most out of your Excel sorting. Read on to learn how to sort in Excel by column and make the most out of your data.
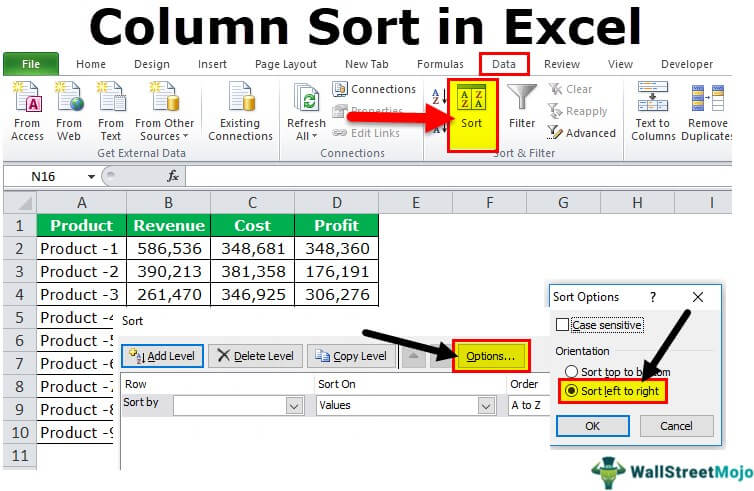
If you need to sort data in an Excel column, select the column you want to sort. Then, click the Data tab in the ribbon and select Sort. You can choose to sort by A to Z or Z to A. You can also sort by color and other criteria.
If you need to sort multiple columns, select all the columns you want to sort. Click the Data tab in the ribbon and select Sort. You can choose to sort by multiple columns, row labels, and other criteria.
Sorting Excel Data by Column
Sorting data in Excel is a great way to quickly and easily organize your spreadsheet data. Excel allows you to sort by one or more columns, so that you can quickly find the information you need. This tutorial will show you how to sort in Excel by column.
When sorting in Excel, you can sort by one column or multiple columns. To sort by a single column, select the column you want to sort and click the “Sort” button at the top of the spreadsheet. You will then be presented with the Sort dialog box. Select the column you want to sort, the sort order (ascending or descending), and any additional options you want to apply. When you’ve made your selection, click “OK” to apply the sort.
If you want to sort by multiple columns, select the columns you want to sort and click the “Sort” button. You will then be presented with the Sort dialog box. Select the columns you want to sort and the sort order, and any additional options you want to apply. When you’ve made your selection, click “OK” to apply the sort.
Sorting Data with Multiple Levels
If your spreadsheet contains data with multiple levels, you can use the “Sort by Level” option to sort your data. To do this, select the columns you want to sort and click the “Sort” button. Select the columns you want to sort and click the “Sort by Level” button. You will then be presented with the Sort by Level dialog box. Select the level you want to sort and the sort order, and any additional options you want to apply. When you’ve made your selection, click “OK” to apply the sort.
When sorting by multiple levels, you can also use the “Add Level” button to add additional levels to your sort. Select the columns you want to sort and click the “Sort” button. Select the columns you want to sort and click the “Add Level” button. You will then be presented with the Add Level dialog box. Select the level you want to add and the sort order, and any additional options you want to apply. When you’ve made your selection, click “OK” to add the level to your sort.
Sorting Data with Multiple Criteria
If your spreadsheet contains data with multiple criteria, you can use the “Sort by Criteria” option to sort your data. To do this, select the columns you want to sort and click the “Sort” button. Select the columns you want to sort and click the “Sort by Criteria” button. You will then be presented with the Sort by Criteria dialog box. Select the criteria you want to sort and the sort order, and any additional options you want to apply. When you’ve made your selection, click “OK” to apply the sort.
When sorting by multiple criteria, you can also use the “Add Criteria” button to add additional criteria to your sort. Select the columns you want to sort and click the “Sort” button. Select the columns you want to sort and click the “Add Criteria” button. You will then be presented with the Add Criteria dialog box. Select the criteria you want to add and the sort order, and any additional options you want to apply. When you’ve made your selection, click “OK” to add the criteria to your sort.
Keeping Headers Visible When Sorting
When sorting a large spreadsheet, it can be difficult to keep track of the column headers. To keep the headers visible when sorting, select the columns you want to sort and click the “Sort” button. Select the columns you want to sort and click the “Options” button. You will then be presented with the Options dialog box. Select the “Keep Headers Visible When Sorting” checkbox and click “OK” to apply the option.
When you’ve made your selection, click “OK” to apply the sort. Your column headers will now remain visible when sorting your data.
Using the Custom Sort Option
If you need to sort your data in a specific order, you can use the “Custom Sort” option. To use the Custom Sort option, select the columns you want to sort and click the “Sort” button. Select the columns you want to sort and click the “Custom Sort” button. You will then be presented with the Custom Sort dialog box.
Select the column you want to sort and the sort order, and any additional options you want to apply. When you’ve made your selection, click “OK” to apply the sort. You will then be presented with the Custom Sort dialog box. Here you can select the items you want to sort and the order in which they should be sorted. When you’ve made your selection, click “OK” to apply the sort.
Related FAQ
Question 1: What is sorting in Excel?
Answer: Sorting in Excel is a way of organizing a spreadsheet’s data into a specific order based on the values of one or more columns. When sorting by a single column, the data is ordered from smallest to largest (or in A-Z order). When sorting by multiple columns, the data is ordered based on the sorting criteria of each column. Sorting is a helpful way to quickly analyze and organize data.
Question 2: How do I sort in Excel by column?
Answer: To sort in Excel by column, first select the entire data set that you would like to sort. Then, click the “Data” tab in the ribbon. In the “Sort & Filter” group, click “Sort”. A dialog box will appear, allowing you to choose which columns you would like to sort by, as well as the order (ascending or descending) for each column. Click “OK” when you are finished.
Question 3: What if I have a large data set to sort?
Answer: If you have a large data set to sort, it may be helpful to use the “Filter” tool. To do this, click the “Data” tab in the ribbon. In the “Sort & Filter” group, click “Filter”. This will add drop-down boxes to each column, allowing you to quickly and easily filter the data set to show only the data you need. Then, you can use the “Sort” tool to sort the data by any column.
Question 4: Can I sort by multiple columns?
Answer: Yes, it is possible to sort by multiple columns in Excel. To do this, select the entire data set you would like to sort. Then, click the “Data” tab in the ribbon. In the “Sort & Filter” group, click “Sort”. A dialog box will appear, allowing you to choose which columns you would like to sort by, as well as the order (ascending or descending) for each column. Click “Add Level” if you need to add an additional sorting criteria. When you are finished, click “OK”.
Question 5: Can I sort in Excel by color?
Answer: Yes, it is possible to sort in Excel by color. To do this, select the entire data set you would like to sort. Then, click the “Data” tab in the ribbon. In the “Sort & Filter” group, click “Sort”. A dialog box will appear. At the bottom of the dialog box, click “Options”. In the “Sort by Color” section, choose the cell color that you would like to sort by. Then, click “OK”.
Question 6: Can I save a customized sort?
Answer: Yes, it is possible to save a customized sort in Excel. To do this, select the entire data set you would like to sort. Then, click the “Data” tab in the ribbon. In the “Sort & Filter” group, click “Sort”. A dialog box will appear. At the bottom of the dialog box, click “Options”. In the “Sort Options” section, click “Save As” and enter a name for your customized sort. Then, click “OK”.
Sorting in Excel by column is a simple and efficient way to quickly sort through and organize data. It is an incredibly useful tool for organizing large datasets and simplifying complex calculations. With a few clicks of the mouse, you can quickly organize and adjust your data in Excel to make it easier to work with. So go ahead and give it a try – you’ll be glad you did!