


How to Take Ownership of a Folder in Windows 10

Are you a Windows 10 user who is looking for ways to take ownership of a folder? If so, you’ve come to the right place! In this guide, we will explain the steps you need to take to take ownership of a folder in Windows 10. We’ll cover how to do this using the File Explorer and Command Prompt, so no matter your level of technical experience, you’ll be able to get the job done quickly and easily. Let’s get started!
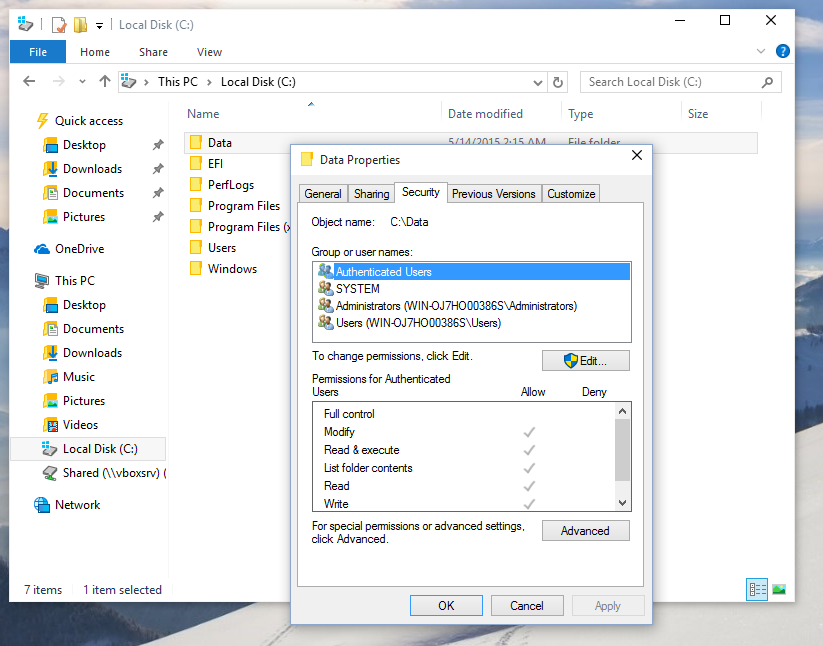
- Open File Explorer and navigate to the folder that you want to take ownership.
- Right-click on the folder and select Properties.
- Select the Security tab and click Advanced.
- Click Change next to Owner and type in your username.
- Select Check Names and click OK.
- Click OK again and check the Allow box for the Full Control permission.
- Click OK and you should now have ownership of the folder.
Taking Ownership of a Folder in Windows 10
Taking ownership of a folder in Windows 10 is a straightforward process. In Windows 10, users can assign ownership of a folder to themselves or someone else. This is useful when a folder has been shared with users and they need to change the permissions for that folder, or if users need to recover files from an old account. In this article, we will discuss how to take ownership of a folder in Windows 10.
Understanding What Taking Ownership of a Folder Means
Taking ownership of a folder in Windows 10 means that the user has the permission to modify and delete the contents of the folder. This permission is usually assigned to the folder’s original owner. However, if the folder is shared with other users, they may not have the permission to modify or delete the contents of the folder. In such cases, the user can take ownership of the folder and gain full access to the folder’s contents.
How to Take Ownership of a Folder in Windows 10
Taking ownership of a folder in Windows 10 is a simple process. To take ownership of a folder, the user must open the folder and then right-click on it. Next, the user should select the ‘Properties’ option from the menu that appears. On the ‘Properties’ window, the user should click on the ‘Security’ tab. On the ‘Security’ tab, the user should click on the ‘Advanced’ button. On the ‘Advanced Security Settings’ window, the user should click on the ‘Change’ link next to the ‘Owner’ section. On the ‘Select User or Group’ window, the user should type in their username and then click ‘Check Names’ to verify that the username is correct. Finally, the user should click ‘OK’ to take ownership of the folder.
Changing the Permissions of a Folder
Once the user has taken ownership of a folder, they can change the permissions of the folder. To do this, the user should open the folder and right-click on it. Next, the user should select the ‘Properties’ option from the menu that appears. On the ‘Properties’ window, the user should click on the ‘Security’ tab. On the ‘Security’ tab, the user should click on the ‘Advanced’ button. On the ‘Advanced Security Settings’ window, the user should click on the ‘Edit’ button. On the ‘Permissions’ window, the user should select the user or group that they want to give permissions to, and then select the permissions that they want to assign to the user or group. Finally, the user should click ‘OK’ to save the changes.
Restoring Files From Old Accounts
If users need to recover files from an old account, they can take ownership of the folder containing the files. To do this, the user should open the folder and right-click on it. Next, the user should select the ‘Properties’ option from the menu that appears. On the ‘Properties’ window, the user should click on the ‘Security’ tab. On the ‘Security’ tab, the user should click on the ‘Advanced’ button. On the ‘Advanced Security Settings’ window, the user should click on the ‘Change’ link next to the ‘Owner’ section. On the ‘Select User or Group’ window, the user should type in the username of the old account and then click ‘Check Names’ to verify that the username is correct. Finally, the user should click ‘OK’ to take ownership of the folder.
Conclusion
Taking ownership of a folder in Windows 10 is a simple process. Users can assign ownership of a folder to themselves or someone else. This is useful when a folder has been shared with users and they need to change the permissions for that folder, or if users need to recover files from an old account. In this article, we have discussed how to take ownership of a folder in Windows 10, how to change the permissions of a folder, and how to restore files from old accounts.
Few Frequently Asked Questions
What is Taking Ownership of a Folder?
Taking ownership of a folder in Windows 10 is a way for users to gain access to a folder that is locked or restricted. By taking ownership of a folder, users can add, edit, or delete the contents of the folder, or even change the security settings on the folder. This can be particularly useful if a user has accidentally locked themselves out of a folder, or if they need to access a folder that is restricted by an administrator.
How do I Take Ownership of a Folder in Windows 10?
Taking ownership of a folder in Windows 10 is a relatively simple process. First, right-click on the folder you want to take ownership of and select “Properties” from the menu. Next, select the “Security” tab, then click on the “Advanced” button. On the next window, select the “Owner” tab, and select the user or group you want to give ownership rights to. Finally, click “OK” to save the changes.
What are the Benefits of Taking Ownership of a Folder?
The primary benefit of taking ownership of a folder is that it allows users to access and manage the contents of the folder. This can be useful if a user is locked out of a folder, or if an administrator has restricted access to the folder. In addition, taking ownership of a folder allows users to change the security settings on the folder, giving them greater control over who can access the contents of the folder.
Are There Any Risks to Taking Ownership of a Folder?
As with any action, there are some potential risks to taking ownership of a folder. For example, if the user who takes ownership of the folder is not careful, they may accidentally delete or modify important files within the folder. Additionally, if the user gives ownership rights to another user or group, they may be giving away control of the folder and its contents.
Can I Take Ownership of a Folder on a Network?
Yes, it is possible to take ownership of a folder on a network. However, it is important to note that the process for taking ownership of a folder on a network may be different than the process for taking ownership of a folder on a local computer. Additionally, it is important to remember that any changes made to a folder on a network may affect other users who are connected to the network.
Can I Take Ownership of a System Folder?
Taking ownership of a system folder can be a risky process, and it should only be done with extreme caution. System folders are typically protected by the operating system, and making changes to them may cause system instability or other unwanted side effects. Therefore, it is generally not recommended to take ownership of a system folder unless it is absolutely necessary.
How To Take Ownership Of Administrative Files and Folders On Windows 10/8/7
In conclusion, taking ownership of a folder in Windows 10 is a relatively easy process. It involves the use of the File Explorer, Security tab, and Advanced settings. With these simple steps, you can easily take ownership of a folder in Windows 10 and have full control of your files. Taking ownership of a folder can help you protect important files and keep your computer secure.