


How to setup Networking In Windows 10 Windows 11?

How to setup Networking In Windows 10 Windows 11?
Modern computing is defined by our ability to communicate and share with one another by using devices of all shapes and sizes. These days, most of that activity happens over the world’s largest global network, the internet, using a variety of widely accepted hardware and software standards. The internet is also the driving force behind cloud-based services, which are transforming the way we work and play.
The same network standards that allow connections to the internet can also be used to create a local area network (LAN), which makes it possible to share files, printers, and other resources in a home or an office.
In the not-so-distant past, setting up a network connection was a painful process, one that often required professional help. Today, network hardware is ubiquitous, and setting up a network connection in Microsoft Windows 10 requires little or no technical knowledge. That doesn’t mean the process is entirely pain-free; troubleshooting network problems can be maddeningly frustrating, and understanding the basics of networking is tremendously helpful in isolating and fixing problems.
In this chapter, we cover the essentials of connecting a Windows 10 device to wired and wireless networks in a home or small office. We also explain how to share resources securely and how to check the status of your network connection to confirm that it’s working properly. And when you want access to an entire computer rather than just its resources, a feature called Remote Desktop allows you to do exactly that, and a section of this chapter is devoted to showing you how.
As of Windows 10 version 1803, a feature that facilitated easy resource sharing over a home network has been removed. HomeGroup first appeared in Windows 7, but it’s now gone. That doesn’t mean the end of easy sharing, of course. Later in this chapter, we discuss alternatives to HomeGroup, including Nearby Sharing, a brand-new feature in version 1803.
WINDOWS 10 NETWORKING ESSENTIALS
Before you can connect to the internet or a local area network, your Windows 10 device needs a network adapter, properly installed with working drivers.
Since the release of Windows 7, Microsoft’s hardware certification requirements have mandated that every desktop PC, laptop, all-in-one, and portable device include a certified Ethernet or Wi-Fi adapter. Some portable devices also include modems that connect to mobile broadband networks, and Bluetooth adapters support limited types of direct connections between PCs.
You’ll typically find wired Ethernet adapters in desktop PCs and all-in-ones, where a permanent wired network connection is appropriate. These adapters can be integrated into the motherboard or installed in an expansion slot and accept RJ45 plugs at either end of shielded network cables. (Most such devices also include a wireless network adapter.)
Most modern wired adapters support the Gigabit Ethernet standard, which allows data transfers at up to 1 gigabit (1,000 megabits) per second. (Some older devices might be limited to the Fast Ethernet standard, which transfers data at 100 megabits per second.) In an office or a home that is wired for Ethernet, you can plug your network adapter into a wall jack that connects to a router, hub, or switch at a central location called a patch panel. In a home or an office without structured wiring, you need to plug directly into a network device.
In recent years, wireless networking technology has enjoyed an explosion in popularity. Wireless access points are a standard feature in most home routers and cable modems, and Wi-Fi connections are practically ubiquitous. You can connect to Wi-Fi, often for free, in hotels, trains, buses, ferries, airplanes, and even public parks in addition to the more traditional hotspot locations such as cafés and libraries.
All laptops and mobile devices designed for Windows 10 include a Wi-Fi adapter, which consists of a transceiver and an antenna capable of communicating with a wireless access point. Wireless adapters are also increasingly common in desktop and all-in-one computer designs, allowing them to be used in homes and offices where it is impractical or physically impossible to run network cables.
Ethernet and Wi-Fi are the dominant networking technologies in homes and offices. Alternatives include phone-line networks, which plug into telephone jacks in older homes, and powerline technology, which communicates using adapters that plug into the same AC receptacles you use for power. The availability of inexpensive wireless network gear has relegated phoneline and power-line technologies to niche status; they’re most attractive in older homes and offices, where adding network cable is impractical and where wireless networks are unreliable because of distance, building materials, or interference. (A hybrid approach, useful in some environments, allows you to plug a Wi-Fi extender into an existing power line to increase signal strength in a remote location or to create a so-called mesh network.)
You don’t need to rely exclusively on one type of network. If your cable modem includes a router and a wireless access point, you can plug network cables into it and use its wireless signal for mobile devices or for computers located in areas where a network jack isn’t available.
Windows 10 detects and configures network hardware automatically, installing drivers from its built-in collection. A wired internet connection should be detected automatically; you’re prompted to enter the access key for a wireless connection during the setup process.
Checking the status of your network
As we noted earlier, most network connections in Windows 10 should configure themselves automatically during setup. Tools included with Windows 10 allow you to inspect the status of the current connection and either make changes or troubleshoot problems.
The most easily accessible network tool is the status icon that appears by default in the notification area at the right side of the taskbar. Its icon indicates the current network type (wired or wireless) and the status of the network. Click that icon to display the network flyout, which presents options relevant to your type of network connection.
Figure 13-1 shows the network flyout for a laptop with a wired Ethernet adapter, connected through a docking station, and a connected Wi-Fi adapter. Both networks appear to be operating properly. (A status of Limited, rather than Connected, would indicate problems with the network’s ability to connect to the internet.)
Figure 13-1 The network icon in the notification area shown here indicates that the wired connection is the primary connection. The flyout above shows that the system also has a secured Wi-Fi connection.
Every available network is shown on this list, including wired connections and wireless access points that are broadcasting their names. The icon for each available wireless connection indicates its signal strength, with the list ranked in descending order by signal strength.
The three buttons visible at the bottom of the network flyout shown previously in Figure 13-1 are available on any device that has a Wi-Fi adapter. Click or tap Wi-Fi to temporarily disable wireless connections. Doing so changes the network flyout as shown in Figure 13-2. By default, Wi-Fi remains disabled until you manually tap the Wi-Fi button again. If you want your Wi-Fi holiday to be temporary, select an alternative option from the Turn Wi-Fi Back On list; you can choose 1 Hour, 4 Hours, or 1 Day.
Figure 13-2 Click the Wi-Fi button to turn the wireless adapter off or back on. The default setting requires you to turn Wi-Fi back on manually, or you can set a timer under the Turn Wi-Fi Back On menu.
The option to disable Wi-Fi temporarily comes in handy when you’re traveling and have access only to a weak wireless signal (which might drain your PC’s battery as it repeatedly tries to make a connection), or a paid Wi-Fi option that you’ve decided is too expensive. Setting a timer allows you to reconnect without having to remember to turn Wi-Fi back on manually.
Clicking or tapping Airplane Mode shuts down all wireless communications, including Wi-Fi, Bluetooth, cellular, GPS, and near field communication (NFC). (You can selectively enable wireless devices by opening Settings > Network & Internet > Airplane Mode.) The third button, available on any device with a Wi-Fi adapter, activates the system as a mobile hotspot.
A red X or yellow triangle over the network icon means your connection is not working properly. The yellow triangle is Windows 10’s way of warning that something’s wrong with the connection; a red X usually indicates a more serious problem with the adapter.
Network management tools
As with so many other parts of Windows 10, the knobs and dials and switches that control networking have steadily migrated from the old Control Panel to a home in the modern Settings app. You can find every network setting you need by going to Settings > Network & Internet, where you’ll see the clearly organized Status page shown in Figure 13-3. (If you prefer the old-style interface, click the Network And Sharing Center link near the bottom of that page.)
Figure 13-3 You can accomplish just about any network-related task from this starting point in Settings.
The move to the modern Settings app hasn’t removed every trace of the old-style Control Panel, however. Clicking Change Adapter Options, for example, leads to the not-so-modern dialog box shown in Figure 13-4. As we explain in the next section, you no longer need to visit this page to adjust TCP/IP configuration settings.
Figure 13-4 This group of settings has not yet shed its old Control Panel look and feel. At some point in the not-too-distant future, expect them to be replaced by equivalent options in the Settings app.
TCP/IP configuration
Transmission Control Protocol/Internet Protocol (TCP/IP) is the default communications protocol of the internet and for modern local area networks; in Windows 10, it’s installed and configured automatically and cannot be removed. Most of the time, your TCP/IP connection should just work, without requiring any manual configuration. (We cover some troubleshooting techniques at the end of this chapter.) Networks that use the TCP/IP protocol rely on IP addresses to route packets of data from point to point.
On a TCP/IP network, every computer has a unique IP address for each protocol (that is, TCP/IPv4 and TCP/IPv6) in use on each network adapter. An IPv4 address is a 32-bit number that is normally expressed as four 8-bit numbers (each one represented in decimal format by a number from 0 through 255) separated by periods. A 128-bit IPv6 address is usually shown as eight 16-bit numbers (each one represented in hexadecimal format) separated by colons. In addition to the IP address, each computer’s TCP/IP configuration has the following additional settings:
- A subnet mask, which tells the network how to distinguish between IP addresses that are part of the same network and those that belong to other networks
- A default gateway, which is a computer that routes packets intended for addresses outside the local network
- One or more Domain Name System (DNS) servers, which are computers that translate domain names (such as www.microsoft.com) into IP addresses
- Dynamic Host Configuration Protocol (DHCP) This is the default configuration for Windows 10. A DHCP server maintains a pool of IP addresses for use by network devices. When you connect to a network, the DHCP server assigns an IP address from this pool and sets subnet masks and other configuration details. Many corporate networks use DHCP to avoid the hassle of managing fixed addresses for constantly changing resources; all versions of Windows Server include this capability. Most routers and residential gateways also incorporate DHCP servers that automatically configure computers connected to those devices.
- Automatic Private IP Addressing (APIPA) When no DHCP server is available, Windows automatically assigns an IP address in a specific private IP range. (For an explanation of how private IP addresses work, see the sidebar “Public and private IP addresses” later in the chapter.) If all computers on a subnet are using APIPA addresses, they can communicate with one another without requiring additional configuration. APIPA was introduced with Windows 98 and works the same in all versions of Windows released since that time.
- Static IP Addressing By entering an IP address, subnet mask, and other TCP/IP details in a dialog box, you can manually configure a Windows workstation so that its address is always the same. This method takes more time and can cause some configuration headaches, but it allows a high degree of control over network addresses.
- Alternate IP Configuration Use this feature to specify multiple IPv4 addresses for a single network connection (although only one address can be used at a time). This feature is most useful with portable computers that regularly connect to different networks. You can configure the connection to automatically acquire an IP address from an available DHCP server, and you can then assign a static backup address for use if the first configuration isn’t successful.
To see details of your current IP configuration, open Settings > Network & Internet and click the Properties button under the active network connection (alternatively, you can click Wi-Fi or Ethernet and then click the name of the current network at the top of the page). Scroll down to see a compact but information-rich list of network details like those shown here:
For a more comprehensive view of your network, go to Settings > Network & Internet > Status and click View Hardware And Connection Properties. That option shows a far more detailed list of network properties, covering every installed network adapter. Figure 13-5 shows the top of one such list on a Windows 10 PC; you can tell from this display that the IP address was automatically assigned by the DHCP server in a router at IP address 172.24.0.1.
Figure 13-5 This more expansive view of network properties includes details about DHCP servers and link speeds not found in the Properties pages for an individual adapter.
On most home and business networks, IP addresses are assigned automatically by DHCP servers; in some cases, you might need (or prefer) to use static IP addresses, which are fixed numeric addresses.
Static IP addresses are useful if you plan to set up a web server, a mail server, a virtual private network (VPN) gateway, or any other computer that needs to be accessible from across the internet. Even inside a local network, behind a router or firewall, static IP addresses can be useful. For instance, you might want to configure the router so that packets entering your network on a specific port get forwarded to a specific computer. If you use DHCP to assign addresses within the local network, you can’t be certain that the address of that computer will remain the same over time. But by assigning that computer a static IP address that’s within the range of addresses assigned by the DHCP server, you can ensure the computer always has the same address and is thus always reachable.
This procedure works best if you first allow the DHCP server to assign addresses. Open the properties of the connection and make a note of the current settings. To set a static IP address, follow these steps:
1. Go to Settings > Network & Internet > Status and click the Properties button beneath the adapter you want to configure. (Alternatively, you can click Wi-Fi or Ethernet and then click the name of the current network at the top of that page.) Make a note of current DHCP-assigned addresses for the network adapter and DNS servers.
2. Under the IP Settings heading, click Edit.
3. In the Edit IP Settings dialog box, change the setting from Automatic (DHCP) to Manual. That exposes two switches, IPv4 and IPv6. Turn either or both connections to the On position.
4. Fill in the blanks for each protocol you selected in the previous step. You must supply an IP address, a subnet prefix length, a default gateway, and at least one DNS server address.
5. Click Save to apply the configuration changes. Figure 13-6 shows the dialog box with all fields filled in.
Figure 13-6 When assigning static IP addresses, you must fill in all fields correctly.
If you’re experienced with setting IP addresses manually using the old-style Control Panel interface, one detail in this dialog box might be confusing. The Subnet Prefix Length field corresponds to the Subnet Mask from the legacy network configuration dialog box. A subnet mask of 255.255.255.0, for example, is equal to a subnet prefix length of 24. If you’re confused about what value to enter, we recommend the online calculator at https://www.calculator.net/ip-subnet-calculator.html.
Mobile hotspots and other metered connections
Some devices with data connections on a cellular network allow you to turn the device into a mobile Wi-Fi hotspot—a feature sometimes referred to as tethering.
This capability is invaluable when you need to get some work done on a portable PC, and an affordable, reliable, and secure Wi-Fi connection isn’t available. Most modern smartphones, including iPhones and Android devices, can act as a hotspot, although the cellular data provider must allow this capability.
The downside of using a mobile hotspot where you pay by the megabyte or gigabyte is potentially higher costs (especially if you’re roaming outside your home network) or the risk that you’ll hit your data limit and have your connection throttled or stopped completely. To avoid that possibility, Windows 10 identifies mobile hotspots as metered connections and automatically limits certain types of background activity. By default, the list of restricted activities includes downloads from Windows Update, syncing with OneDrive, and always-on connections to an Exchange Server connection in Microsoft Outlook.
To ensure that Windows 10 treats a specific network as a metered connection, open Settings > Network & Internet. To check and, if necessary, adjust the current connection, click Status, and then click the Properties button beneath the connection. To adjust settings for a connection that is not currently active, click Wi-Fi, click or tap Manage Known Networks, select the network you want to mark as metered, and then tap Properties. Slide the Set As Metered Connection switch to the On position, as shown in Figure 13-7.
Figure 13-7 On pay-as-you-go networks, or on those with data caps, you can reduce the amount of data used by telling Windows 10 to treat the connection as metered.
To see how much data you’ve used on each connection over the past 30 days, open Settings > Network & Internet > Status and click the Data Usage button beneath the connection. The Status page shows total data usage over the past 30 days; the Data Usage page breaks down that total on a per-app basis.
For even more aggressive management of a potentially expensive wireless network, click Enter Limit. That opens a dialog box where you can set a data limit for that connection; the limit can apply monthly (with a reset date that you specify) or on a one-time basis, and you can set the limit to a specific value, expressed in MB or GB. Choose Unlimited if you have no data cap but simply want to monitor usage during your billing period.
Finally, we would be remiss not to note that recent versions of Windows 10 have expanded the Mobile Hotspot feature to support sharing of any network connection on a Windows 10 PC. If you’ve paid for Wi-Fi on an airplane, for example, you can share that connection securely with up to eight other devices.
You’ll find all the options you need by going to Settings > Network & Internet > Mobile Hotspot. There are four settings to pay attention to here.
1. To begin sharing your network connection, flip the Mobile Hotspot switch to the On position.
2. Choose which connection you want to share. In the screenshot shown here, Ethernet is the only option, but you might find yourself in a location where you have multiple connections: wired, Wi-Fi, or even mobile data.
3. Choose how to share your connection: over Wi-Fi or Bluetooth.
4. Click Edit to change the connection name, replace the default
random password with one of your own choosing, and customize the type of connection. With that setup complete, you can turn on your mobile hotspot from the network flyout or from Settings and connect any Wi-Fi- or Bluetooth-capable device (including a mobile phone) to your Windows 10 network connection.
SETTING THE NETWORK LOCATION
A desktop PC connected to a wired home or small office network typically remains in a single location. In contrast, mobile devices running Windows 10 can connect to different types of networks—a corporate domain, a wireless hotspot at a coffee shop, or a private home network. Each type of network has its own security requirements. Windows uses network locations to categorize each network and then applies appropriate security settings. When you connect to a new network, Windows applies one of three security settings:
- Public This is the default setting for any new, untrusted network connection. Network discovery is turned off for public networks, and unsolicited incoming connections are blocked, making it more difficult for other people on the same access point to try to connect to your computer. This option is appropriate for networks in public places, such as wireless hotspots in coffee shops, hotels, airports, and libraries. It’s also the correct choice if your desktop or laptop PC is directly connected to a cable modem or other broadband connection without the protection of a router and hardware firewall.
- Private This option is appropriate when you’re connecting to a trusted network, such as your own network at home—if and only if that network is protected by a router or residential gateway (a consumer device that combines a cable modem, router, and wireless access point in a single box) or comparable internet defense. When you make this choice, Windows enables network discovery for sharing with other users on the network.
- Domain This option is applied automatically when you sign in to Windows using a computer that’s joined to a Windows domain, such as your company network. In this scenario, network discovery is enabled, allowing you to see other computers and servers on the network by using accounts and permissions controlled by a network administrator.
The location of the current network is shown on the Network Status page, below the name of the network.
To change the profile of a wireless network from Public to Private, or vice versa, go to Settings > Network & Internet > Status and click the Properties button beneath that connection, as shown in Figure 13-8. Choose your preferred option from the Network Profile section.
Figure 13-8 A PC on a Private network is “discoverable,” and it’s safe for other PCs and network devices to connect to this computer. When you set the network location to Public, outside access is blocked.
The procedure on a wired network is the same. Note, however, that the option to change a wired network from Private to Public might not be available in some managed configurations. In those cases, you can use the PowerShell commands Get-NetConnectionProfile and Set-NetConnectionProfile, which are documented at https://docs.microsoft.com/powershell/module/netconnection.
CONNECTING TO A WIRELESS NETWORK
In this section, we assume you have already configured a wireless access point (often included as a feature in cable modems and DSL adapters supplied by your broadband provider) and confirmed that it is working correctly, or that you are in a location with a public or private wireless access point managed by someone else.
Whenever your computer’s wireless network adapter is installed and turned on, Windows scans for available wireless access points. If it finds at least one (and you’re not already connected to a wireless network), it alerts you via the wireless network icon, which looks a bit like an antenna. If you see a bright dot at the end of an otherwise gray antenna, connections are available.
Unless you’re out in the country, far from civilization, you’re likely to see lots of access points available for connection, most of them owned by your neighbors or nearby visitors. Assuming those networks are adequately secured with a network security key you don’t know and can’t guess, you’d have no luck connecting to them.
Clicking or tapping the entry for a secure wireless access point that doesn’t have a saved connection displays a check box asking whether you want to connect automatically to that network in the future. If this is a place you expect to visit again (or in the case of a coffee shop, again and again, and again…), select that box and click Connect to enter and save your credentials. Note that saved Wi-Fi network security keys are synced between devices when you sign in with a Microsoft account, so you might find that a brand-new device, one you’ve never used before, automatically connects to your home or office Wi-Fi without having to ask you.
Clicking the Connect button for a secure wireless access point reveals a box in which you’re expected to enter a passphrase, as in Figure 13-9. If what you enter matches what’s stored in the access point’s configuration, you’re in. Getting in is easy on a network you control, where you set the network security key. For a secured access point controlled by someone else—a doctor’s waiting room, a coffee shop, a friend’s office—you need to ask someone, typically the network owner, for the passphrase or key.
Figure 13-9 Connecting to a secure network for the first time requires that you correctly enter a passphrase or security key.
To disconnect from a Wi-Fi access point, click or tap its entry in the network flyout and then tap Disconnect. Doing so automatically turns off the option to connect automatically to that network in the future.
Windows 10 saves credentials for every Wi-Fi access point you connect to, giving you the option to connect with a tap when you revisit. If that thought makes you uncomfortable, you can see and manage the full list of networks by opening Settings > Network & Internet > Wi-Fi and clicking Manage Known Networks. That list can be startlingly long, especially if you’re a frequent traveler. Tap any name in the list (use the search box if the list is long and you want to find a specific saved network), and you’ll see two buttons, as in Figure 13-10.
Tap Properties to view information about the network and turn off the option to connect automatically, as shown earlier in Figure 13-7. Tap the Forget button to delete any saved security information and remove the network name from the list. (In Windows 10 version 1709 and later, the Properties and Forget buttons are also available for any nearby Wi-Fi networks to which you’ve previously connected: Open the network flyout and right-click any visible network to see those options.)
Figure 13-10 Wireless networks you connect to are saved in this list. Tap Forget to delete the saved security key and remove the network from the list.
Connecting to a hidden network
Every wireless network has a name, formally known as a service set identifier but typically referred to as an SSID. In an effort to enforce security through obscurity, some wireless networks are set up so that they don’t broadcast their SSID. Connecting to such a hidden network is a bit more challenging because its name doesn’t appear in the list of available networks on the network flyout or in Network & Internet Settings. Making such a connection is possible, however, as long as you know the network name and its security settings.
If one or more nearby networks aren’t broadcasting their SSID, scroll to the bottom of the network flyout and choose Hidden Network from the list of available networks. Click or tap that entry, enter the correct SSID, and click Connect. After passing that test, you can enter the passphrase or security key to complete the connection.
To configure settings for a network that isn’t in range so that you can connect to it automatically when you arrive at the location where it’s available, open the Manage Known Networks list, shown earlier in Figure 13-10, and click Add. That opens a dialog box like the one shown in Figure 13-11. This example illustrates how to connect to a corporate network using the 802.11x standard, which requires user-level authentication rather than shared keys or passphrases.
Figure 13-11 Click the Add button at the top of the list of known networks to manually add a wireless network, such as this secure corporate network, that is not in range.
Wireless security
On a conventional wired network, especially in a private home or office, physical security is reasonably easy to maintain: If someone plugs a computer into a network jack or a switch, you can trace the physical wire back to the intruder’s computer. On wireless networks, however, anyone who comes into range of your wireless access point can tap into your network and intercept signals from it.
If you run a small business, you might want to allow internet access to your customers by using an open internet connection. Some internet service providers create secure guest accounts on their customers’ cable modems that allow other customers of that service to connect using their network credentials.
Other than those scenarios, however, you probably want to secure your network so that the only people who can connect to it are those you specifically authorize. Doing that means configuring security settings on your wireless access point or router. When you connect to a network, known or unknown, the level of security is determined by the encryption standard chosen by the network owner and supported by network hardware on both sides of the connection.
Depending on the age of your hardware, you should have a choice of one or more of the following options, listed in order of preference:
- Wi-Fi Protected Access 2 (WPA2) Based on the 802.11i standard, WPA2 provides the strongest protection for consumergrade wireless networks. It uses 802.1x-based authentication and Advanced Encryption Standard (AES) encryption; combined, these technologies ensure that only authorized users can access the network and that any intercepted data cannot be deciphered. WPA2 comes in two flavors: WPA2-Personal and WPA2- Enterprise. WPA2-Personal uses a passphrase to create its encryption keys and is currently the best available security for wireless networks in homes and small offices. WPA2-Enterprise requires a server to verify network users. All wireless products sold since early 2006 must support WPA2 to bear the Wi-Fi CERTIFIED label.
- Wi-Fi Protected Access (WPA) WPA is an earlier version of the encryption scheme that has since been replaced by WPA2. It was specifically designed to overcome weaknesses of WEP. On a small network that uses WPA, clients and access points use a shared network password (called a preshared key, or PSK) that consists of a 256-bit number or a passphrase that is from 8 to 63 bytes long. (A longer passphrase produces a stronger key.) With a sufficiently strong key based on a truly random sequence, the likelihood of a successful outside attack is slim. Most modern network hardware supports WPA only for backward compatibility.
- Wired Equivalent Privacy (WEP) WEP is a first-generation scheme that dates back before the turn of the century. It suffers from serious security flaws that make it inappropriate for use on any network that contains sensitive data. Most modern Wi-Fi equipment supports WEP for backward compatibility with older hardware, but we strongly advise against using it unless no other options are available.
You might see other encryption options, including the 802.11x standard, which allows corporate networks to enforce access through user credentials such as Active Directory. Those configurations are typically designed for use on large enterprise networks and are beyond the scope of this book.
You must use the same encryption option on all wireless devices on your network—access points, routers, network adapters, print servers, cameras, and so on—so choose the best option that’s supported by all your devices. If you have an older device that supports only WEP (and it can’t be upgraded with a firmware update), consider retiring or replacing that device.
Using Hotspot 2.0
Today, wireless hotspots are nearly ubiquitous at airports, hotels, coffee shops, fast-food restaurants, and many other places. In most cases, you use the same procedure to connect to one of these networks as you do to connect to your own Wi-Fi network.
The original version of Windows 10 also included support for easier wireless connections. Using these tools promised internet access in additional locations, at greater convenience, and for lower costs than the public Wi-Fi hotspots you find at airports, hotels, and so on.
Two Windows 10–supported alternative wireless connections that we described in earlier editions of this book—Wi-Fi Sense and Paid Wi-Fi—have been discontinued. A third, Hotspot 2.0, continues to be supported as of late 2020.
Hotspot 2.0 (which also goes by the names HS2 and WiFi Certified Passport) is designed to make Wi-Fi connection effortless and secure. Based on the 802.11u Wi-Fi standard, all Hotspot 2.0 networks use WPA2- Enterprise security. Once you enroll in Hotspot 2.0 and download a profile, your computer automatically connects to a secure Wi-Fi hotspot when you’re in range.
To use Hotspot 2.0, your device must support it. To confirm that it does, open a command prompt window and type
netsh wlan show wirelesscapabilities
If ANQP Service Information Discovery is shown as Supported, you’re good to go.
Next, you need to set up an account with a Hotspot 2.0 provider and download the profile. Start by going to Settings > Network & Internet > Wi-Fi, and turn on Let Me Use Online Sign-Up To Get Connected (below the Hotspot 2.0 Networks heading). When you’re in range of a Hotspot 2.0 network, Windows displays a list of providers for online sign-up. Follow the provider’s instructions for creating an account and installing the profile.
Thereafter, whenever you’re near a Hotspot 2.0 access point, your device automatically and seamlessly connects to the network. Because Hotspot 2.0 uses a certificate installed as part of the profile as your login credential, you won’t need to enter a user name or password to get online securely.
TRANSFERRING PICTURES, LINKS, AND OTHER ITEMS BETWEEN NEARBY DEVICES
Not everything in Windows networking is a holdover from bygone days. An important new feature, Nearby Sharing, allows you to transfer files, pictures, and videos between two devices running Windows 10 version 1803 or later. In addition, you can share links to web pages, from Microsoft Edge or from non-Microsoft browsers that include an extension to add links to the Windows Timeline. Both devices can be yours, allowing you to quickly move files between a laptop and desktop PC, for example. Or, with your express permission, you can transfer files or share a web link with someone else. The recipient sees a prompt to accept the shared item and has to accept the transfer request. Both computers must have Bluetooth, and both must be running Windows 10 version 1803 or later. Additionally, they must be within Bluetooth range—typically about 30 feet—to allow easy discovery of other devices eligible for sharing. Nearby Sharing is disabled by default. To enable it, open Settings > System > Shared Experiences and turn on Nearby Sharing. See Figure 13-12.
Figure 13-12 Using Nearby Sharing, you can limit transfers to your own devices or enable sharing with everyone nearby—with your permission and theirs, of course.
Under the heading I Can Share Or Receive Content From, you have two choices: Everyone Nearby and My Devices Only. With the second option selected, you can share or receive files only between devices on which you’ve connected a matching Microsoft account. By default, files you receive are stored in your profile’s Downloads folder. To specify a different destination folder, click Change.
With Nearby Sharing turned on, you can send one or more files, photos, or videos, or a web page link, to another device from any app that supports the Share feature in Windows 10. In File Explorer, right-click a file and choose Share from the shortcut menu, or select multiple items and click Share, on the Share tab. In Microsoft Edge, click Share to send a link to the current page. In the Photos app, open a photo or video or select multiple items from your photo collection and click Share. Devices that are available to receive shared files appear in the center of the Share tab, below your contacts, as shown in Figure 13-13.
Figure 13-13 Nearby Windows 10 devices that are eligible to receive shared files appear in the center of this pane. Click the computer icon to send a transfer request to that PC.
On the device you’ve selected to share the items with, a sharing invitation appears above the notification area. (If it disappears too quickly for you to react, open Action Center to retrieve it.) Figure 13-14 shows a notification for a screenshot, shared from the Snip & Sketch tool. As the intended recipient, you can save the file and open it as soon as the download is complete, save the file in the default folder, or decline the request.
Figure 13-14 When you share files, photos or videos, you have the option to open them as soon as the transfer is complete. For links to web pages, the only options are Open and Decline.
The Nearby Sharing feature assumes that both the sender and the recipient of the shared item are in close physical proximity and ready to act promptly. The popout notification remains visible for about five seconds; if you don’t respond within 20 seconds or so, the action is canceled on the sharing device.
CONNECTING TO ANOTHER COMPUTER WITH REMOTE DESKTOP
Sharing computer resources over a properly configured network gives you access to all the files you might need, wherever they’re stored. But sometimes even that’s not enough. You might need to run a program that’s installed only on another computer, or you might need to configure and manage another computer’s files and settings in ways that can be done only by sitting down in front of that computer. For those occasions, a Remote Desktop session is the perfect solution.
With Remote Desktop, applications run on the remote computer; your computer is effectively used as a dumb terminal. You can use a low-powered computer or even a mobile device to connect to a remote computer directly. Remote Desktop connections are encrypted, so your information is secure.
In this section, we focus on the most common scenario: configuring a PC running Windows 10 Pro, Enterprise, or Education or any supported version of Windows Server to allow incoming Remote Desktop connections and using a second PC running any edition of Windows 10 as the remote client over a local network. (PCs running Windows Home edition can be used as a Remote Desktop client but do not allow hosting Remote Desktop sessions.)
Installing Remote Desktop client soware
Windows 10 includes a desktop program for remote access called Remote Desktop Connection. Although this program’s main feature set and its overall appearance have remained largely unchanged since its debut nearly 20 years ago, it’s still perfectly suitable for remote connections. If you’re sitting in front of a PC running Windows 7, you can use this app to connect to a Windows 10 PC configured as a Remote Desktop Server.
A newer alternative, called Microsoft Remote Desktop, is available in the Microsoft Store. (To see its listing, go to https://aka.ms/urdc.) This app works on a wide variety of Windows 10 device types, and it includes some capabilities not available in Remote Desktop Connection. In this section, we describe how to use both programs.
Even if you don’t have a PC available, you might still be able to connect to a Remote Desktop server using a nonWindows device. Microsoft has Remote Desktop clients for mobile devices running iOS and Android as well as Apple-branded PCs running MacOS. For download links and installation instructions, see http://bit.ly/remotedesktop-clients.
Enabling inbound remote desktop connections
For security reasons, incoming Remote Desktop sessions are not allowed without your explicit permission. To grant access on a computer running Windows 10 Pro, Enterprise, or Education, go to Settings > System > Remote Desktop and slide the Enable Remote Desktop switch to the On position. (You must be signed in using an administrator account to make this change, and you must confirm the configuration change in a separate step.)
Enabling Remote Desktop starts a service that listens for incoming connections on port 3389. It also creates an exception in Windows Firewall that allows authenticated traffic on this port. (If you’re using third-party security software that includes a firewall, it should make this configuration change for you; if it doesn’t, you’ll need to adjust that software’s settings so it allows incoming access to TCP port 3389.)
With that step out of the way, the current user account and any user account that’s a member of the local Administrators group can connect remotely to the computer. To allow access for other user accounts that are not members of the local Administrators group, click Select Users That Can Remotely Access This PC and add the accounts.
Using the Remote Desktop app
As we noted earlier, Remote Desktop is a modern app that’s not included with Windows; it is, however, available as a free download from the Microsoft Store.
Remote Desktop offers several features not found in Remote Desktop Connection. Its visual approach shows all your remote connections on the home screen, allowing you to open one with a single click or tap. In addition, Remote Desktop includes several performance enhancements that optimize your connection quality. It supports multiple instances, so you can operate two or more Remote Desktop sessions simultaneously, each in its own window. And, of course, as a modern app, it’s touch friendly.
The Remote Desktop app window is downright Spartan until you’ve saved a desktop or two. Adding a desktop takes minimal effort: Click the Add (+) button and then click Desktop. Add A Desktop appears in the right pane, as shown in Figure 13-15. Enter the name or IP address of the PC to which you want to connect, and then click Save to add its tile on the left side of the app window.
Figure 13-15 In the PC Name box, you can specify the remote computer by name or IP address.
All the other fields in the Add A Desktop pane are optional. By default, the User Account field is set to Ask Me Every Time. In this configuration, you’re prompted for your user name and password each time you connect to the desktop. If you know you’ll always want to use the same account, you can add its credentials here, and Remote Desktop will sign you in every time without prompting. Click the arrow at the right side to select a previously configured user account. If the account you want to use doesn’t appear in the list, click the plus sign above the User Account box and add the necessary details.
In addition to those two settings, you can save a handful of other parameters, including some that come into view when you click Show More:
Display Name Provide a friendly descriptive name that appears under the icon for a remote computer in the main Remote Desktop window instead of the PC name or IP address.
Group If you have multiple saved connections, you can group them by adding a group name and then selecting a group for each connection.
Gateway To reach a remote desktop through a gateway server on a corporate network, specify its name or IP address, along with the name of a user account with access permission.
Connect To Admin Session For connecting to a computer running Windows 10, this option has no effect, and you can safely ignore it. It enables administrative access on some older Windows Server configurations.
Swap Mouse Buttons This option is appropriate for left-handed individuals who have used Settings > Devices > Mouse to set the primary mouse button as Right instead of Left. Enabling this setting swaps the functionality of the left and right mouse buttons while you work in the remote desktop session to match the local settings.
Display Settings These settings let you specify a screen resolution and display size for the remote desktop. If you don’t specify a resolution here, Remote Desktop uses the resolution of the client computer, displayed full screen, by default. After selecting a custom resolution, you can also choose a custom scaling factor.
Update The Remote Session Resolution On Resize With this setting on, you can resize a Remote Desktop session in a window and have the display resolution adjust to your changes.
Local Resources The three settings under this heading allow you to share the client computer’s Clipboard contents and microphone with the remote computer and choose whether audio plays on the remote computer, on the client computer, or on neither.
Working in a Remote Desktop session
After you save a connection in the Add A Desktop pane, an icon for that connection appears in Remote Desktop. Click the icon to open a connection to the remote computer. Along the way, you might encounter a couple of obstacles:
If you specified Ask Me Every Time in the User Account box, Remote Desktop asks for the user name and password of an account authorized on the remote computer to make a connection. Select Remember Me, and you won’t need to enter this information in future sessions.
By default, Remote Desktop sessions you create on your local network use self-hosted digital certificates that aren’t recognized as trusted by the client computer. If you’re certain that you’re connecting to the right computer, select the Don’t Ask About This Certificate Again check box (so you won’t be bothered in future sessions) and click Connect.
After bounding past those hurdles, Remote Desktop attempts to open a connection. If the account you use for the remote connection is already signed in to the remote computer—or if no one is signed in to the remote computer—the remote computer’s desktop then appears on your computer.
If a different user account is signed in to the remote computer, Windows lets you know that you’ll be forcing that person to sign out and gives you a chance to cancel the connection. On the other end, the signed-in user sees a similar notification that offers a short time to reject the remote connection before it takes over. Note that only one user at a time can control the desktop of a computer running Windows. Whoever is currently signed in has the final say on whether someone else can sign in.
While you’re connected to the remote computer, the local display on that computer (if it’s turned on) does not show what you see on the client computer but instead shows the lock screen. A person who has physical access to the remote computer can’t see what you’re doing (other than the fact that you’re signed in remotely).
When you connect to a remote computer using the modern Remote Desktop app without specifying a custom resolution, the remote computer takes over your entire screen using the resolution of the client computer. At the top of the screen, in the center, a tiny toolbar with two controls appears. Click the magnifying glass icon to zoom the remote display; click the ellipsis (three dots) icon to reveal two buttons in the upper-right corner, as shown here.
Click Disconnect to end your remote session. The remote computer remains locked, ready for someone to sign in locally. Click Full Screen to toggle between full-screenand windowed views of the remote desktop.
While the display is in full-screen mode, you can move the mouse pointer to the top edge of the screen to display the Remote Desktop title bar. It includes the usual window controls (minimize, resize, and close). Move the mouse pointer to the bottom edge of the screen to display the taskbar for your local computer. Clicking any icon on the local taskbar shifts the focus away from the remote session and back to your local computer. If you’re running the Remote Desktop app on a touchscreenequipped PC, you can reveal either of these controls by swiping in from the top or bottom edge of the screen.
Ending a remote session
When you’re through with a Remote Desktop session, you can lock, sign out, or disconnect. If the remote computer is running Windows 10, you’ll find these options in the usual places where comparable options appear on your local computer, Lock and Sign Out appear when you click the user avatar on Start on the remote computer, and Disconnect appears when you click Power on Start. For remote machines running earlier Windows versions, these options appear in the lower-right corner of the remote session’s Start menu. (You must click the arrow to see all the options.)
Locking the computer keeps the remote session connected and all programs running, but it hides everything behind a sign-in screen that requests a password; this is comparable to pressing Windows key+L to lock your computer.
Signing out closes all your programs, exits your user session, and disconnects.
If you disconnect without signing out, your programs continue to run on the remote computer, but the connection is ended. The sign-in screen is visible on the remote computer, and it’s available for another user. If you sign in later—either locally or through a remote connection—you can pick up right where you left off. As an alternative to the Start commands, you can disconnect by clicking the Disconnect button, displaying the Remote Desktop title bar and clicking the Back button, or simply closing the Remote Desktop window.
Adjusting Remote Desktop app settings
At the top of the Remote Desktop app window, to the right of the Add button, is a Settings button that exposes a pane filled with options to customize the app experience. Here, you can edit credentials for saved user accounts, for example; to remove a user account, choose a user name from the list, click the pen icon above the name, and then click the faint Remove This Account link at the bottom of the Edit An Account pane.
Other settings on this list that are potentially useful include a Start Connections In Full Screen switch, which you should turn off if you prefer to run remote sessions in a window, as well as a Prevent The Screen From Timing Out switch that can reduce the annoyance of having to sign back in if you leave an open session to work on other tasks.
Using Remote Desktop Connection
Remote Desktop Connection is a desktop app that should be familiar to longtime Windows users accustomed to remote administration tasks. To start it, in the search box, type remote and then click Remote Desktop Connection, or enter its command directly: Mstsc.exe (that name is a holdover from the olden days and is short for Microsoft Terminal Services Connection). A dialog box like the one shown in Figure 13-16 appears. In the Computer box, type the name of the remote computer or its IP address. If you’ve previously used the app, the last connection will be visible, and a drop-down list will show PCs you previously connected to.
Figure 13-16 You can specify the remote computer by name or IP address.
After entering the PC name, you can click Connect and begin the process of connecting to the remote PC immediately. As with the modern Remote Desktop app (described in the preceding section), Windows warns if your connection will knock off another user who’s signed in to the remote computer and gives that user veto power over your connection request.
Changing screen resolutions and display settings
When you make a default connection, the display from the remote computer fills your entire screen, using the resolution of the client computer. Along the top of the screen, in the center, a small title bar appears. This title bar, dubbed the connection bar in Remote Desktop Connection, lets you switch between your own desktop and the remote desktop. The Minimize, Maximize, and Restore buttons work as they do in other programs:
The pushpin button locks the connection bar in place. If you click the pushpin to unlock the connection bar, it disappears completely, retracting into the top of the screen. To make the connection bar reappear, “bump” the mouse pointer to the top edge of the screen. To keep the connection bar visible at all times, click the pushpin again. The Close button disconnects the remote computer (but does not sign you out of the remote computer) and closes Remote Desktop Connection. You can pick up where you left off by reopening Remote Desktop Connection and reconnecting or by signing in locally at the remote computer.
You might prefer to use less than your full screen resolution for the remote desktop. (This option is especially useful if you have a large monitor and the work you want to do with Remote Desktop is just another task among several.) You must set the resolution—along with a number of other options—before you connect to the remote computer. After you start Remote Desktop Connection, click the Show Options button (shown previously in Figure 13-16) to expand the dialog box. Then click the Display tab, which is shown in Figure 13- 17. You can set the screen resolution to any size that’s supported on the client hardware. Set it to full screen by moving the slider all the way to the right.
Figure 13-17 Use this slider to adjust the screen resolution when running a Remote Desktop session in a window instead of a full screen.
Remote Desktop Connection allows the use of multiple monitors, as long as the remote computer is running Windows 7 or later. To configure the connection for use with more than one monitor on the client software, select Use All My Monitors For The Remote Session.
Configuring other remote options
The Remote Desktop Connection client software offers a wide range of additional configuration options. We won’t go through every tab, but here are a few options that you might find useful:
Saved credentials On the General tab, you can enter a user name and then select the Allow Me To Save Credentials check box. After you save credentials (in encrypted form, of course), they’re entered automatically, allowing you to connect without extra steps. You’ll find Edit and Delete buttons to manage saved credentials on the main Remote Desktop dialog box, as shown earlier in Figure 13-16.
Local Resources On the expanded connection dialog box, click the Local Resources tab to select whether you want to access printers connected to the local computer, whether you want the Clipboard contents to be shared between the local and remote session, and how you want remote audio handled.
Performance You’ll find performance-related options on the Experience tab of the Remote Desktop Connection dialog box. If you’re using a slow, bandwidth-challenged, or metered connection, you should disable as many features as possible to reduce the amount of information that must be transmitted across the wire and keep the mouse and windows movements responsive. On the other hand, if you’re connecting to another desktop over a fast local area network, you might as well enable all features to enjoy the full experience of working at the remote computer.
Saving a Remote Desktop configuration
Changes you make in the expanded Remote Desktop Connection dialog box are automatically saved in a hidden file named Default.rdp (stored in your default save location for documents), and they’re used the next time you open Remote Desktop Connection. But you might want to have several different Remote Desktop Connection configurations for connections to different computers. If you have a portable computer, you might want different settings for use with different connections to the same computer (for example, a slow Wi-Fi connection from a hotel versus a fast LAN at your branch office).
To save a configuration, after you make all your settings, click the General tab, and click Save As. To reuse a stored configuration at a later time, start Remote Desktop Connection, click Show Options, click Open, and then double-click the stored file. More simply, select it from the Jump List for Remote Desktop Connection (on the taskbar or Start menu), or doubleclick the stored file in File Explorer.
SHARING FILES, PRINTERS, AND OTHER RESOURCES OVER A LOCAL NETWORK
Much of the networking infrastructure of Windows 10 is a refinement of features that were developed decades ago, when the Internet was still an interesting experiment. Today, the simplest way to share files, digital media, and other resources, even between computers in the same home or office, is through a cloud-based service like OneDrive. There are, however, still valid reasons for Windows PCs to connect and share resources across a local area network.
These traditional networking tools and techniques are fully supported in Windows 10, and you can use them alongside OneDrive sharing if you want to. The underlying system of share permissions and NTFS permissions for controlling access to objects remains in Windows 10, working much like it has in previous versions of Windows going all the way back to Windows NT in the early 1990s. That’s our starting point for this section.
Understanding sharing and security models in Windows
Much like Windows 7, Windows 10 offers two ways to share file resources, whether you’re doing so locally or over the network:
Public folder sharing When you place files and folders in your Public folder or its subfolders, those files are available to anyone who has a user account on your computer. Each person who signs in has access to his or her own profile folders (Documents, Music, and so on), and everyone who signs in has access to the Public folder. (You need to dig a bit to find the Public folder, which— unlike other profiles—doesn’t appear under Desktop in the left pane of File Explorer. Navigate to C:\Users\Public. If you use the Public folder often, pin it to the Quick Access list in File Explorer.) By default, all users with an account on your computer can sign in and create, view, modify, and delete files in the Public folders. The person who creates a file in a Public folder (or copies an item to a Public folder) is the file’s owner and has Full Control access. All others who sign in locally have Modify access. Settings in Advanced Sharing Settings (accessible from Settings > Network & Internet, discussed in the next section) determine whether the contents of your Public folder are made available on your network and whether entering a user name and password is required for access. If you turn on password-protected sharing, only network users who have a user account on your computer (or those who know the user name and password for an account on your computer) can access files in the Public folder. Without password-protected sharing, everyone on your network has access to your Public folder files if you enable network sharing of the Public folder. You can’t select which network users get access, nor can you specify different access levels for different users. Sharing via the Public folder is quick and easy—but it’s inflexible.
Advanced sharing By choosing to share folders or files outside the Public folder, you can specify precisely which user accounts are able to access your shared data, and you can specify the types of privileges those accounts enjoy. You can grant different access privileges to different users. For example, you might enable some users to modify shared files and create new ones, enable other users to read files without changing them, and lock out still other users altogether.
You don’t need to decide between sharing the Public folder and sharing specific folders, because you can use both methods simultaneously. You might find that a mix of sharing styles works best for you; each has its benefits:
Sharing specific folders is best for files you want to share with some users but not with others—or if you want to grant different levels of access to different users.
Public folder sharing provides a convenient, logical way to segregate your personal documents, pictures, music, and so on from those you want to share with everyone who uses your computer or your network.
Configuring your network for sharing
If you plan to share folders and files with other users on your network, you need to take a few preparatory steps. (If you plan to share only with others who use your computer by signing in locally, you can skip these steps.
And if your computer is part of a domain, some of these steps—or their equivalent in the domain world—must be done by an administrator on the domain controller. We don’t cover those details in this book.)
1. Be sure that all computers use the same workgroup name. With modern versions of Windows, this step isn’t absolutely necessary, although it does improve network discovery performance.
2. Be sure that your network’s location is set to Private. This setting makes it possible for other users to discover shared resources and provides appropriate security for a network in a home or an office. For details, see “Setting the network location,” earlier in this chapter.
3. Be sure that Network Discovery is turned on. This should happen automatically when you set the network location to Private, but you can confirm the setting—and change it if necessary—in Advanced Sharing Settings, which is shown in Figure 13-18. To open Advanced Sharing Settings, go to Settings > Network & Internet; on the Status page, click Network And Sharing Center. In Network And Sharing Center, click Change Advanced Sharing Options.
Figure 13-18 After you review settings for the Private profile, click the arrow by All Networks (below Guest Or Public) to see additional options.
4. Select your sharing options. In Advanced Sharing Settings, make a selection for each of the following network options. You’ll find the first option under the Private profile; to view the remaining settings, expand All Networks.
1. File And Printer Sharing Turn on this option if you want to share specific files or folders, the Public folder, or printers; it must be turned on if you plan to share any files (other than media streaming) over your network. The mere act of turning on file and printer sharing does not expose any of your computer’s files or printers to other network users; that occurs only after you make additional sharing settings.
2. Public Folder Sharing If you want to share items in your Public folder with all network users (or, if you enable password-protected sharing, all users who have a user account and password on your computer), turn on Public folder sharing. If you do so, network users will have read/write access to Public folders. With Public folder sharing turned off, anyone who signs in to your computer locally has access to Public folders, but network users do not.
3. Media Streaming Turning on media streaming provides access to pictures, music, and video through streaming protocols that can send media to computers or to other media playback devices. In an era where most people stream their music collections from services like Spotify, this option is increasingly esoteric and nearly irrelevant.
4. File Sharing Connections Leave this option set to 128-bit encryption, which has been the standard for most of this century.
5. Password Protected Sharing When passwordprotected sharing is turned on, network users cannot access your shared folders (including Public folders, if shared) or printers unless they can provide the user name and password of a user account on your computer. With this setting enabled, when another user attempts to access a shared resource, Windows sends the user name and password that the person used to sign in to her own computer. If that matches the credentials for a local user account on your computer, the user gets immediate access to the shared resource (assuming permissions to use the resource have been granted to that user account). If either the user name or the password does not match, Windows asks the user to provide credentials. With password-protected sharing turned off, Windows does not require a user name and password from network visitors. Instead, network access is provided by using the Guest account. As we explain in Chapter 11, “Managing user accounts, passwords, and credentials,” this account isn’t available for interactive use but can handle these tasks in the background.
5. Configure user accounts. If you use password-protected sharing, each person who accesses a shared resource on your computer must have a user account on your computer. Use a Microsoft account or, for a local account, use the same user name as that person uses on his or her own computer and the same password as well. If you do that, network users will be able to access shared resources without having to enter their credentials after they’ve signed in to their own computer.
Sharing files and folders from any folder
Whether you plan to share files and folders with other people who share your computer or those who connect to your computer over the network (or both), the process for setting up shared resources is the same as long as the Sharing Wizard is enabled. We recommend you use the Sharing Wizard even if you normally disdain wizards. It’s quick, easy, and certain to make all the correct settings for network shares and NTFS permissions—a sometimes-daunting task if undertaken manually. After you configure shares with the wizard, you can always dive in and make changes manually if you need to. (Although it’s possible to use the Advanced Sharing options to configure network sharing independently of NTFS permissions, we don’t recommend that technique and do not cover it in this edition.)
To be sure the Sharing Wizard is enabled, open File Explorer Options. (Type folder in the search box, and then choose File Explorer Options. Or, in File Explorer, click View > Options.) In the dialog box that appears, shown next, click the View tab. Near the bottom of the Advanced Settings list, see that Use Sharing Wizard (Recommended) is selected:
With the Sharing Wizard at the ready, follow these steps to share a folder or files:
1. In File Explorer, select the folders or files you want to share. (You can select multiple objects.)
2. Right-click and choose Give Access To > Specific People. (In versions before 1709, the command is Share With.) Alternatively, click or tap the Share tab and then click Specific People in the Share With box. You might need to click the arrow in the Share With box to display Specific People. The Network Access dialog box appears, as shown in Figure 13-19.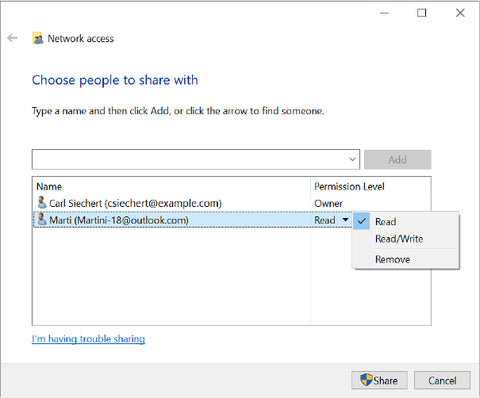
Figure 13-19 For each name in the list other than the owner, you can click the arrow to set the access level—or remove that account from the list.
3. Click in the text box and enter the name or Microsoft account for each user with whom you want to share. You can type a name in the box or click the arrow to display a list of available names; then click Add. Repeat this step for each person you want to add.
The list includes all users who have an account on your computer, plus Everyone. Guest is included if passwordprotected sharing is turned off. If you want to grant access to someone who doesn’t appear in the list, click Create A New User, which takes you to User Accounts in Control Panel.
4. For each user, select a permission level. Your choices are
1. Read Users with this permission level can view shared files and run shared programs, but they cannot change or delete files. Selecting Read in the Sharing Wizard is equivalent to setting NTFS permissions to Read & Execute.
2. Read/Write Users assigned the Read/Write permission have the same privileges you do as owner: They can view, change, add, and delete files in a shared folder. Selecting Read/Write sets NTFS permissions to Full Control for this user.
5. Click Share. After a few moments, the wizard displays a page like the one shown in Figure 13-20.
Figure 13-20 The Sharing Wizard displays the network path for each item you shared.
6. In the final step of the wizard, you can do any of the following:
1. Send an email message to the people with whom you’re sharing. The message includes a link to the shared items.
2. Copy the network path to the Clipboard. This is handy if you want to send a link via another application, such as a messaging app. (To copy the link for a single item in a list, right-click the share name and choose Copy Link.)
3. Double-click a share name to open the shared item.
4. Open File Explorer with your computer selected in the Network folder, showing each network share on your computer. When you’re finished with these tasks, click Done.
Creating a share requires privilege elevation, but after a folder has been shared, the share is available to network users no matter who is signed in to your computer—or even when nobody is signed in.
Stopping or changing sharing of a file or folder
If you want to stop sharing a particular shared file or folder, select it in File Explorer and on the Share tab, click Remove Access (Stop Sharing in versions before 1709). Or right-click and choose Give Access To > Remove Access. Doing so removes access control entries that are not inherited. In addition, the network share is removed; the folder will no longer be visible in another user’s Network folder.
To change share permissions, right-click and choose Give Access To > Specific People. In the File Sharing dialog box (shown earlier in Figure 13-19), you can add users, change permissions, or remove users. (To stop sharing with a user, click the permission level by the user’s name and choose Remove.)
Sharing a printer
Although Windows doesn’t have a wizard for sharing a printer over the network, the process is fairly simple. You configure all options for a printer—shared or not—by using the printer’s properties dialog box, which you access from Settings > Devices > Printers & Scanners.
To make a printer available to other network users, select a printer, click Manage, and then click Printer Properties. On the Sharing tab, select Share This Printer and provide a share name, as shown in Figure 13-21.
Figure 13-21 The share name for a printer can include spaces.
Unlike for shared folders, which maintain separate share permissions and NTFS permissions, a single set of permissions controls access to printers, whether by local users or by network users. (Of course, only printers that have been shared are accessible to network users.)
When you set up a printer, initially all users in the Everyone group have Print permission for documents they create, which provides users access to the printer and the ability to manage their own documents in the print queue. By default, members of the Administrators group also have Manage Printers permission—which allows them to share a printer, change its properties, remove a printer, and change its permissions—and Manage Documents permission, which lets them pause, restart, move, and remove all queued documents. As an administrator, you can view or modify permissions on the Security tab of the printer properties dialog box.
Setting server properties
In addition to setting properties for individual printers by using their properties dialog boxes, you can set other properties by visiting the Print Server Properties dialog box. To get there, open Settings > Devices > Printers & Scanners. Then, under Related Settings, click Print Server Properties.
The first three tabs control the list of items you see in the properties dialog box for a printer:
The Forms tab controls the list of forms you can assign to trays using the Device Settings tab in a printer’s properties dialog box. You can create new form definitions and delete any you create, but you can’t delete any of the predefined forms.
On the Ports tab, you can configure the ports that appear on the Ports tab in a printer’s properties dialog box.
The Drivers tab offers a list of all the installed printer drivers and provides a centralized location where you can add, remove, or update drivers.
On the Advanced tab, you can specify the location of spool files. (You might want to change to a folder on a different drive if, for example, you frequently run out of space on the current drive when you attempt to print large documents.) You can also set notification options on this tab.
FINDING AND USING SHARED RESOURCES ON A WINDOWS NETWORK
The Network folder is your primary gateway to available network resources, just as This PC is the gateway to resources stored on your own system. The Network folder (shown in Figure 13-22) contains an icon for each computer that Windows discovers on your network; double-click a computer icon to see that computer’s shared resources, if any.
Figure 13-22 The Network folder shows all computers on your network, not just those in your workgroup.
To open a shared folder on another computer, doubleclick its icon in the Network folder. If you have the proper permissions, this action displays the folder’s contents in File Explorer. It’s not always that easy, however. If the user account with which you signed in doesn’t have permission to view a network computer or resource you select, a dialog box (shown next) asks you to provide the name of an account (and its password, of course) that has permission. Don’t be fooled by the Domain reference below the User Name and Password boxes; in a workgroup, that value refers to the local computer.
Perhaps the trickiest part of using shared folders is fully understanding what permissions have been applied to a folder and which credentials are in use by each network user. It’s important to recognize that all network access is controlled by the computer with the shared resources; regardless of what operating system runs on the computer attempting to connect to a network share, it must meet the security requirements of the computer where the shared resource is actually located.
Working with mapped network folders
Mapping a network folder makes it appear to applications as though the folder is part of your own computer. Windows assigns a drive letter to the mapped folder, making the folder appear like an additional hard drive. You can still access a mapped folder in the conventional manner by navigating to it through the Network folder. But mapping gives the folder an alias— the assigned drive letter—that provides an alternative means of access.
To map a network folder to a drive letter, follow these steps:
1. Open This PC in File Explorer, and on the ribbon’s Computer tab, click Map Network Drive. (Alternatively, after you open a computer in the Network folder, right-click a network share and choose Map Network Drive.)
2. Select a drive letter from the Drive list. You can choose any letter that’s not already in use.
3. In the Folder box, type the path to the folder you want or, more easily, click Browse and navigate to the folder.
4. Select Reconnect At Sign-In if you want Windows to connect to this shared folder automatically at the start of each session.
5. If your regular sign-in account doesn’t have permission to connect to the resource, select Connect Using Different Credentials. (After you click Finish, Windows asks for the user name and password you want to use for this connection.)
6. Click Finish.
In File Explorer, the “drive” appears under This PC.
If you change your mind about mapping a network folder, right-click the folder’s icon in your This PC folder. Choose Disconnect on the resulting shortcut menu, and the connection will be severed.
Connecting to a network printer
To use a printer that has been shared, open the Network folder in File Explorer and double-click the name of the server to which the printer is attached. If the shared printers on that server are not visible, return to the Network folder, click to select the server, and then, on the ribbon’s Network tab, click View Printers. Right-click the printer and choose Connect. Alternatively, from the Devices And Printers folder, click Add A Printer and use the Add Printer Wizard to add a network printer.
TROUBLESHOOTING NETWORK PROBLEMS
Network connectivity problems can be a source of great frustration. Fortunately, Windows 10 includes several tools and wizards that can help you identify and solve problems. Even better, Windows has built-in network diagnostic capabilities, so in many cases, if there is a problem with your network connection, Windows knows about it before you do, displays a message, and often solves the problem.
When a network-dependent activity (for example, browsing to a website) fails, Windows works to address the most common network-related issues, such as problems with file sharing, website access, newly installed network hardware, connecting to a wireless network, and using a third-party firewall.
If you encounter network problems that don’t trigger an automatic response from Windows, you should first try to detect and resolve the problem with one of the built-in troubleshooters. Open Settings > Network & Internet; on the Status page, click Network Troubleshooter and follow the prompts to fix an issue. If the options shown in that troubleshooter don’t address your problem, go to Settings > Update & Security > Troubleshoot to see additional choices.
Each of the troubleshooting wizards performs several diagnostic tests, corrects some conditions, suggests actions you can take, and ultimately displays a report that explains the wizard’s findings. Sometimes, the problem is as simple as a loose connection.
If the diagnostic capabilities leave you at a dead end, you’ll find that restarting the affected network hardware often resolves the problem, because the hardware is forced to rediscover the network. Here’s a good general troubleshooting procedure:
1. Isolate the problem. Does it affect all computers on your network, a subset of your network, or only one computer?
2. If it affects all computers, try restarting the internet device (that is, the cable or DSL modem). If the device doesn’t have a power switch, unplug it for a few moments and plug it back in.
3. If the problem affects a group of computers, try restarting the router to which those computers are connected.
4. If the problem affects only a single computer, try repairing the network connection for that computer. Open Settings > Network & Internet and, on the Status page, click Change Adapter Options. Then, in Network Connections, select the connection and click Diagnose This Connection. If the troubleshooter doesn’t resolve the problem, select the connection and click Disable This Network Device; then click Enable This Network Device, which causes Windows to reinitialize the connection.
Network troubleshooting tools
When the built-in troubleshooters don’t solve the problem, it might be time to dig deeper into the Windows toolbox. The following list includes some of the command-line utilities you can use to diagnose, monitor, and repair network connections. To learn more about each utility, including its proper syntax, open a Command Prompt window and type the executable name followed by /?.
IP Configuration Utility (Ipconfig.exe) Displays all current Transmission Control Protocol/Internet Protocol (TCP/IP) network configuration values and refreshes Dynamic Host Configuration Protocol (DHCP) and DNS settings.
Name Server Lookup (Nslookup.exe) Displays information about Domain Name System records for specific IP addresses, host names, or both so that you can troubleshoot DNS problems.
Net services commands (Net.exe) Performs a broad range of network tasks. Type net with no parameters to see a full list of available command-line options.
Network Command Shell (Netsh.exe) Displays or modifies the network configuration of a local or remote computer that’s currently running. This command-line scripting utility has a huge number of options, which are fully detailed in Help.
TCP/IP Ping (Ping.exe) Verifies IP-level connectivity to another internet address by sending Internet Control Message Protocol (ICMP) packets and measuring the response time in milliseconds.
TCP/IP Traceroute (Tracert.exe) Determines the path to an internet address and lists the time required to reach each hop. It’s useful for troubleshooting connectivity problems on specific network segments.
As is the case with other command-line utilities, the Windows PowerShell environment includes cmdlets that offer much of the same functionality along with the scripting capability of PowerShell. You can get a list that includes many of the more commonly used networkrelated cmdlets by entering the following at a PowerShell prompt:
get-command -module nettcpip, netadapter
Troubleshooting TCP/IP problems
When you encounter problems with TCP/IP-based networks, such as an inability to connect with other computers on the same network or difficulty connecting to external websites, the problems might be TCP/IP related. You’ll need at least a basic understanding of how this protocol works before you can figure out which tool to use to uncover the root of the problem.
Checking for connection problems
Any time your network refuses to send and receive data properly, your first troubleshooting step should be to check for problems with the physical connection between the local computer and the rest of the network. Assuming your network connection uses the TCP/IP protocol, the first tool to reach for is the Ping utility. When you use the Ping command with no parameters, Windows sends four echo datagrams—small Internet Control Message Protocol (ICMP) packets—to the address you specify. If the machine at the other end of the connection replies, you know that the network connection between the two points is alive.
To use the Ping command, open a Command Prompt window (Cmd.exe) and type the command ping target_name (where target_name is an IP address or the name of another host machine). The return output looks something like this:
C:\>ping www.example.com
Pinging www.example.com [93.184.216.34] with 32
bytes of data:
Reply from 93.184.216.34: bytes=32 time=54ms
TTL=51
Reply from 93.184.216.34: bytes=32 time=40ms
TTL=51
Reply from 93.184.216.34: bytes=32 time=41ms
TTL=51
Reply from 93.184.216.34: bytes=32 time=54ms
TTL=51
Ping statistics for 93.184.216.34:
Packets: Sent = 4, Received = 4, Lost = 0 (0%
loss),
Approximate round trip times in milli-seconds:
Minimum = 40ms, Maximum = 54ms, Average =
47ms
If all the packets you send come back and the time values are roughly equal, your TCP/IP connection is fine, and you can focus your troubleshooting efforts elsewhere. If some packets time out, a “Request timed out” message appears, indicating your network connection is working, but one or more hops between your computer and the target machine are experiencing problems. In that case, repeat the Ping test using the -n switch to send a larger number of packets; ping –n 30 192.168.1.1, for example, sends 30 packets to the computer or router at 192.168.1.1.
A high rate of timeouts, also known as packet loss, usually means the problems are elsewhere on the network and not on the local machine. (To see the full assortment of switches available for the Ping command, type ping with no target specified.)
If every one of your packets returns with the message “Request timed out,” the problem might be the TCP/IP connection on your computer or a glitch with another computer on that network. To narrow down the problem, follow these steps, in order, stopping at any point where you encounter an error:
1. Ping your own machine by using any of the following commands:
ping ::1
ping 127.0.0.1
ping localhost
These are standard addresses. The first line is the IPv6 address for your own computer; the second line is the IPv4 address; the third line shows the standard host name. If your local network components are configured correctly, each of these three commands should allow the PC on which the command is run to talk to itself. If you receive an error, TCP/IP is not configured properly on your system. For fix-it details, see “Repairing your TCP/IP configuration” later in this chapter.
2. Ping your computer’s IP address.
3. Ping the IP address of another computer on your network.
4. Ping the IP address of your router or the default gateway on your network.
5. Ping the address of each DNS server on your network. (If you don’t know these addresses, see the next section for details on how to discover them.)
6. Ping a known host outside your network. Well-known, hightraffic websites are ideal for this step, assuming that they respond to ICMP packets.
7. Use the PathPing command to contact the same host you specified in step 6. This command combines the functionality of the Ping command with the Traceroute utility to identify intermediate destinations on the internet between your computer and the specified host or server.
If either of the two final steps in this process fails, your problem might be caused by DNS problems, as described later in this chapter. (For details, see “Resolving DNS issues.”) To eliminate this possibility, ping the numeric IP address of a computer outside your network instead.
(Of course, if you’re having DNS problems, you might have a hard time finding an IP address to ping!) If you can reach a website by using its IP address but not by using its name, DNS problems are indicated.
If you suspect that there’s a problem on the internet between your computer and a distant host or server, use the Traceroute utility (Tracert.exe) to pinpoint the problem. Like the Ping command, this utility works from a command line. You specify the target (a host name or IP address) by using the syntax tracert target_name, and the utility sends out a series of packets, measuring the time it takes to reach each hop along the route.
Timeouts or unusually slow performance indicate a connectivity problem. If the response time from your network to the first hop is much higher than the other hops, you might have a problem with the connection to your internet service provider; in that case, a call to your ISP’s support line is in order. Problems further along in the traceroute might indicate congestion or hardware problems in distant parts of the internet that are out of your ISP’s hands. These symptoms might disappear when you check another URL that follows a different path through the internet.
If your testing produces inconsistent results, rule out the possibility that a firewall program or NAT device (such as a router or residential gateway) is to blame. If you’re using Windows Defender Firewall or a third-party firewall program, disable it temporarily. Try bypassing your router and connecting directly to a broadband connection such as a DSL or cable modem. (Use this configuration only for testing and only very briefly because it exposes your computer to various attacks.)
If the Ping test works with the firewall or NAT device out of the picture, you can rule out network problems and conclude that the firewall software or router is misconfigured. After you complete your testing, be sure to enable the firewall and router again.
Diagnosing IP address problems
You can also get useful details of your IP configuration by using the IP Configuration utility, Ipconfig.exe, in a Command Prompt window. Used without parameters, typing ipconfig at a command prompt displays the DNS suffix; IPv6 address, IPv4 address, or both; subnet mask; and default gateway for each network connection. To see exhaustive details about every available network connection, type ipconfig /all.
The actual IP address you see might help you solve connection problems:
If the address is in the format 169.254.x.y, your computer is using Automatic Private IP Addressing (APIPA). This means your computer’s DHCP client was unable to reach a DHCP server to be assigned an IP address. Check the connection to your network.
If the address is in one of the blocks of IP addresses reserved for use on private networks (for details, see the sidebar “Public and private IP addresses” earlier in this chapter), make sure that a router or residential gateway is routing your internet requests to a properly configured public IP address.
If the address of your computer appears as 0.0.0.0, the network is either disconnected or the static IP address for the connection duplicates an address that already exists on the network.
Make sure you’re using the correct subnet mask for computers on your local network. Compare IP settings on the machine that’s having problems with those on other computers on the network. The default gateway and subnet mask should be identical for all network computers. The first one, two, or three sets of numbers in the IP address for each machine should also be identical, depending on the subnet mask. A subnet mask of 255.255.255.0 means the first three IP address numbers of computers on your network must be identical—192.168.0.83 and 192.168.0.223, for instance, can communicate on a network using this subnet mask, but 192.168.1.101 will not be recognized as belonging to the network. The gateway machine must also be a member of the same subnet. (If you use a router, switch, or residential gateway for internet access, the local address on that device must be part of the same subnet as the machines on your network.)
Temporary DNS problems can also be caused by the DNS cache, which Windows maintains for performance reasons. If you suddenly have trouble reaching a specific site on the internet and you’re convinced there’s nothing wrong with the site, type this command to clear the DNS cache: ipconfig /flushdns.
A more thorough solution is offered by ipconfig /registerdns, which renews all DHCP leases (as described in the previous section) and reregisters all DNS names.