


Installing configuring and deploying Windows 10 or Windows 11

Installing, configuring, and deploying Windows 10
Mechanically, Windows Setup has evolved substantially since Windows 10 debuted in 2015. Those step-by-step details are a big part of this chapter. An even more important change, though, is the way in which you’re likely to encounter Windows Setup.
In the first year after its release, when Microsoft was offering Windows 10 as a free upgrade, the installed base for the new operating system went from zero to well over 300 million. (Five years later, the number of PCs running Windows 10 is over 1 billion.) Most of those early adopters got to Windows 10 by upgrading a PC running an earlier version of Windows. With that free upgrade offer long since ended, we expect that most of the readers of this book who encounter Windows 10 for the first time will do so on a new PC, where the Windows Setup experience is abbreviated. When you first power up a new PC with Windows 10 already installed, you go through the brief Out Of Box Experience (OOBE) setup; then you sign in and get to work.
But sooner or later you’ll almost certainly have to deal with one of the other, more complicated Setup options. If you’ve replaced or upgraded the system drive on a PC, for example, your only choice is to boot from installation media and perform a clean install. And even though upgrades are less common than they were in that frenetic first year, millions of PCs worldwide are still running Windows 7; given that support for that older operating system ended on January 14, 2020, those systems should be migrated to Windows 10 (or retired).
BEFORE YOU START
Whether you’re planning to upgrade an old PC or perform a clean install on a newly built or refurbished device, you can increase the odds that setup will succeed by taking some common-sense precautions. At the top of this list is checking the hardware on which you plan to install Windows 10 to confirm that it meets the minimum requirements for Windows:
- Processor 1 gigahertz (GHz) or faster
- RAM 1 gigabyte (GB) (32-bit) or 2 GB (64-bit)
- Free disk space (system drive) 32 GB
- Graphics card Microsoft DirectX 9 graphics device with WDDM driver
Those are extremely modest requirements, and almost every PC sold in the past 10 years with Windows 7 or a later version preinstalled should qualify. Note that some older devices that are at or near the minimum for one or more of these hardware components might not perform acceptably. The minimum specification for memory is especially unrealistic by modern standards; in our experience, Windows 10 will not perform acceptably on a device equipped with less than 4 GB of memory. Likewise, we don’t recommend trying to install and run Windows 10 on a device with a system drive smaller than 64 GB.
To download the Windows 10 installation files, you also need internet access. (In fact, reliable internet access is a prerequisite for most tasks we describe in this book.) A Microsoft account is recommended but is not required.
Check for potential compatibility problems
In broad terms, any device that was designed for Windows 8.1 or later should be compatible with Windows 10, as should any apps or device drivers installed on that device. There are, however, exceptions to this rule—some of them minor, others more serious. Your likelihood of encountering compatibility issues goes up when upgrading a PC running Windows 7.
Before you run Setup, though, especially on an older device, it’s worth taking inventory of your critical apps and devices and checking with the developer or manufacturer to confirm that those products are supported under Windows 10. Pay special attention to any app or device originally designed and developed before the release of Windows 7 in 2009. We also recommend checking for BIOS or firmware updates that might be available, especially for PCs that were originally designed before the initial release of Windows 10 in 2015. These updates are often helpful in heading off installation issues before they arise.
Back up your data and settings
Having an up-to-date backup of important files is, of course, good advice for any time. But it’s especially important when you’re upgrading an operating system.
The simplest way to back up files is to sync them to the cloud. OneDrive sync capabilities are built in to Windows 10 and Windows 8.1; a sync utility for Windows 7 is available for download from https://onedrive.com/download. Move or copy your files into the OneDrive folder and wait for them to be fully synchronized before proceeding.
With large file collections or slow internet connections— or if you just prefer not putting your files in cloud storage —a sufficiently large USB flash drive or an external hard drive makes a perfectly good target for a local backup. If you’re upgrading from Windows 7, you can use its builtin backup program; individual files and folders from those backups can be restored in Windows 10 by using the helpfully labeled Backup And Restore (Windows 7) option in Control Panel.
If you’re upgrading from Windows 8.1 and you signed in with a Microsoft account, your personalized settings are already being synced to OneDrive. From Windows 7, there’s no easy way to back up those settings. Although you can find third-party utilities that promise to accomplish this task, it’s probably faster (and less risky) to re-create that handful of settings than it is to mess with transfer utilities. A far more important task is to ensure that you have product keys or other license details for any third-party software that might require re-installation.
Download or create installation media
For every Windows 10 installation scenario that we cover in the next section, you need access to installation media. To do a clean install on modern hardware, the most common choice is a bootable USB flash drive; on older hardware, a bootable DVD might be required. For upgrades and reinstallations, you can use the same type of physical media or download an ISO file, which you can then mount directly or use to create your own installation media.
The real star of the Download Windows 10 page, however, is the Media Creation Tool, which is a bootstrap version of the Windows 10 Setup program. It’s a small file (less than 20 MB in size) that takes only seconds to download. (Recent versions of the tool incorporate the Windows version number into the executable filename— MediaCreationTool2004.exe, for example.) After running the tool and accepting a license agreement, you should see a screen that offers the option to upgrade the current PC or create installation media for another PC.
Select that second option to reach the step shown in Figure 2-1.
Figure 2-1 These default Media Creation Tool options will create the correct installation media for almost all modern PCs in the United States.
By default, the choices for Language, Edition, and Architecture match the current configuration. If you want to change any of those choices, do so before you click Next.
Choosing the correct installer involves finding the specific combination of three factors that match your needs:
- Language Windows 10 is available in a large number of languages—more than 100—covering nearly 200 countries and regions. Choose the base language that’s appropriate for your installation. You can add language interface packs to translate text that’s displayed in commonly used wizards, dialog boxes, menus, and other items in the user interface; however, you can’t change the parent language except by reinstalling Windows using an edition built for that language.
- Edition In early releases of the Media Creation Tool, this field gave you the option to download either Windows 10 Home or Windows 10 Pro. As of late 2017, only one choice is available in the United States; the download consists of a combined installer that can be used to install any retail edition. Large organizations with volume license contracts can install Windows 10 Enterprise or Education on a system that already has a license to run an edition of Windows that qualifies for the upgrade.
- Architecture Windows 10 is available in 32-bit and 64-bit distributions. Choosing Both from this drop-down list causes the Media Creation Tool to download a larger ISO file capable of installing either architecture. Most modern CPUs support either version, and your preference should be for the 64-bit version. In general, 32-bit versions of Windows are appropriate for systems with 2 GB (or less) of RAM, with no option to add memory. Choose a 64-bit version if your system includes 4 GB or more of memory or if you rely on one or more programs that are available only in 64-bit editions. (All your 32-bit programs, including new and old versions of Microsoft Office, will work fine on a 64-bit installation of Windows, so you needn’t have any fears in that regard.
If you’re creating installation media on a USB flash drive, the Media Creation Tool takes care of properly formatting the flash drive, making it bootable, and downloading and copying all the necessary files to it. But under some circumstances the Media Creation Tool falls short. For example, if your internet connection is slow or has a data cap, you might prefer to avoid the lengthy download. And, crucially, the Media Creation Tool is limited to the latest Windows 10 version. If you’re trying to install the previous version, perhaps because the current one has compatibility issues with your hardware, you’ll need to find another way.
For those situations, an ISO file that contains all the installation files comes in handy. With an ISO file and a PC running Windows 10, you can create your own installation media with ease.
You can’t simply copy installation files to a USB flash drive and use it to perform a clean install. First, you have to make the disk bootable. When creating a bootable drive, you need to consider two factors:
- Partitioning scheme: MBR or GPT? You can use a flash drive formatted using either scheme with a Unified Extensible Firmware Interface (UEFI) system; older BIOS-based systems are typically able to recognize only MBR partitions.
- Disk format: NTFS or FAT32? If you plan to install Windows on a modern UEFI-based system (such as the Microsoft Surface Pro and Surface Book families), the boot files must reside on a FAT32 partition on the flash drive. If the drive is formatted using another file system, the PC will not recognize the device as bootable.
One of the simplest ways to create a bootable install drive is to use the built-in Recovery Media Creator tool, RecoveryDrive.exe. Just as in previous Windows versions, this tool can be used to create a bootable drive that includes the recovery partition provided by the OEM. If you perform a clean install or remove that recovery partition to reclaim disk space, the recovery drive can be used only for simple repair operations.
To run the Recovery Media Creator tool, type RecoveryDrive in the search box and then choose the Recovery Drive app from the search results. (Or, if you prefer, search for the Create A Recovery Drive option in Control Panel or Settings.) Figure 2-2 shows this tool in operation.
Figure 2-2 Choose the option to back up system files if you want to create a recovery drive using a Windows 10 image preinstalled by an OEM that you can use to reset the current system.
If you used the Media Creation Tool to download an ISO file containing the Windows installation files, you can burn its contents to a DVD (assuming that you have a DVD burner handy and the target system on which you plan to install Windows has an optical drive from which it can start). Or, if you have access to a system running Windows 10, you can make your own bootable media, following these steps:
- Create a blank recovery drive using the steps we described earlier, skipping the option to copy system files to the drive.
- Double-click the ISO file to mount it as a virtual DVD.
- Use File Explorer to drag all files and folders from the virtual DVD to the USB recovery drive.
Choose your installation method
You have two choices when running Windows Setup: inplace upgrades and custom installations.
Microsoft strongly encourages in-place upgrades for anyone moving to Windows 10 on a PC currently running Windows 7 (with Service Pack 1) or Windows 8.1. You can also use this technique to update an older Windows 10 version to a more recent version instead of waiting for a feature update to be installed automatically or to repair an ailing installation by “upgrading” to the currently installed version. To perform an in-place upgrade, start the Windows 10 Setup program from within the current Windows installation.
The default option for an in-place upgrade offers to keep all your data files, installed programs, and settings, at the risk of creating some compatibility issues. But you also have the option to start from scratch, with or without your personal data files; if you choose the latter option, you need to reinstall desktop programs and re-create or sync settings from another system.
You must boot from the Windows 10 media and choose a custom installation (sometimes referred to as a clean install) if either of the following conditions is true:
- You need to adjust the layout of the system disk. The Windows 10 installer includes disk-management tools you can use to create, delete, format, and extend (but not shrink) partitions on hard disks installed in your computer. Knowing how these tools work can save you a significant amount of time when setting up Windows.
- You want to install Windows 10 alongside another operating system. If you want to set up a multi-boot system, you need to understand how different startup files work so that you can manage your startup options effectively.
If the system on which you plan to install Windows 10 is already running a Windows version that supports upgrades (Windows 7, Windows 8.1, or Windows 10), you can start the Setup program from within Windows.
When running Setup from within Windows, you can upgrade from Windows 7 or Windows 8.1 to Windows 10. You can also use the in-place upgrade technique to move from an older version of Windows 10 to a newer one—from version 1903 to version 20H2, for example. As we noted earlier, installation files you download using the Media Creation Tool include all retail editions of Windows—Home, Pro, and a few obscure editions most people can safely ignore. In these scenarios, Setup automatically chooses the Windows 10 version that corresponds to the currently installed Windows version.
In early versions of the Media Creation Tool, you had the option to choose a specific Windows 10 edition for download. That led to some scenarios that involved an unsupported upgrade path, without the option to transfer programs and settings. If you want to upgrade to a higher Windows edition, your best bet is to perform a supported upgrade first (Windows 8.1 to Windows 10 Home, for example) and then, after Windows 10 is running smoothly, follow the steps we describe later in this chapter to convert the installation to a different edition.
Double-clicking Setup from within Windows does not offer the option to perform a custom install. However, performing an upgrade and choosing Nothing from the list of what you want to keep has essentially the same effect as performing a clean install. After Windows 10 is installed, the Reset This PC option offers an alternative way to accomplish the same task of reinstalling Windows when something isn’t working properly.
HOW WINDOWS 10 SETUP WORKS
The Windows Installer (Setup.exe) is used for both inplace upgrades and clean installs. In this chapter, we use the term Setup to refer to the operation of this program in either mode. For upgrades, the installer is streamlined, offering a minimum of options. Booting from Windows 10 installation media offers a much more complete set of options: choosing a specific physical disk for use in dual-boot (or multi-boot) scenarios, creating and formatting partitions, and setting up unattended installations, for example. In this section, we cover both options. We don’t include step-by-step instructions to document every possible upgrade or clean installation scenario. (We do, however, cover some noteworthy changes related to privacy that debuted as part of Windows 10 version 1703.) Given the nearly infinite number of combinations of PC hardware, providing comprehensive instructions would be impossible. And besides, we’re confident our readers can make their way through a setup wizard without handholding.
In Windows 10, Setup works in multiple stages, the details of which vary depending on whether you’re performing an in-place upgrade or a custom installation. The process is extremely robust and is capable of recovering from a failure at any stage.
Setup first performs a basic system compatibility check to confirm that the system has sufficient free disk space for both the installation and the recovery options, that required CPU features are available, and that both memory and graphics hardware meet minimum requirements. During this phase, Setup also inventories hardware and confirms that critical drivers are available (storage and networking, for example). If any critical drivers are unavailable, Setup stops and rolls back.
In either type of installation, the lengthiest stage occurs with Setup running offline in the Windows Preinstallation Environment (Windows PE), during which it backs up the previous Windows installation (if one exists) into a Windows.old folder and applies the new Windows 10 image.
The remaining stages of installation run after a restart, with the final stage consisting of what’s known as the Out of Box Experience (OOBE), with the user signing in and either creating a new profile or migrating an existing one as part of the upgrade. The most important part of the OOBE process is the creation of the primary user account.
Setup does its magic using two folders:
- C:\$Windows.~BT A hidden folder that contains the files used during both the online and the offline phases of installation. When you launch Setup from installation media, such as a mounted ISO file or a bootable DVD or USB flash drive, the initial phase of Setup creates this folder and copies the installation files to it for temporary use, eliminating the possibility of an installation failure caused by prematurely removing or unmounting the installation media.
- C:\Windows.old Created only when you perform an upgrade or do a clean install on a volume that already contains a Windows installation. This folder does double duty. During upgrades, it’s used as a transfer location to hold files and settings that are moving from the old installation to the new one. After the Setup program completes its work, this folder holds system files from the previous Windows installation as well as any user files that were not migrated during Setup.
If you poke around in the root of the system drive, you might notice additional hidden folders with similar names: $Windows.~WS, for example, is created by the Media Creation Tool when you download Windows 10 installation files, and $GetCurrent is created when you use the Update Assistant.
Upgrading from an earlier Windows version
A streamlined wizard walks you briskly through a Windows 10 upgrade. The process is significantly faster than in earlier versions of Windows, especially on systems with a large number of files. No major upgrade is ever risk free, of course, but the Windows 10 installer is designed to be robust enough to roll back gracefully in the case of a failure.
In Windows 10, you can begin the upgrade process by running the Media Creation Tool and selecting the first option, Upgrade This PC Now. That option downloads the full installation file and then runs the Windows Setup program immediately, downloading additional installation files on the fly. As an alternative, you can use bootable installation media or an ISO file mounted as a virtual drive.
When you kick off a Windows 10 upgrade, Setup performs a series of tasks. First, it runs a compatibility check, which determines whether your PC, peripheral devices, and installed Windows apps will work with Windows 10.
When you start an online upgrade from within Windows 8.1, the upgrade keeps all your data files and migrates settings, Windows apps, and desktop programs. Upgrades from Windows 7 preserve data files and desktop programs but do not migrate personalized settings such as your desktop background.
If you have Windows 10 installation media, you can also start the upgrade process from within Windows. Open the DVD or USB flash drive in File Explorer and doubleclick Setup. The resulting wizard walks you through several steps that aren’t part of the streamlined online upgrade. The most important of these is the option to transfer files, apps, and settings, a topic we cover shortly.
Checking compatibility
A compatibility checker is built into the Windows 10 Setup program (replacing the Upgrade Advisor from Windows 7), and it runs as one of the first steps when you kick off an upgrade. A more limited version runs on a clean install, checking for issues such as a BIOS that needs updating or a disk controller or network adapter that has no supported driver.
In most cases, this appraisal turns up nothing, and Setup continues without interruption. If this routine finds any issues, however, it notifies you with a warning dialog box. Setup will refuse to continue if your device doesn’t have enough RAM or free disk space. Other causes of hard blocks include a CPU or a BIOS version that is not supported, as well as the presence of a hard-disk controller or networking device that lacks a driver. When the compatibility checker turns up any hard blocks, Setup ends immediately, with a message that identifies the problem.
For less severe issues, the Setup program might warn you that specific apps or devices might not work correctly or will have reduced functionality in Windows 10. You might be given the option to fix the issue and try the upgrade again. In these cases, the compatibility checker offers instructions to deal with specific issues:
- You might need to install updates to your current version of Windows before continuing.
- You might need to suspend disk encryption before upgrading.
- Some apps must be uninstalled before the upgrade can continue. (In some cases, they can be reinstalled after the upgrade is complete.)
- Some apps must be updated to a newer version before the upgrade can be completed.
- After the upgrade, you might need to reinstall language packs.
If the upgrade process ends prematurely for any of these reasons, Setup generally cleans up after itself, although you might have to manually remove some leftovers.
Transferring files, apps, and settings
When you choose the Upgrade Now option from the Download Windows 10 page on a volume that is already running a previous version of Windows, the upgrade process preserves all your files and apps. To choose an alternative option, you must run Setup from installation media or a mounted ISO file. Figure 2-4 shows the additional options available if you click Choose What To Keep.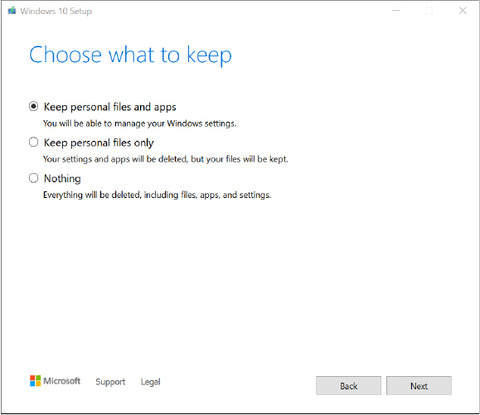
Figure 2-4 When you upgrade from Windows 7 to Windows 10, these three options are available when Setup begins.
Here’s what happens with each option:
- Keep Personal Files And Apps All Windows desktop programs and user accounts are migrated. After the upgrade is complete, you need to sign in with your Microsoft account to install apps from the Windows Store and sync saved settings. When upgrading from Windows 8.1, this option includes the capability to preserve settings.
- Keep Personal Files Only This option is the equivalent of a repair installation. Each user’s personal files are available in a new user profile that otherwise contains only default apps and settings.
- Nothing Choose this option if you want to perform a clean install, with your existing installation moved to Windows.old. Note that the descriptive text, “Everything will be deleted,” is misleading. Your personal files, as well as those belonging to other user accounts in the current installation, are not deleted. Instead, they are moved to the Windows.old folder, where you can recover them by using File Explorer.
After the initial prep work, Setup restarts in offline mode, displaying a progress screen that is simpler than the one from the initial release of Windows 10.
In this mode, you can’t interact with the PC at all. Your PC is effectively offline as the following actions occur.
Windows Setup first moves the following folders from the existing Windows installation on the root of the system drive into Windows.old:
- Windows
- Program Files
- Program Files (x86)
- Users
- ProgramData
During this offline phase, Setup extracts registry values and program data from the freshly created Windows.old folder, based on the type of upgrade, and then prepares to add this data to the corresponding locations in the new Windows 10 installation. Third-party hardware drivers are also copied from the old driver store in preparation for the new installation.
Next, Setup lays down a new set of system folders for Windows 10 using the folder structure and files from the compressed Windows image. After that task is complete, Setup moves program files, registry values, and other settings it gathered earlier.
Moving folders minimizes the number of file operations that are required, making upgrade times consistent even when individual user accounts contain large numbers of files. (By contrast, the Windows 7 Setup program moved files individually, which led to some painfully long upgrades.)
To further speed things up, Windows 10 Setup uses hard link operations to move files and folders from the transport location to the new Windows 10 hierarchy. Not having to physically move the file improves performance and allows for easy rollback if something goes wrong during the upgrade.
Setup moves folders associated with individual user accounts as part of a default in-place upgrade. The entire folder is placed within the fresh Windows 10 installation unchanged; every file in the folder and all its subfolders is preserved. (Note that organizations using corporate deployment tools can override some of this behavior, excluding some files or subfolders and merging the contents of default folders with the contents of existing folders from the source operating system.)
This activity is accompanied by several restarts and can take more than an hour, depending on your hardware, although an upgrade on modern hardware typically goes much faster. At the conclusion of this process, you’re confronted with a sign-in screen. That’s followed by a single screen that allows you to choose privacy settings for your device.
If you’re upgrading from Windows 7 or from a Windows 8.1 PC that was configured to use a local user account, you need to sign in using the credentials for that account. After that, you’ll have the option to link your account to a Microsoft account or to continue using a local account.
By signing in with a Microsoft account, you can continue setting up Windows 10 by using your synced settings. The most current version of each preinstalled app is downloaded from the Store before you sign in.
Performing a clean install
Among some PC traditionalists, it’s a badge of honor to wipe a newly purchased PC clean and then set up Windows from scratch. Even if you’re not so fastidious, a clean install is sometimes unavoidable; it’s the only option for PCs you build yourself and for virtual machines, and it’s sometimes the fastest way to get back up and running after a disk failure.
The time-tested road to a clean install involves starting up from a bootable USB flash drive containing the Windows 10 installation files and removing all traces of the currently installed Windows version before proceeding to run Setup.
This is still a perfectly valid installation method, one we’ll describe in more detail shortly. But it’s no longer the only option, nor is it always the best. For a system that’s already running any modern version of Windows, you’ll find it much easier to start Setup from within Windows, choose an upgrade install, and choose the option to keep Nothing. After you use Disk Cleanup Manager or the tools in Settings > System > Storage to remove the old Windows installation, the result is functionally identical to an old-fashioned clean install.
That neat option isn’t possible if you’re starting with a brand-new hard disk, or you want to install a 64-bit Windows 10 edition on a device that’s currently running 32-bit Windows, or you want to clean up a messy OEM’s partition layout on the system disk, or … well, you get the idea.
For those scenarios, you need to boot into the Windows 10 Setup program from a USB flash drive (or a DVD drive, if your PC is equipped with one of those increasingly rare peripherals). You might need to read the manual for your device to learn the magic combination of keystrokes and firmware settings that make it possible to start up using a bootable Windows 10 disc or drive.
After the installation process begins, you can follow the instructions as outlined in this section.
When you boot from that media, you pass through a few introductory screens—choosing a language, accepting a license agreement—and eventually reach the Windows Setup dialog box shown in Figure 2-5. You’re asked to choose an installation type—Upgrade or Custom. Be aware: “Which type of installation do you want?” is a trick question.
Figure 2-5 When you boot from a USB flash drive or DVD to perform a clean install of Windows, the only option that works from this screen is Custom.
Choosing the Upgrade option leads to an error message. You can upgrade Windows only if you start Setup from within Windows.
The Custom option allows you to continue, and you’re presented with a list of available disks and volumes. Figure 2-6 shows what you see on a system with a single drive that has not yet been partitioned and contains only unallocated space.
Figure 2-6 In this simple scenario, with a single physical disk that has not been partitioned, click Next to create the necessary partitions and install Windows using the entire physical drive.
You can use the tools beneath the list of available drives to manage partitions on a drive that currently contains a Windows installation and user data. For example, if you want a truly fresh start, you can select each partition and click Delete until only unallocated space remains. You can also use these tools to create one or more new partitions, format an existing partition, or extend a partition to include adjacent unallocated space.
To make adjustments to existing disk partitions, boot from Windows 10 installation media (DVD or bootable USB flash drive) and run through Windows Setup until you reach the Where Do You Want To Install Windows page. Figure 2-7 shows a system that contains two physical drives. Drive 0 contains a standard partition layout, with Windows installed on Partition 4. (Partitions 1 and 2 for this drive have scrolled out of view.) Drive 1 is divided in half, with a primary data volume and an identical amount of unallocated space.
Figure 2-7 Use the disk-management tools in this phase of the Windows 10 installation process to manage disk partitions for more efficient data storage and multi-boot configurations.
You can accomplish any of the following tasks here:
- Select an existing partition or unallocated space on which to install Windows 10. Setup is simple if you already created and formatted an empty partition in preparation for setting up Windows, or if you plan to install Windows 10 on an existing partition that currently contains data or programs but no operating system, or if you want to use unallocated space on an existing disk without disturbing the existing partition scheme. Select the partition or unallocated space and click Next.
- Delete an existing partition. Select a partition, and then click Delete. This option is useful if you want to perform a clean installation on a drive that currently contains an earlier version of Windows. Because this operation deletes data irretrievably, you must respond to an “Are you sure?” confirmation request. After deleting the partition, you can select the unallocated space as the destination for your Windows 10 installation or create a new partition. Be sure to back up any data files before choosing this option.
- Create a new partition from unallocated space. Select a block of unallocated space on a new drive or on an existing drive after deleting partitions, and click New to set up a partition in that space. By default, Windows Setup offers to use all unallocated space on the current disk. You can specify a smaller partition size if you want to subdivide the disk into multiple drives. If you have a 4-TB drive, for example, you might choose to create a relatively small partition (we recommend at least 128 GB in this configuration) on which to install Windows and use the remaining space to create a second volume with its own drive letter on which to store data files such as music, pictures, documents, and videos.
- Extend an existing partition by using unallocated space. If you’re not happy with your existing partition scheme, you can use the Extend option to make a partition larger, provided that unallocated space is available immediately to the right of the existing partition in Disk Management, with no intervening partitions. If the manufacturer of your PC initially divided a 128- GB hard disk into system and data volumes of equal size, you might decide to rejoin the two partitions when performing a clean install. After backing up your files from the data volume to an external drive or to cloud storage, delete the data partition, select the original system partition to the left of the newly freed space, and click Extend. Choose the total size of the extended partition in the Size box (the default is to use all available unallocated space) and click Apply. You can now continue with Setup.
Alert observers will no doubt notice that one option is missing from that list. Unfortunately, Setup does not allow you to shrink an existing disk partition to create unallocated space on which to install a fresh copy of Windows 10. The option to shrink a volume is available from the Disk Management console after Windows 10 is installed, but if you want to accomplish this task before running Setup, you need to use third-party diskmanagement tools.
After you click Next, the installation process switches into a lengthy unattended phase in which it partitions and formats the disk (if necessary), copies the clean Windows 10 image to the system partition, installs device drivers, and starts default services. When those operations are complete, you arrive at a series of screens where you select the default region and keyboard layout.
If you do a clean install of Windows 10 Pro using bootable media, you’re faced with one additional choice immediately after Setup completes these initial installation tasks. The dialog box shown in Figure 2-8 asks you to choose whether you want to set up the device for personal use or as part of an organization. For an installation of Windows 10 Enterprise or Education, the dialog box asks whether you want to join Azure AD or join a domain. (This portion of Setup has undergone numerous changes since the initial release of Windows 10, all in the interest of reducing confusion when setting up a work PC.)
Figure 2-8 This option is available only when you do a clean install of Windows 10 Pro.
If you own the device, or if it is a company PC that will be joined to a Windows domain, choose Set Up For Personal Use and click Next to continue.
If the PC will be managed by your organization using something other than a Windows domain on a local network, choose the second option (Set Up For An Organization). Clicking Next leads you through a series of dialog boxes you use to set up a device for access to online services (from Microsoft and others). The credentials are managed in Azure Active Directory and can be linked to services such as a Microsoft 365 account at a workplace or university.
Performing an edition upgrade
To gain access to features that aren’t available in your edition of Windows, you need to upgrade to a different edition. This scenario is especially common when you purchase a retail PC configured with Windows 10 Home and want to take advantage of features in Windows 10 Pro, but the same technique allows you to upgrade from any edition to any higher edition, including Enterprise and Education editions.
The fastest upgrade path is to enter a product key for the new edition. Open Settings > Update & Security > Activation and look at the two options under the Upgrade Your Edition Of Windows section, as shown here:
Click Go To The Store and follow the prompts to purchase an upgrade. Or, if you already have a valid product key and associated license for the upgrade, click Change Product Key and enter that 25-character key. In either case, completing the upgrade requires a restart (or two) and typically requires only a few minutes.
ACTIVATING WINDOWS
For more than 15 years, desktop versions of Windows have included a set of anti-piracy and anti-tampering features. In the past, Microsoft has used different names for these capabilities: Windows Activation Technologies and Windows Genuine Advantage, for example. In Windows 10, these features are collectively referred to as the Software Protection Platform.
The various checks and challenges in Windows 10, in essence, are enforcement mechanisms for the Windows 10 license agreement, which is displayed during the process of installing or deploying the operating system. (You must provide your consent to complete setup.) We’re not lawyers, so we won’t attempt to interpret the terms of this legal document. We do recommend you read the license agreement, which is written in relatively plain language compared to many such documents we’ve read through the years.
In this section, we explain how the activation and validation mechanisms in Windows 10 affect your use of the operating system.
Product activation happens shortly after you sign in on a PC running a freshly installed copy of Windows 10. Typically, this involves a brief communication between your PC and Microsoft’s licensing servers. If everything checks out, your copy of Windows is activated silently, and you never have to deal with product keys or activation prompts.
The activation process is completely anonymous and does not require that you divulge any personal information. If you choose to register your copy of Windows 10, this is a separate (and optional) task.
After you successfully activate your copy of Windows 10, your hardware is still subject to periodic antipiracy checks from Microsoft. This process verifies that your copy of Windows has not been tampered with to bypass activation. It also allows Microsoft to revoke the activation for a computer when it determines after the fact that the original activation was the result of product tampering or that a product key was stolen or used in violation of a volume licensing agreement.
The activation mechanism is designed to enforce license restrictions by preventing the most common form of software piracy: casual copying. Typically, a Windows 10 license entitles you to install the operating system software on a single computer. If you’re trying to activate Windows 10 using a product key that has previously been activated on a second (or third or fourth) device, you might be unable to activate the software automatically.
Windows licensing options
Every copy of Windows is licensed, not sold. Windows 10 supports multiple license types, some of which are new.
- Full A full license is sold directly to retail customers as an electronic distribution or a packaged product. With a full license, Windows can be installed on a computer that was not sold with Windows originally, or it can be used as an upgrade. (Microsoft no longer sells upgrade-only licenses for Windows.) You need a full license to install Windows in a virtual machine, on a Mac or other computer that does not come with Windows preinstalled, or in a dual-boot or multi-boot setup. A full license can be transferred to a different computer; the underlying copy of Windows on the original PC must be removed for the transferred license to be valid.
- OEM An OEM (original equipment manufacturer) license is one that’s included with a new computer. This license is locked to the computer on which it’s installed and cannot be transferred to a new computer. OEM System Builder packages are intended for use by small PC makers but are often used by consumers and hobbyists in place of a more expensive full license. The system builder is required to provide support for OEM Windows along with the device on which it is installed.
- Volume Volume licenses are sold in bulk to corporate, government, nonprofit, and educational customers and are typically deployed by using enterprise-management tools. A volume license for Windows is available as an upgrade only.
- Cloud If you purchased an upgrade to Windows 10 Enterprise using a subscription option (E3 or E5), your license is associated with your Azure Active Directory account. You can activate that edition of Windows on up to five PCs by signing in with those credentials.
- Digital license PCs that have been upgraded from Windows 7 or Windows 8.1, during or after the free upgrade offer, receive a digital license that is associated with the upgraded hardware on Microsoft’s activation servers. The details of a digital license can be linked to a Microsoft account, as we describe later in this section.
Do you need a product key?
The 25-character alphanumeric product key is certainly not dead, although you’re increasingly less likely to need such a key to work with Windows 10. On most PCs built by large OEMs and sold through retail channels, Windows can retrieve the embedded license information from the computer’s firmware and activate automatically.
Smaller OEMs (in Microsoft’s parlance, these are called System Builders) purchase individual copies of Windows that require a product key for activation. The System Builder is required under the terms of the OEM license to include that key as part of the Windows installation and to provide an official copy of that key to the purchaser of the PC.
If you’re building your own PC or installing Windows 10 in a new virtual machine, you still need a product key rom a retail copy of Windows 10 or an OEM System Builder package. You also need a product key to upgrade a PC that does not already have a valid Windows 10 license.
If you skip the opportunity to enter a product key during a clean install, or if the key you enter fails activation (perhaps because it has been used on another PC), you can go to Settings > Update & Security > Activation and click the Change Product Key button. Enter a valid product key for the currently installed Windows edition using the dialog box shown in Figure 2-9.
Figure 2-9 When you enter the 25-character alphanumeric product key, Windows automatically checks it and prompts you to complete activation.
Here are some important facts you should know about product keys:
- A custom product key is stored in firmware on any copy of Windows that is preinstalled on a new PC by a large computer maker. This configuration is called System Locked Preinstallation (SLP). Using this configuration, you can reinstall the same edition of Windows and reactivate without having to enter a product key.
- Your product key matches your edition of Windows. When you enter a product key as part of a custom install of Windows, the key identifies the edition to be installed. If you purchase a boxed copy of Windows 10 from a retail outlet, the installation media (a DVD or a USB flash drive) contains a configuration file that automatically installs the edition that matches the product key included with that package.
- Some Windows 10 PCs don’t require a product key. If you upgraded a properly activated copy of Windows 7 or Windows 8.1, you don’t need to enter a product key. A record of the edition that device is licensed to use, Home or Pro, is stored with the device’s hardware ID on Microsoft’s activation servers. That digital license can be associated with your Microsoft account for later use. Digital licenses are also associated with upgrades and full licenses of Windows 10 purchased from the Microsoft Store.
- Product keys are not tied to a specific architecture. The product key matches a specific Windows 10 edition and will activate a 32-bit or 64-bit copy of that Windows 10 edition on your hardware (assuming the hardware is compatible with the architecture you choose, of course).
- You are not required to enter a product key when performing a clean install of Windows 10. You’re prompted to enter a valid product key when you perform a clean installation of Windows 10, as shown in Figure 2-10. If you are reinstalling Windows 10 on a PC that has previously been activated and has a digital license, click I Don’t Have A Product Key, just to the left of the Next button.

Figure 2-10 Setup automatically installs the Windows edition that matches the 25-character alphanumeric product key you enter here and attempts to activate using that key after Setup is complete.
Clicking I Don’t Have A Product Key allows Setup to proceed but might require that you select a specific Windows edition to install. Be sure to choose the edition that matches your license.
Managing digital licenses
In the first year after the initial release of Windows 10, Microsoft made upgrades from Windows 7 and Windows 8.1 free; as we noted earlier in this chapter, the free upgrade offer was extended until December 31, 2017, for any PCs that use assistive technology. As part of these campaigns, Microsoft also added a new license type. On PCs upgraded using that free offer, the Windows activation server generated a Windows 10 license certificate (Microsoft initially called it a digital entitlement but later changed the nomenclature to digital license) for the corresponding edition (Home or Pro). That digital license is stored in conjunction with your unique installation ID on Microsoft’s activation servers. (You can read more details about this and other license types at https://support.microsoft.com/help/12440/windows10-activation.)
The unique installation ID is essentially a fingerprint of your PC, based on a cryptographic hash derived from your hardware. That hash, reportedly, is not reversible and not tied to any other Microsoft services. So, although it defines your device, it doesn’t identify you. But it does make it possible to store activation status for that device online.
Once that online activation status is recorded, you can wipe your drive clean, boot from Windows 10 installation media, and install a clean copy (skipping right past the prompts for a product key); at the end of the process, you’ll have a properly activated copy of Windows 10.
At any time, you can check the activation status of your device by going to Settings > Update & Security > Activation, as shown in Figure 2-11.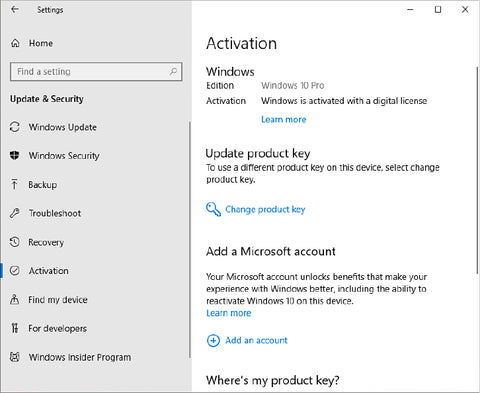
Figure 2-11 Most Windows 10 PCs will be automatically activated, with the successful activation status shown in this dialog box.
One detail worth noting in Figure 2-11 is the suggestion to add a Microsoft account. Doing so creates a record of the digital license that can be retrieved for troubleshooting purposes, as we discuss in the next section.
Troubleshooting activation problems
When you install Windows 10 on a new PC, it attempts to contact Microsoft’s licensing servers and activate automatically within three days. Under most circumstances, activation over the internet takes no more than a few seconds. If the process fails, you see several indications that there’s a problem. The first is a link at the bottom of every page in Settings: Windows Isn’t Activated. Activate Windows Now. If you open any option from the Personalization category in Settings, every option is grayed out and unavailable, with a message in red at the top: “You need to activate Windows before you can personalize your PC.” Below that is an Activate Windows Now link.
The most obvious reminder of all appears, naturally, if you click Settings > Update & Security > Activation. Figure 2-12 shows an example of this dire message.
Figure 2-12 In the event of an activation error, you can use options on this Settings page to use a troubleshooting tool, buy a new license from the Microsoft Store, or enter a product key.
If you’re confident you have a legitimate Windows 10 license, click Troubleshoot to try to fix the problem. The activation troubleshooter can resolve some simple problems and is especially well suited for activation errors that result from hardware changes or from situations where you inadvertently installed the wrong Windows edition (Home instead of Pro, for example). In fact, if the troubleshooter is unable to resolve your issue, it offers an I Changed Hardware On This Device Recently option, as shown here: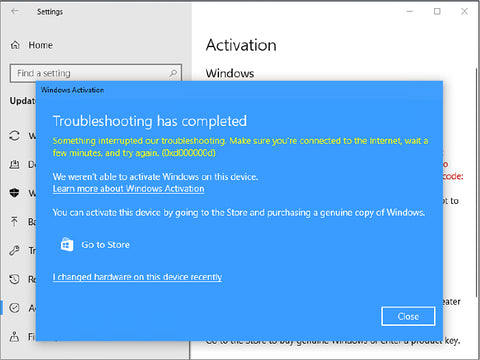
Why are hardware changes an issue?
You’re allowed to reinstall and reactivate Windows 10 on the same hardware an unlimited number of times. During the activation process, Windows transmits a hashed file that serves as a “fingerprint” of key components in your system. When you reinstall the same edition of Windows 10 you activated previously, the activation server receives the current hardware fingerprint and compares that value against the one stored in its database. Because you’re reinstalling Windows 10 on hardware that is essentially the same, the fingerprints will match, and activation will be automatic.
Just as with earlier Windows versions, this activation process is designed to prevent attempts to tamper with the activation files or to “clone” an activated copy of Windows and install it on another computer. What happens if you upgrade the hardware in your computer?
When you activate your copy of Windows 10, a copy of the hardware fingerprint is stored on your hard disk and checked each time you start your computer. If you make substantial changes to your system hardware, you might be required to reactivate your copy of Windows.
You can upgrade almost all components in a system without requiring a new license. Replacing the motherboard on a PC is the most certain way to trigger the activation mechanism, because the activation server assumes you tried to install your copy of Windows on a second computer. If you replaced a defective or failed motherboard with one that is the same model or the manufacturer’s equivalent, you do not need to acquire a new operating system license, and you should be able to reactivate your copy of Windows.
To help with this scenario, the activation troubleshooter relies on a feature that was introduced with the Anniversary Update, version 1607: the capability to save a digital license for Windows 10 and link it to your Microsoft account. This step isn’t mandatory, but it’s handy if you make major changes to a system with a digital license and need to reactivate.
If the PC in question has a valid digital license that has been previously associated with a Microsoft account, you can run the activation troubleshooter to make the match that Microsoft’s activation servers can’t. Click the Troubleshoot link at the bottom of that Settings page to launch a tool that tries to find the activation record for the PC you’re using. If you’re not signed in with a Microsoft account, you need to do so, using the account you used previously to activate this PC.
Figure 2-13 shows the activation troubleshooter in action. After signing in with the Microsoft account to which the previous device activation was linked, you’ll see a list of linked devices. Select the name associated with the device you’re having troubles with and then click Activate.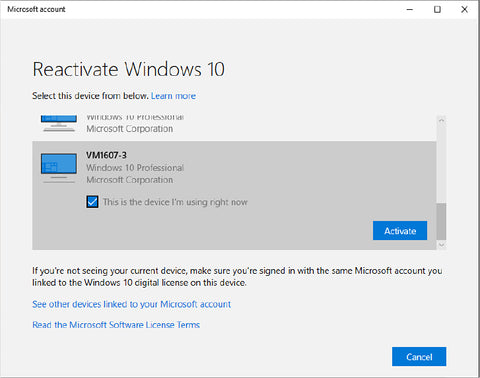
Figure 2-13 Using the activation troubleshooter, you can choose a digital license from a previously activated device to resolve issues that occur if you make significant hardware changes.
If all else fails, your only remaining option is to contact the telephone-based activation support center, explain the circumstances, and—assuming that the support representative accepts your claim—manually enter a new activation code. (If you upgrade your PC with a new motherboard, that is considered a new PC and might require a new license.)
The license agreement for a retail copy of Windows 10 allows you to transfer it to another computer, provided that you completely remove it from the computer on which it was previously installed. An OEM copy, by contrast, is tied to the computer on which it was originally installed. You can reinstall an OEM copy of Windows an unlimited number of times on the same computer. However, you are prohibited by the license agreement from transferring that copy of Windows to another computer after it has been assigned to a device.
Product activation and corporate licensing Businesses and educational institutions that purchase licenses through a Microsoft Volume Licensing (VL) program receive access to VL media and product keys that require activation under a different set of rules from those that apply to retail or OEM copies. Under the terms of a volume license agreement, each computer with a copy of Windows 10 must have a valid license and must be activated.
Beginning with the Anniversary Update to Windows 10, Microsoft also made it possible to upgrade to Windows 10 Enterprise from Windows 10 Pro by purchasing a Windows 10 Enterprise E3 or E5 subscription from a Microsoft partner who is part of the Cloud Service Provider program. Beginning with version 1903, this option extends to Windows 10 Education, the equivalent of Enterprise edition for educational institutions. For more details about subscription activation, visit the following page: https://docs.microsoft.com/windows/deployment/windows-10-enterprise-subscription-activation
Enterprise and Education editions of Windows 10 can be installed using Multiple Activation Keys, which allow activations on a specific number of devices within an organization, or they can use Key Management servers to activate computers within an organization. If you encounter activation issues with Windows 10 Pro or Enterprise in a VL deployment, contact the person in your organization who manages your VL agreement—the “Benefits Administrator,” as this person is called.
Managing Windows activation from the command prompt Windows 10 includes a command-line tool you can use to examine the licensing status of a PC, change its product key, and perform other activation-related tasks.
Although this feature is primarily intended for automating license administration activities, you can also run the Windows Software Licensing Management Tool interactively. Open a Command Prompt or Windows PowerShell window with administrative privileges, and then run the command slmgr.vbs. If it’s run without parameters, this command shows its full syntax in a series of dialog boxes.
One common use of this tool is to display the current licensing status for a device, using the syntax slmgr.vbs /dli. Figure 2-14, for example, shows the status of a device running Windows 10 Enterprise that has been properly activated with a Multiple Activation Key.
Figure 2-14 This output from the Windows Software Licensing Management Tool shows a system that is properly licensed. If you see an error code here, you need to do some troubleshooting.
For a much more detailed display of information, use the same command with a switch that produces verbose output: slmgr.vbs /dlv. Use slmgr.vbs /ipk <product_key> to enter the 25-character product key you provide following that switch. The /upk switch uninstalls the current product key, and the /cpky switch removes the product key from the registry to deter attempts to steal and reuse a key. To see all available switches, enter the slmgr.vbs command by itself.
CONFIGURING A MULTI-BOOT SYSTEM
If your computer already has any version of Windows installed and you have a second disk partition available (or enough unallocated space to create a second partition), you can install a clean copy of Windows 10 without disturbing your existing Windows installation. At boot time, you choose your Windows version from a startup menu, like the one shown in Figure 2-15.
Although this is typically called a dual-boot system, it’s more accurate to call it a multi-boot configuration, because you can install as many copies of Windows or other PC-compatible operating systems as your system resources allow.
Figure 2-15 This system is configured to allow a choice of operating systems at startup.
Having the capability to choose your operating system at startup is handy if you have a program or device that simply won’t work under Windows 10 but can’t easily be run in a virtual machine. When you need to use the legacy program or device, you can boot into your earlier Windows version without too much fuss. This capability is also useful for software developers and IT professionals who need to be able to test how programs work under different operating systems using physical (not virtual) hardware.
For experienced Windows users, installing a second copy of Windows 10 in its own partition can also be helpful as a way to maintain a completely clean environment, separate from confidential work data. It’s also useful when you need to experiment with a potentially problematic program or device driver without compromising a working system. After you finish setting up the second, clean version of Windows 10, you’ll see an additional entry on the startup menu that corresponds to your new installation. (The newly installed version is the default menu choice; it runs automatically if 30 seconds pass and you haven’t made a choice.) Experiment with the program or driver and see how well it works. If, after testing thoroughly, you’re satisfied that the program is safe to use, you can add it to the Windows 10 installation you use every day.
To add a separate installation of Windows 10 to a system on which an existing version of Windows is already installed, first make sure you have an available volume (or unformatted disk space) separate from the volume that contains the system files for your current Windows version.
The target volume can be a separate partition on the same physical disk as the current Windows installation, or it can be on a different hard disk. If your system contains a single disk with a single volume used as drive C, you cannot create a multi-boot system unless you add a new disk or use software tools to shrink the existing partition and create a new partition from the free space.
(The Disk Management console, Diskmgmt.msc, includes this capability on all supported versions of Windows; you can also use third-party software for this task. For details, see “Shrinking a volume” in Chapter 14.) The new partition does not need to be empty; if it contains system files for another Windows installation, they will be moved to Windows.old. Run Setup, choose the Custom (Advanced) option, and select the disk and partition you want to use for the new installation. The Setup program automatically handles details of adding the newly installed operating system to the Boot Configuration Data store.
And how do you edit and configure the Boot Configuration Data store? Surprisingly, the only official tool is a command-line utility called Bcdedit. Bcdedit isn’t an interactive program; instead, you perform tasks by appending switches and parameters to the Bcdedit command line. To display the complete syntax for this tool, open an elevated Command Prompt or PowerShell window (using the Run As Administrator option) and type the command bcdedit /?.
For everyday use, most Bcdedit options are esoteric, unnecessary—and risky. In fact, the only option that we remember using more than once in the past four years is the command to change the text for each entry in the boot menu. By default, the Setup program adds the generic entry “Windows 10” followed by a volume number for each installation. If you set up a dual-boot system using two copies of Windows 10 (one for everyday use, one for testing), you’ll find it hard to tell which is which because the menu text will be essentially the same for each. To make the menu more informative, follow these steps:
- Start your computer and choose either entry from the boot menu. After startup is complete, make a note of which installation is running.
- Right-click Start, or press Windows key+X, and choose Command Prompt (Admin) or Windows PowerShell (Admin) from the Quick Link menu. Click Yes in the User Account Control box to open an elevated Command Prompt or PowerShell window.
- Type the following command: bcdedit /set {current} description “Menu description goes here” (substituting your own description for the placeholder text and making sure to include the quotation marks). Press Enter.
- Restart your computer, and note that the menu description you just entered now appears on the menu. Select the other menu option.
- Repeat steps 2 and 3, again adding a menu description to replace the generic text and distinguish this installation from the other one.
A few startup options are available when you click or tap Change Defaults Or Choose Other Options at the bottom of the boot menu. Doing so leads to the Options menu shown here:
You can choose which installation is the default operating system (this is where descriptive menu choices come in handy) and change the timer that determines how long you want to display the list of operating systems. The default is 30 seconds; you can choose 5 seconds (allowing the default operating system to start automatically unless you quickly interrupt it) or 5 minutes, if you want to ensure you have a choice even if you’re distracted while the system is restarting. These options write data directly to the Boot Configuration Data store.
For slightly more control over the boot menu timer, use the System Configuration utility, Msconfig.exe. You can use the Boot tab to change the default operating system and set the Timeout interval in any amount between 3 and 999 seconds.
TWEAKING AND TUNING YOUR WINDOWS 10 INSTALLATION
When Windows Setup completes, you’re signed in and ready to begin using Windows 10. For upgrades and clean installs alike, we suggest following this simple checklist to confirm that basic functionality is enabled properly:
Check Windows Update. If you didn’t get the latest updates as part of the upgrade process, they should arrive automatically within the next 24 hours. Checking for updates manually lets you install them at your convenience and avoid a scheduled overnight restart.
Look for missing device drivers. Open Device Manager and look for any devices that have a yellow exclamation mark over the icon or any devices that are listed under the Other category. This is also a good time to install any custom drivers supplied by the device maker that might unlock additional features not available with the class drivers provided through Windows Update.
Adjust display settings. You’ll want to confirm that the display is set for its native resolution and that any additional tasks, such as color calibration, have been completed.
Check your network connection. If you skipped the option to connect to a network during a clean install, you can complete the task now. On a secure home or small business network, open the Network folder in File Explorer to switch from a public network to a private network and allow local file sharing. (You can also make this adjustment on the Network & Internet > Status page in Settings; click Properties to reveal the options.)
Verify security settings. If you use third-party security software, install it now and get the latest updates.
Change default programs. Use this opportunity to set your preferred browser, email client, music playback software, and so on.
Adjust power and sleep settings. The default settings are usually good enough, but they’re not always a perfect match for your preferences. Now is a good time to adjust when your device sleeps and whether it requires a password when it wakes.