


Security and Encryption Troubleshooting for windows 10 and windows 11

Security and Encryption Troubleshooting
Security and privacy are a strange thing these days. On the one hand, they’re absolutely paramount for the consumer, with social media, advertising, and other corporations wanting to know more and more about us to sell us appropriate advertising. On the other hand, much of that advertising is pretty well targeted, and some would argue that it’s so unbearably difficult to keep anything private anymore, especially as many of us put it out on social media willingly, that we’re on a hiding to nothing.
For business, it’s arguably even more important, not just because of huge fines that governments can issue over data breaches but also because of corporate espionage, entire governments wanting to steal sensitive documents and secret patents, and so on.
So why when Microsoft launched Windows 11 then with a renewed focus on privacy and security did it cause absolute uproar? Microsoft had decided that in order for a PC to be compatible with Windows 11, it must include a TPM 2.0 chip or an equivalent fTPM (I’ll come to what these are in a while). Many Windows 10 PCs both in home and business use don’t have one, either because the motherboard never came with one or where there is a socket, one hadn’t been fitted.
The upshot of this was that millions of perfectly good Windows 10 PCs, many of which might only be two or three years old when Windows 11 launched, wouldn’t be upgradeable and would, when all support ends for Windows 10 in 2025, be resigned to the scrap pile. Now, you might think I, as the author of The Green IT Guide (Apress, 2022), have strong thoughts about this. Indeed, I do and I personally petitioned Microsoft to extend support for Windows 10 so as to avoid making the world’s growing ewaste pile larger than it needed to be; you can read more about this at https://pcs.tv/3Oo7KZD. At the time of writing, nothing has happened yet, and I really can only hope they see sense.
As a personal preference, I have for years now always ensured that any new PC I buy, be it a desktop (which is definitely my preferred way of working) or a laptop, comes with a fitted TPM chip. I always use this to fully encrypt the PC using Microsoft’s Bitlocker full disk encryption, but this is slightly more complex than it used to be. Let me explain.
TPM vs. fTPM
Let’s start with what a TPM (Trusted Platform Module) really is. TPMs are chips that are a hardware encrypted microcontroller that securely stores cryptographic keys that are used to decrypt previously encrypted data. It’s used for everything from Windows’ Bitlocker full disk encryption to the storage of personal biometric data for Windows Hello and even for the storage of software licenses and to help prevent cheating in some games.
Note:TPMs need to be activated in the UEFI firmware in order for Bitlocker and Windows Hello to work on the PC. In Chapter 15, I detailed how you can find these and activate them.
TPM was adopted as an international standard in 2009, and the more secure 2.0 standard was announced in 2014, so it’s been around for a few years already though not everybody adopted it.
You will find that most PCs don’t come with a TPM chip as standard. Some businessoriented PCs will come with one, many more will come with a TPM chip as an option, and many more motherboards, especially higher-end boards for enthusiasts and gamers, will come with a slot into which you can insert a TPM module, which is how I’ve always done it on my desktop PCs.
fTPM is now the much more common standard, but you might not want to use it; allow me to explain. Firmware TPM is a TPM chip that’s emulated by the UEFI firmware on a PC’s motherboard. Because UEFI firmware already comes with its own encryption and security, it’s a more cost-effective way for PC builders to make PCs that are secure and compatible with Windows 11.
There are problems with an fTPM however; chief among them is that if you need to upgrade or reset the UEFI firmware at any time, you will completely wipe all the data stored in the fTPM. This is unlike a separate TPM chip or module where the data is stored completely independently of the motherboard’s firmware.
Malware attacks on PCs have become nastier in recent years, something we’ll look at in detail in Chapter 18, and so it’s important for UEFI firmware to be kept up to date where possible and appropriate, so that it remains secure. The choice of a full TPM chip or module then vs. an fTPM can be a tricky one.
Encryption Is Not Enforced in Windows 11
You might think then, given that TPMs and fTPMs are enforced as part of the Windows 11 minimum specification, that encryption of a PC is also enforced and that all PCs will be fully encrypted and safe from data theft. Sadly, you’d be wrong. While some PCs will come with the disks encrypted by default, most won’t so it’s something you’ll need to do yourself, but don’t worry we’re going to cover all of that.
The requirement for a TPM (which I shall now use as an umbrella term) is so that PCs can be fully encrypted if the owner chooses to do so, and so that Microsoft’s biometric sign-in feature, Windows Hello, can be used on the machine, and again only if it comes with or optionally has compatible hardware such as an infrared webcam, fingerprint reader, or smart card reader, none of which are mandated by the minimum Windows 11 specification.
You can see then that the encryption, TPM, and other security requirements for Windows 11 can be confusing and are not often applied equally or even applied at all.
Windows 11 Home
Things get more complicated with Windows 11 Home. Throughout this book, I have detailed how you can support and troubleshoot problems for the new breed of home and hybrid workers that are using their own computers, some of which are shared with their family and housemates. That’s okay, you say, we can encrypt their PCs with Bitlocker and all will be safe. Sadly, if they’re using the Home edition of Windows 11 or Windows 10, Bitlocker isn’t supported.
Some, and I must stress this, some PCs will support a feature called Device encryption which is essentially Bitlocker but managed through a simple switch in Settings and then Privacy & security (see Figure 17-1), but there’s no guarantee that a PC will support the feature as not all of them do.
Figure 17-1. Many, but not all, Windows 11 Home PCs support Device Encryption
The Complexities of Secure PCs
We end in a situation where the simplicity of purchasing and supporting PCs isn’t as simple as it was just a few short years ago. Back in 2015 when Windows 10 launched, or even earlier as Bitlocker first appeared in Windows Vista, you knew that if a PC had a TPM, it would be a chip in hardware and that no Windows Home PCs would support encryption at all, as the Device Encryption feature didn’t exist back then. Now it’s not a safe assumption that a new PC running Windows 11, or a Windows 10 that’s upgradeable to Windows 11, will have the TPM and encryption security you need.
The upshot is that you have to ask a few more questions than before and also try and audit what PCs and hardware your home and hybrid workers are using, so as to maintain the best and most appropriate security for your organization.
Rather than supporting, maintaining, and troubleshooting PCs becoming easier and more straightforward over time, encryption is one area where it’s managed to become more complex.
Using Bitlocker on a PC
I have already detailed how to activate Bitlocker on Windows 11 Home. Open Settings and then navigate to Privacy & security and look for a Device encryption option (see Figure 17-2). If you don’t see it, it’s not supported on the PC. This is a simple on/off switch, and there’s no management for it other than that in the Settings interface.
Figure 17-2. Encryption in Windows 11 Home is found in Settings
In the Pro, Enterprise, and Education editions of Windows 11, Bitlocker is still, as of the time of writing this, managed from the Control Panel. We can expect it to move to Windows Tools in the future, but there is also a chance it will also appear in Settings as Microsoft takes security more and more seriously.
Note:Only disks formatted using Microsoft’s NTFS partition format or their relational file system ReFS can be encrypted with Bitlocker.
Open Bitlocker Drive Encryption from the Control Panel, and you will see all of the drives on your PC listed with their encryption status (see Figure 17-3). Encrypting a drive is a simple matter of clicking the Turn on Bitlocker link and following the wizard that first checks to see if the drive is compatible (if you have a TPM, almost none aren’t).
Figure 17-3. Click Turn Bitlocker on to encrypt a drive
Note:You cannot encrypt any additional disks or partitions in the PC until the Windows disk (C:) has first been encrypted. External (USB) disks can be encrypted at any time.
You will be asked where you want your Bitlocker recovery key to be stored. This is a 50-character decryption key that you definitely want to keep a copy of. The reason is that if you need to enter it later, perhaps because of a problem with the PC or the fTPM being reset and you don’t have it, you can forget ever getting access to your files and data again. You can store your encryption key in one of several different places:
- Your Microsoft Account (more on this shortly)
- On a printout (I don’t recommend this one for fairly obvious reasons of loss and other people being able to access it)
- On a USB Flash Drive (again, I don’t recommend this as the file could all too easily be deleted)
- In an Azure Active Directory Account if you are using a managed PC in a domain environment
Accessing Your Encryption Key(s) Online
If you choose to back up your encryption key to your Microsoft Account or to an Azure AD account, you need to be able to access them later. Fortunately, this is straightforward. For a Microsoft Account, save the web link https://account.microsoft.com/devices/recoverykey into your browser (see Figure 17-4). Note that if you have two-factor (multifactor) authentication set up on your Microsoft Account, which you definitely should have, then you will need to get through that too before you can access the code.
Figure 17-4. You can access Bitlocker recovery keys from a Microsoft Account via a web browser
If you are in a managed environment, the Bitlocker encryption keys for PCs, where people are signed in using a Microsoft 365 or Azure AD account, are stored in Endpoint Manager. Open Endpoint Security and stored keys are available in the Disk encryption section (see Figure 17-5).
Figure 17-5. You can find Azure AD Bitlocker keys in Endpoint Manager
TPM Administration
Sometimes, especially if Bitlocker has been used on the PC previously, you will need to perform administration tasks on the TPM. In the bottom-left corner of the Bitlocker panel is a TPM Administration link. Click this and a management console window will open (see Figure 17-6). There’s not really much to do with a TPM other than clear it. If the TPM has never been used before however, you might need to click the Prepare TPM link to get it ready for its first use.
Figure 17-6. You can administer the TPM from the Windows desktop
Caution:Clearing a TPM will delete any Bitlocker keys stored and also any saved biometric data for Windows Hello.
Managing Encrypted Disks
I have already mentioned that if you have more than one disk or partition in your PC, such as a D: or E: drive, they cannot be encrypted until after the Windows disk, the C: drive, has first been encrypted. Once disks are encrypted though, there are further options available to you that will appear in the Bitlocker panel (see Figure 17-7).
Figure 17-7. Various options are available for encrypted disks
The options available to you for encrypted drives are as follows:
- Suspend protection, which will temporarily prevent new files written to the disk from being encrypted. They will be encrypted later when protection is reinstated. This is most useful on lower-power machines with slower disks and for when you have intensive work going on that doesn’t need to be interrupted.
- Back up your recovery key will allow you to create a copy of your recovery key to one of the locations I detailed earlier.
- Turn off Bitlocker will deactivate encryption and decrypt the drive. You will need to do this for an fTPM before upgrading or resetting the UEFI firmware.
- Add password will allow you to add a separate password that must be typed in to access the disk.
- Add smart card will only allow access to the drive when an appropriate smart card is used with the PC.
- Turn on/off auto-unlock will automatically unlock drives other than the Windows disk when an authenticated user signs in to the PC.
Using Bitlocker To Go
Bitlocker To Go is full disk encryption for removable storage such as USB hard disks and flash drives, and it’s every bit as effective as Bitlocker for disks inside a PC, though works in a slightly different way. From the main Bitlocker panel, when a removable drive is plugged in, it will appear as a drive that can be encrypted (see Figure 17-8).
Figure 17-8. Removal storage can be encrypted with Bitlocker To Go
Note:Only removable storage formatted using Microsoft’s NTFS partition format can be encrypted with Bitlocker and Bitlocker To Go.
The difference with drives inside the PC comes when you go to encrypt the drive, and you are asked how you want to unlock it (see Figure 17-9). There are two choices available, using a smart card or using a password.
Figure 17-9. You can unlock Bitlocker To Go drives in two ways
Beyond that, there’s not much to say about using and managing Bitlocker To Go, and in these days of fully secure and encrypted cloud storage and ubiquitous Internet access, it’s not really needed, except for specialist cases such as the transport of sensitive government secrets by black-ops agents across borders in USB Flash Drives disguised as a ballpoint pen (you watch too many Mission Impossible movies; Ed).
Encrypting File System
Speaking of things that are completely obsolete but still around in Windows, the Encrypting File System (EFS) is high up on the list. First introduced with Windows NT 3.0, it’s a system for encrypting individual files and folders on a PC, but it doesn’t come without its problems, and I really can’t recommend that anybody use it when Bitlocker is such a better solution.
EFS differs from Bitlocker in that, because it’s not the disk that’s encrypted, any files and folders that you encrypt will remain encrypted when copied off the disk. This is fine for general usage, but you can hit problems if those files are copied onto a file system that doesn’t support EFS. If this happens, as did once with some of my own files that I copied to a Network Attached Storage (NAS) drive, you might find the files become unusable, which is just another reason not to use EFS in my own view.
This is a troubleshooting book however, and it’s possible you will come across a situation where EFS is being used. It’s found by right-clicking a file or folder and selecting the Properties for the item. Under the General tab in the properties dialog, click the Advanced attributes button, and you will see an option to Encrypt [the] contents to secure data (see Figure 17-10).
Figure 17-10. You encrypt files and folders from File Explorer
With the encryption done, you will be prompted to Back up your encryption key (see Figure 17-11), which is essential as otherwise you could lose access to those files forever. The file or folder will then have a padlock icon appear in its top-right corner.
Figure 17-11. You should always back up your encryption key
You can back up your encryption certificates at any time however by searching in the Start Menu for encrypt and launching Manage file encryption certificates when it appears in the search results. This will launch a wizard that will suggest the certificate to back up, and you can view its details to be sure it is the correct one (see Figure 17-12).
Figure 17-12. You can back up your certificate(s) at any time
You will be asked for a save location for the certificate backup and for a password that will be required to unlock it (see Figure 17-13). Under no circumstances should you save this certificate to a folder that is already encrypted with EFS.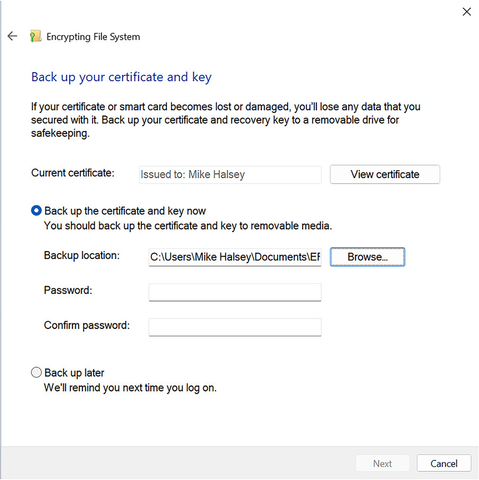
Figure 17-13. You can set a password to open the certificate
If you later need to reimport the certificate, perhaps because you have given a copy of the encrypted file(s) to another person, you can do so by double-clicking the certificate file to open it (see Figure 17-14).
Figure 17-14. You can reimport certificates by double-clicking them
Cipher.exe
EFS can also be managed with the Command Line tool cipher.exe.
Caution:When you encrypt a file using EFS, Windows first makes a backup copy of the file that is deleted when the file is encrypted. This file might still be recoverable later, and so the /w switch is useful for securely wiping free space on the PC. Note however that it does not work for files less than 1KB in size.
EFSDump
There is also a tool with Microsoft’s Sysinternals suite that can be used to help you manage EFS encrypted files. EFSDump can be used to audit which users on a PC have access to encrypted files. It’s a simple Command Line tool that is used in the format EFSDump [-s] [-q] <File or Folder> where -s will recurse subdirectories, and -q will suppress errors. If you use it in the format EFSDump -s -q C:\*.*, it will detail the users that are authorized to access encrypted files on the C: drive of the PC (see Figure 17-15).
Figure 17-15. EFSDump can report which users have access to encrypted files
Windows Advanced Firewall
If like me you’re old enough to remember the release of Windows XP Service Pack 2, then you’ll know just how big a deal it was that Microsoft finally included a firewall with Windows. Before then, and for some time afterward, people including myself had to use a third-party firewall (ZoneAlarm was my personal choice).
These days, if you buy one of the big antivirus and security suites, they’ll commonly not ship with a firewall at all. The reason for this is that for many years now the firewall that ships with Windows is really very good indeed.
The Windows Firewall comes with two personalities, the basic and advanced versions. You can find the basic firewall in Windows Security, and I detailed how to use it in Chapter 3 so won’t repeat any of that here.
In Windows Tools however, you will find Windows Defender Firewall with Advanced Security, which we can probably expect to be renamed at some point in the future. It’s here you can get advanced control over the firewall, such as creating and modifying rules, opening and closing specific ports, and importing and exporting new and existing firewall policies (see Figure 17-16).
Figure 17-16. The Advanced Firewall in Windows 11 is very configurable
You create inbound and outbound rules separately, and a wizard guides you through the process of creating a rule for a specific program on the PC (see Figure 17-17), for a specific port or series of ports, from a predefined list that Windows and server features such as Hyper-V, file sharing, BranchCache, and Remote Desktop, or create a fully custom rule which additionally allows you to create rules for specific installed services.
Figure 17-17. A wizard guides you through the process of creating firewall rules
Where you will most likely want to use the Advanced Firewall is for managing the security of your workplace connections, especially for workers dialing into your network from around the world. In the left panel, click Connection Security Rules, and a New Rule… link will then appear in the right side panel.
You can create rules that cover all manner of different security requirements and protocols (see Figure 17-18), authentication, tunnelling, and IP addressing (useful for that spy from earlier in the chapter if they had their secret ballpoint pen/USB Flash Drive stolen, eh?; Ed).
Figure 17-18. All manner of connection security rules can be created
Lastly, if you suspect there could be problems with the firewall configuration or operation, clicking Monitoring in the left panel will display current details about the firewall including which of the three profiles (Domain, Private, or Public) is currently in use and whether rules are being implemented (see Figure 17-19).
Figure 17-19. You can check the current status of the firewall
Tip:If you suspect firewall policies on the PC have become corrupt, click Windows Defender with Advanced Firewall in the left panel, then from the Action menu click Restore Default Policy. This will reset all firewall policies to the state they were in when Windows 11 was installed.
Local Security Policy
I’ve talked in Chapter 3 how you can use Group Policy to create a secure and robust PC system, though these days many people prefer Mobile Device Management (MDM). In Windows Tools, there is a subset of policies under the heading Local Security Policy. This is where you will find not just Group Policy settings related directly to security, such as password policies, but also quick links to other security features within Windows 11 (see Figure 17-20).
Figure 17-20. Security policies are accessible from within Windows Tools
Summary
Security is clearly hugely important for our PCs, for data privacy, compliance (both corporate and governmental), and for your own peace of mind, especially when it comes to maintaining robust and reliable systems.
We’re about to get a crash course though in just how bad things can get in the next chapter when we talk about what can happen with malware and virus infections and how you can both protect a PC from and even manually remove everything from trojans to ransomware.