


Virus and Malware Troubleshooting for windows 10 and windows 11

Virus and Malware Troubleshooting
Long gone are the days when getting a virus on your PC was annoying. As the world has become more connected, and as we’re doing more financial and official activities on our PCs, smartphones, and tablets, the risk has increased greatly. When we then factor in home and hybrid workers, and people using their own home PCs for workplace purposes, connecting to cloud services in which sensitive customer data is stored… you take my point.
All of this means that protecting a PC from malware and ransomware is no longer a process of treating it as a stand-alone device, but rather as part of a larger ecosystem of different device types, virtual and physical storage, varying operating systems and how all of this interoperates.
How We Got to Today
It seems appropriate then that we should start with some best practice advice, focused on the world in which we find ourselves today, but in order to understand that, it’s important to know where we came from.
When Windows 10 launched in 2015, we hadn’t seen the explosion in big data that we have today, although it was slowly underway. The gig economy was just getting started with the launch of apps such as Uber; people were beginning to notice privacy more for their technology, but perhaps one of the biggest technology stories came from Canadian dating website Ashley Madison, where hackers exposed the personal details of 33 million customers.
This event was a wake-up call for the industry and for consumers, and where Windows 10 included some basic privacy controls when it launched (see Figure 18-1), these were not really to be found in web browsers because end users and consumers weren’t at the time demanding them.
Figure 18-1. Privacy controls in Windows 10 in 2015 were basic
Privacy in Windows 10 when it launched was also fairly basic, with few controls and simple on/off switches to manage protections (see Figure 18-2). In October 2015 though, UK ISP TalkTalk suffered a cyber attack that resulted in the theft of 157,000 customers’ personal details, including more than 15,600 bank account numbers.
The hackers, teenagers from Staffordshire UK that were hacking for fun, were caught and jailed, with the lead hacker serving four years before starting a no doubt prosperous career in cyber-security.
Figure 18-2. Malware protection was fairly basic in Windows 10 in 2015
Things have changed significantly in the intervening times sparked in no small part by the WannaCry ransomware that in 2017 infected more than 230,000 computers in over 150 countries, including bringing Britain’s National Health Service (NHS) to a standstill. As I write this, another ransomware attack on the NHS just ten days ago is being investigated as it is suspected patient data had been stolen.
Clearly, the threat of malware, ransomware, and hacking is greater than ever, and companies, organizations, governments, and individuals can no longer leave smartphones, computers, and servers unpatched (who remembers web servers running older and unpatched versions of Apache?).
I visited the Microsoft Cybercrime Center at the company’s Redmond campus in early 2019 (see Figure 18-3). The place genuinely looks like a set from a CIA spy movie with people sat at banks of PCs, facing huge video screens with live telemetry data on them. I’d love to have been able to show you a photo of it, but we weren’t permitted to take any.
Figure 18-3. The Microsoft Cybercrime Center is fascinating
In the summer of 2022, I was again at Microsoft, and we received a briefing about the war in Ukraine, detailing the sharp and intense increase in cyber attacks against the country in the two weeks before the invasion by Russia in February of that year.
We were told how Microsoft had been working with partners such as Amazon, Google, the National Security Agency (NSA), Britain’s GCHQ security and intelligence center, Ukraine’s security and intelligence agencies, and others to thwart the attacks and keep the infrastructure and financial systems of the country operating.
Best Practice for Maintaining Security
So what are my top tips for maintaining good security for your data, your PCs, and your IT ecosystem? Things have clearly moved on, and we’re not looking at standalone machines sitting in an office any more. This comes with repercussions and potential consequences, not the least of which are hefty fines for the loss of data held by companies that are hacked.
Times have changed so much that when I would have previously listed “Keep your antivirus software and operating system patched and up to date,” this no longer appears in the list. Compared to best practice advice these days, it’s pretty dumb and obvious.
It’s Okay to Be Paranoid Because They Really Are Out to Get You
We used to think of people being paranoid as them overreacting to the circumstances they found themselves in. These days, however, things are very different. Every business, every organization, every government, and every individual is a target because all of them can provide hackers and criminals with data, money, and access to other systems.
Taking a paranoid approach to security is not something I would advise against any more as if it helps you maintain proper security, and high levels of protection for your systems, and data, then it’ll likely be worth the sleepless nights.
Treat Every System As Being Interconnected with Insecure Systems
As part of the it’s okay to be paranoid approach, it’s also wise to treat every system as though it can and does connect to other computers and systems that aren’t properly secure. This could be a USB Flash Drive the kids brought home from school, or it could be a web service where a vulnerability exists that has not been patched.
This is especially important for home and hybrid workers as their own computers are something you will have little or no control over. Sure, you can use Mobile Device Management (MDM) to enforce strict encryption, updating, and malware protection policies before a computer is allowed to access your network and data, but beyond that, security can be difficult to control.
Encrypt Every Connection
This brings me on to network- and Internet-level encryption. In Chapter 17, I detailed how you can use the Advanced Firewall in Windows 11 to enforce encryption for network and Internet connections. Mandating encryption is crucial for several reasons.
Firstly, there is the mobile worker who likes to sit in their local coffee shop with their laptop or who is travelling on a train or through an airport. Even if the Wi-Fi connection they connect to has password access, this does not mean the laptop can’t be seen by other computers connected to that network.
Tip:If you have the budget for it, a mobile worker able to connect their laptop directly to a cellular network with a built-in SIM or eSIM will be more secure than one connecting to public Wi-Fi.
Then there’s the sticky subject of home broadband and fiber routers. If you search online for a list of home routers known to have unpatched security vulnerabilities, then you’ll get a very unpleasant shock. Sure, in almost every case, a hacker has to be sitting directly outside the property to gain access, but if the data your employee is working on is important enough, that’s exactly what they’ll be prepared to do.
Sandbox Vulnerable Systems
Hands up everybody that is or that knows somebody using an older version of Windows on a PC, or an older smartphone with an Android or iOS version that’s out of support, or that has allowed their smart fridge or living room television to connect to their Wi-Fi network. Yup, that’s pretty much everybody.
Sandboxing is no longer about disconnecting a Windows XP or a Windows 7 PC from your network if you have to keep using it. These days, it’s more about keeping Internet of Things (IoT) devices in your home on a completely separate Wi-Fi network to the computers you store files and data on and use for banking and work.
If you think the problem with routers is bad, don’t search online for IoT devices. The worst part with these devices is that if they do get updated, it always happens quietly in the background, and we have little or no knowledge that it’s even happening, let alone what the current security state of the device might be.
Install a Security Appliance
Security appliances are no longer just for companies with complex networks. A small box for the home can sometimes be picked up for under $100, and you can make your own with a Raspberry Pi and open source software for next to nothing.
I use the Netgate 1100 from www.pfsense.org/products which is less than $200 and can comfortably protect all the devices in my home and office with its combination of fire-and-forget web filtering, firewall, ad blocking, and traffic monitoring.
This appliance was personally recommended to me by a man who until a few years ago was the Technical Director for Cyber at GCHQ in Cheltenham (UK). In his own words, “For 15 years I was the guy keeping the UK safe from state-initiated cyber threats,” so I was inclined to take his advice seriously.
Consider the Implications of Smart Technology
I’ve already mentioned IoT devices in this list. In my own home and gîte, I have two ovens, two cooker hobs, a fridge freezer, and two washing machines that all want to connect to the Internet, and I will not allow any of them to do so.
A friend told me, “You can turn the washing machine on from an app on your phone,” but I pointed out to him that if I wanted to turn the washing machine on, I would very likely have just loaded it, and where would I be standing at that time? There are also many other types of smart home tech that I will simply never use.
Smart door locks are one; I’ll never forget the story of the burglar that called through an open window of a home, “Alexa, open the front door,” which it dutifully did.
Smart and Internet-connected heating, air conditioning, or other crucial systems are also something I will never allow. If you haven’t heard the stories of hackers turning everything off or up to a maximum and then demanding money to release control, then have a search online.
Even something as innocuous as smart lighting is a no-no for me. It might be fun to be able to change the color of the lights in a room for movie night, but when it comes to basic control, I have never found walking two or three steps to a light switch on the wall to be especially difficult.
Create Security Policies That Make Sense to Normal People
People are getting much wiser to the need for data security and privacy controls, but 98% of the population still wouldn’t be able to understand the technical language involved or know how to implement these controls in their own lives.
You will set security and encryption policies that will be good for your organization, but making these policies relatable to people’s own personal lives will not only help you as it’ll hopefully make their own devices and computers more secure, but it’ll help them in the process, and a happy employee is always a much more cooperative employee. The main policy areas I would suggest and how they’re sold to employees and stakeholders in your organization include the following.
Use Two-Factor (Multifactor) Authentication
Explaining the importance of two-factor authentication (TFA) to people is the beginning of really tight security. Explaining that they can do this for their own accounts can help protect their email and social media from hackers, but helping them do so will make the process much simpler.
I have my own guide online at https://pcs.tv/3IBc6tJ for how TFA can be configured for Microsoft, Google, Amazon, and other services. Once people start using TFA, it’s common for them to want to apply it everywhere, and they’ll insist you enforce it for the workplace too.
Enforce Encryption Wherever Possible
In Chapter 17, I talked at length about encryption technologies such as Bitlocker and how they are used. Now there are caveats as not every PC is compatible. Multiboot systems as I detailed have problems with Bitlocker encryption, and not all Windows 11 Home laptops and tablets will support it.
Where encryption is available though, it should always be used. People can extend this to their own smartphones and home computers such as laptops that all run the risk of being lost or stolen, and helping people to ensure their personal devices can be and are encrypted will give people greater peace of mind.
Use Biometrics Where Available
All smartphones come with some form of biometric sensor these days, be it a face or retina infrared scanner or a fingerprint reader. Many laptops will include infrared cameras for Windows Hello or a fingerprint reader built into the power button or somewhere else on the keyboard.
If your budget permits, you should always buy equipment that supports Windows Hello, and helping people to understand how better to use biometrics and reassuring them that their personal biometric data is only ever stored locally in an encrypted chip on the device, and is never transmitted over the Internet, can greatly increase their own peace of mind.
Use Password Managers
Many businesses will use password managers, and some will provide the service as a perk for their employees too. Let’s face it, if you mandate the use of password managers at work, then when people use their own devices not only will they already be familiar with how they work, but they will also be much more inclined to use one.
Maintain Vigilance over Email, Messaging, and SMS
My late father did at one point in his life know a genuine Nigerian prince, a lovely man whom I met on a couple of occasions when he came to our home. This man had business interests in the UK and worked with my father on construction and financing projects.
Sadly at no point did he say he had $5 million to give us in exchange for a small transfer fee and our bank details. This doesn’t stop all the other Nigerian princes though, there seem to be thousands of them, from offering exactly that.
Scams, phishing (where personal data or account access is sought by trickery), and criminal activity by email, private messaging, and by SMS have never been more rife or more varied as it is today. So educating people in the types of things they should look for, and encouraging them to share their own knowledge and experiences with other employees, can not only help secure your own files and data but their personal photos and memories and even their financial accounts.
The Windows Security Center
So with all the good advice out of the way, we have to accept that the basis of good malware protection does indeed start with anti-malware software on the PC. For decades now, it’s been common for people to install third-party antivirus software.
These days, however, the anti-malware software written into and included with Windows 10 and Windows 11 is pretty damn good, and there’s not that much need for any third-party software. As I write this, I’m checking the latest antivirus test results at www.av-comparatives.org/comparison and Microsoft’s anti-malware software and ESET at the two highest rated, both having blocked 99% of threats with zero falsepositives. Norton by comparison might have blocked 100% of the threats, but scored a huge 50 false-positives, with Trend Micro, another popular package for businesses, having 44 false-positives.
Caution:I always take the view that any additional software installed in an operating system is a potential weak spot for vulnerabilities and bugs. Fortunately, I like using Microsoft’s Edge browser and find their anti-malware solution excellent. But either way would probably be using them anyway to avoid installing software on a PC that otherwise might not need to be there.
You can most easily launch Windows Security from its shield icon in the Taskbar, though it’s also available in the Start Menu. It’s one of the parts of Windows that hasn’t yet been fully updated to the Windows 11 look and feel (see Figure 18-4), so we can probably expect it to change somewhat. As regards functionality however, nothing will be removed, though new features might be added over time to meet new threats.
Figure 18-4. The Windows Security Center
Note:Windows Security can be managed through Group Policy at Computer Configuration ➤ Administrative Templates ➤ Windows Components ➤ Microsoft Defender Antivirus and also through both PowerShell and Mobile Device Manager (MDM).
The main Virus & threat protection panel is standard antivirus fare, with a choice of scan types you can perform on the PC, links for the protection history log, and any allowed threats which will likely be older third-party programs that you still use but that might be logged as threats now because of the way they operate.
Tip:Among the scan options is Microsoft Defender Offline scan; this will restart the PC and run a full anti-malware scan from the Recovery Console where, hopefully, no malware is able to load and run.
Configuring Windows Virus Protection
You can click the Manage settings link in Virus & threat protection settings to configure the settings and options for the malware protection (see Figure 18-5). These features should all be switched on, but additional options exist here such as being able to Submit a [suspect virus] sample manually.
Figure 18-5. All the parts of Windows malware protection should be activated
Tip:Tamper protection is an important setting to have switched on as while an administrator on the PC can still make changes to the malware protection in the Security Center, this feature will prevent software from making any changes.
Protecting a PC from Ransomware
Windows 11 comes with a feature called Controlled Folder Access that can provide effective protection from a ransomware attack. I want to talk about this feature though as it needs to be used carefully to prevent it from causing problems for users of the PC.
Controlled Folder Access is disabled by default on a PC and needs to be manually activated by the administrator. It prevents unauthorized software from making changes to the user folders Documents, Pictures, Music, Video, etc. (see Figure 18-6).
Figure 18-6. Controlled Folder Access provides effective protection against ransomware
You can click the Protected folders link to add (or to remove) any folders and entire drives from Controlled Folder Access, and in Figure 18-7, you will see that on my desktop PC I have two additional SSDs installed, the E and F drives that I have added for greater security.
Figure 18-7. You can add entire drives to Controlled Folder Access
This is where we get to the tricky part. Some older legacy software and in fact even newer software and especially games can require writing files into the protected folders, usually Documents. If they don’t have this access, they will report an error or even fail to work at all. Sometimes, Windows might display a notification saying Unauthorized changes blocked. This message means that Controlled Folder Access has prevented an application from modifying, deleting, or adding a file. When this happens, you will need to manually add the application to the exemption list. There are different ways to achieve this.
In Windows Security, open Virus & threat protection and then Ransomware protection, and click either Allow an app through controlled folder access if you are adding an application that you know needs special access or Block history if you are adding an app that has been recently blocked by the feature.
Here, you will be able to see which applications have been recently blocked or add any other app that is installed on the PC (see Figure 18-8).
Figure 18-8. You can add any app as an exemption to Controlled Folder Access
In Group Policy, navigate to Computer Configuration ➤ Administrative Templates ➤ Windows Components ➤ Microsoft Defender Antivirus ➤ Microsoft Defender Exploit Guard ➤ Controlled Folder Access (see Figure 18-9). Here, you can manage and activate Controlled Folder Access, as well as configure protected folders and allow applications through the feature.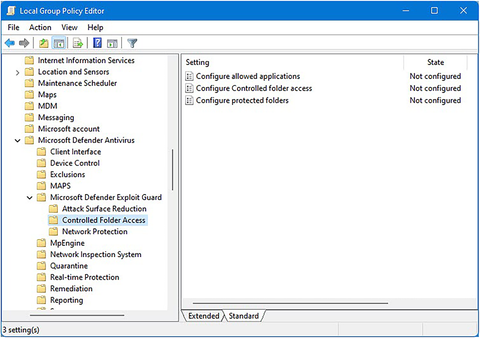
Figure 18-9. You can manage Controlled Folder Access using Group Policy
Note:You can also manage Controlled Folder Access and all Windows Security features using both PowerShell and Mobile Device Management (MDM).
App and Browser Control
Windows has for some years now included a feature called SmartScreen, which is a tool that, as Microsoft says, “helps protect your device from potentially dangerous apps, files, websites, and downloads.” As part of this, you will see an App & browser control section in Windows Security (see Figure 18-10).
Figure 18-10. App & browser control is part of Windows SmartScreen
The Reputation-based protection settings here will allow you to control SmartScreen. This can be important in a business environment where you might have false-positives being reported when perfectly legitimate files and documents are shared between employees. If there are any items blocked, you can manage those items through this interface (see Figure 18-11) and also through Group Policy, MDM, and PowerShell as I mentioned previously.
Figure 18-11. You can manage files, documents, and downloads that have been blocked by SmartScreen
Isolated browsing is a feature that is not activated by default and that needs to be manually switched on in Windows. This will always launch Microsoft’s Edge web browser in an isolated environment to provide better protection when the PC is online (see Figure 18-12).
Figure 18-12. Application Guard needs to be installed manually
Lastly, Exploit protection contains additional tools that can be used to protect Windows 11 from malware attacks. This includes some tools that have been around for years, such as Data Execution Prevention which can prevent malware from accessing protected memory, and newer features such as Randomize Memory Allocations. If you have an older legacy program that misbehaves or won’t function because of this security, you can click Program Settings to manually assign exceptions to it (see Figure 18-13).
Figure 18-13. You can change security settings for specific apps that require it
Device Security
The Device security section contains some hardware-focused security options. Core isolation uses virtualization to create a secure area of system memory that is completely isolated from the rest of the operating system. Important system processes are then run inside this memory to prevent them from being tampered with. This feature is disabled by default and has to be manually activated on the PC (see Figure 18-14).
Figure 18-14. You can manually activate core isolation
If you are having trouble with a Trusted Platform Module (TPM) or Firmware Trusted Platform Module (fTPM) in the PC, then the Security processor section will display any errors that have occurred and offer fixes for the problem where it can (see Figure 18-15).
Figure 18-15. You can find TPM-related errors in Windows Security
Protection History
Lastly in Windows Security is a Protection History panel. Here, you can view all the notifications from Windows Security going back for around the last 30 days (as long as logs are typically kept by Windows) (see Figure 18-16). This can help you identify a problem, such as an application that’s been blocked by a security feature, and fix it.
Figure 18-16. You can view the full protection history in Windows 11
Safe Mode and Diagnostic Mode
Windows comes with two reduced functionality modes that can, and I stress can, help remove infections from a PC, though with malware being as advanced as it is nowadays, it’s likely that you will need more advanced tools, which I will talk about shortly.
Everybody that has used Windows over the years will know about Safe Mode. This is a reduced functionality mode of Windows where only basic and essential drivers and services are loaded, and no third-party drivers, services, or apps are loaded (see Figure 18-17).
Figure 18-17. Safe Mode provides a subset of Control Panel items
You can access Safe Mode from the Recovery Console by clicking Troubleshoot ➤ Advanced Options ➤ Startup Settings and then restarting the PC when a new menu will appear in which you have three Safe Mode options (see Figure 18-18). These are Safe Mode, Safe Mode with networking support, and Safe Mode in a purely Command Line environment.
Figure 18-18. You access Safe Mode from the Recovery Console
Diagnostic Mode is different as it is accessed from within the Windows desktop environment itself. It’s less useful than Safe Mode insofar as more drivers, services, and applications are loaded at startup, but where only a small subset of Control Panel and other administrative options are available in Safe Mode, many more are available in Diagnostic Mode.
You activate Diagnostic Mode by searching in the Start Menu for msconfig. This will open a window that older PC users might recognize as where you used to disable Startup programs (see Figure 18-19).
Figure 18-19. You activate Diagnostic Startup from msconfig
If you select Diagnostic Startup and then click Apply, you will be prompted to restart the PC. When you get to the desktop, everything will appear normal except that Startup programs and some services will not have been loaded.
One thing to note about Diagnostic Startup is that in the same way that you activate it in msconfig, you also need to deactivate it the same way, or else you will always start the PC in Diagnostic Mode.
There are also additional options available under the Boot tab in msconfig:
- Safe boot – Minimal will start the PC in the standard Safe Mode, with no networking support.
- Safe boot – Alternate shell will start the PC with a Command Prompt–only interface.
- Safe boot – Active Directory repair is an additional option that will also load the Active Directory services, in addition to networking services.
- Safe boot – Network loads the OS in Safe Mode with networking services also loaded.
- No GUI boot will load the OS without displaying the Windows loading screen. This can be used when you are troubleshooting display problems.
- Boot log saves a log of what starts and is loaded to the file C:\ Windows\Ntblog.txt.
- Base video forces Safe Mode to use only the standard VGA video drivers that come with Windows. This can be useful for troubleshooting display driver issues.
- OS boot information can be used in conjunction with the No GUI boot option. It will display a list onscreen of services and Windows components that are loaded and run, as they are invoked. You may be familiar with Safe Mode displaying this information by default in versions up to Windows XP.
Manually Removing Malware from a PC
You might find that if you get a malware infection, you can manually remove it. This can even include ransomware and might involve a tool you can download from a security website, and I’ll detail some of these later in this chapter. There are things you can do from within Windows however, so I’m going to walk through it as, if nothing else, it’s a good insight into how malware works.
I will place one caveat on this, however. Microsoft has made great strides with Windows security and proudly proclaimed when they launched Windows 11 that the OS is “the most secure Windows yet.” Many people took this with a grain of salt given they saw Windows 11 as just being Windows 10 in a party dress. In truth though, Microsoft has taken advantage of the stricter new installation requirements for Windows 11 to beef up the security, and, try as I might, I simply could not get malware to take hold in my virtual machine test environment at all.
I had test viruses that had been provided to me by security researchers and that were made available to security product vendors so they could test their products. I was also given access to live virus and even ransomware samples, which very clearly I used with great care. I turned off all the security features and antivirus protection in Windows 11 (or at least I thought I had), and still I couldn’t get any malware to take hold.
This is great news for us generally, and it really does indicate that when Microsoft said Windows 11 is the most secure version of Windows they’ve ever produced, they really weren’t kidding. As a result, a few of the screenshots in this section will have been taken from a Windows 10 installation a while back, which I was able to successfully infect with a test virus.
Windows Defender Offline Scan
I mentioned earlier in this chapter that Windows 11 includes an offline antivirus scanner that works effectively from the Recovery Console. It’s not activated from there however. In Windows Security, click Virus & threat protection and then click the Scan options link. Here, you will see an option to run a Microsoft Defender Offline scan (see Figure 18-20).
Figure 18-20. You can run an offline virus scan from Windows Security
Running this will reboot the PC and then run the scan with the most recently downloaded antivirus scan definitions from a Recovery Console environment where, hopefully, no virus has been able to reside.
Step 1: Isolating the PC
So how do you manually remove malware from a PC? The first step is that you need to completely isolate the PC from your network and the Internet as soon as you have identified an infection. With a network connection, worm viruses can burrow their way through to other PCs and servers on the network.
With an Internet connection, malware can download additional payloads to your PC or upload your files and documents to criminals. The malware can also use your Internet connection to propagate to other machines or even perform actions such as becoming part of a botnet delivering Distributed Denial of Service (DDoS) attacks to companies, organizations, or governments. Isolating the PC also prevents a hacker from taking control of your PC remotely.
If you are using a desktop PC or a laptop that is connected to the network and the Internet via a physical Ethernet cable, then it should be unplugged. If your PC has access to the Wi-Fi, then you should not only disconnect from the network, but you should tell Windows to forget the password to that and any other network within range that it tries to reconnect to (see Figure 18-21).
Figure 18-21. You should tell Windows to forget any network the PC could connect to
If your PC connects to the Internet via cellular, then you should remove the SIM card from the PC or delete the eSIM data. These actions will completely isolate the PC from your local network and from the Internet.
Note:If you have open Wi-Fi networks in the vicinity that do not require a password for access, you still have three options available to you. The first is to physically move the PC to a place where it can’t see or access those networks.
Additionally, some laptops come with a physical switch to deactivate all radio features including Wi-Fi and Bluetooth. Lastly, if you have access to the router for that network, you should be able to block the laptop from the network in the router settings until you have the matter resolved.
Step 2: Identify the Malware Processes
We now need to identify the malware processes, and there will almost always be more than one as they watch one another to make sure they’ve not been shut down and restart each other if they are. For this, we use Process Explorer from the Microsoft Sysinternals suite.
We can see in our screenshot that the malware is highlighted in purple (see Figure 18-22). It has a nonstandard name which is also common for malware processes, but because this is a test virus, it has clearly labelled itself as “Winlogon malware form.”
Figure 18-22. You can identify malware processes using Process Explorer
The color coding for processes in Process Explorer works like this:
- Purple processes, which in our case include the malware, are files that may be compressed (also called packed), which for legitimate applications can help them to use less memory, but in the case of malware can also help to hide the code from your anti-malware scanner. Looking at the purple-colored files should be your first step.
- Red processes are ones that are currently existing (being stopped).
- Green processes have been freshly run (also known as spawned).
- Light blue processes are those run by the same account that started Process Explorer.
- Dark blue processes are ones that have currently been selected by yourself in Process Explorer.
- Pink processes are running Services on the PC, such as the common svchost.exe which is a Windows system process that can host one or more other services where they share a process to reduce overall resource usage on a PC.
Malware and SVCHOST.EXE
Some malware will try to imitate svchost.exe as you will always see a lot of these instances of this service running on a PC (see Figure 18-23). Process Explorer however will still highlight nonservice processes in purple. Look for a [+] icon to the left of an svchost.exe process in the Process Explorer processes list to see any subprocesses which could be malware.
Figure 18-23. SVCHOST (Service Host) is a critical component of Windows
Another thing you can do in Process Explorer is turn on the column to display the user account the processes are running under. Right-click the column headings and click Select columns. Then in the dialog that appears, click UserName and then click OK.
All genuine svchost.exe processes will be running under one of these three usernames: NT AUTHORITY\SYSTEM, LOCAL SERVICE, or NETWORK SERVICE. An instance of svchost running under a different username will be malware.
A third way to check if an svchost.exe process is genuine is to right-click it in Process Explorer and examine its Properties. In the Command line field, genuine Windows processes will always start with C:\Windows\System32\svchost.exe –k (see Figure 18-24).
Figure 18-24. You can check if an SVCHOST process is genuine in Process Explorer
SVCHOST processes can also be checked in Task Manager. At the top of the Properties panel from Process Explorer, you will see the Process Identifier (PID) number for the process, in this case 1796. Open Task Manager, and under the Details tab, find the process with this PID. Open its properties there, and in the Digital Signatures tab, you can check if the process has been digitally signed, and by who (see Figure 18-25).
Figure 18-25. You can check the digital signature of a process
Step 3: Deactivate the Malware
We are now ready to try and deactivate the malware. If we right-click it and examine its Properties, we will see that this particular piece of malware is being run from the C:\Windows\Temp folder (see Figure 18-26). You will need to make a note of both the Path and Autostart Location parameters.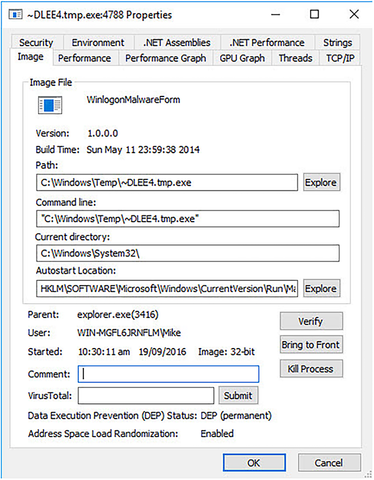
Figure 18-26. Check the path and autostart parameters to find the malware files
Open the Registry Editor by clicking the Explore button next to the Autostart Location field, and you will be taken directly to that key in the Windows Registry; you should delete this key from the Registry (see Figure 18-27).
Figure 18-27. You can open the Registry from Process Explorer
Now we return to Process Explorer and shut down the malware process. Most malware processes though will have a secondary process checking to see if it is being shut down, as a defense mechanism. Instead of killing the process then, you can right-click the process name and suspend it (see Figure 18-28). This will prevent other malware processes from seeing you are killing the infection.
Figure 18-28. You should suspend processes so they don’t think they’re being shut down
Step 4: Test the Results
With the malware possibly disabled, you should restart the PC and then run Process Explorer again as an Administrator to see if the malware process is still running. In this case the malware is still running, so we need to use another Sysinternals tool called Autoruns to see if the malware is still running. See if the malware process is listed under the logon tab. If it is, uncheck it here to disable it (see Figure 18-29).
Figure 18-29. You can check Autoruns to see if malware is still running
This malware has automatically recreated itself at sign-in, which means there must be something else happening on the PC, so we need to go hunting again. This means that, still in Autoruns, we need to look tab to tab for any processes that are not digitally signed; these will be highlighted in pink.
When we look under the Winlogon tab, we can see a SampleCredentialProvider dll that is highlighted because it’s not digitally signed (see Figure 18-30). It might look legitimate, being stored in the C:\Windows\System32 folder having a perfectly normalsounding name winlogondll.dll, but this will be our malware process. We should disable this for now (just in case we’re wrong) as we can always reenable it later if we need to. Make a note of the Registry key and the DLL name and folder location.
Figure 18-30. Nondigitally signed startup entries are highlighted in pink in Autoruns
Step 5: Retest the PC
Now we need to restart the PC again and check once more in Process Explorer for our malware. We can see in Figure 18-31 that we have successfully deactivated it, and it is no longer running on the PC.
Figure 18-31. We can see the malware is no longer running on the PC
Step 6: Clean Up the Malware
The final step in the process is to remove all of the malware files and Registry keys that we found. We know the malware file was in the C:\Windows\Temp folder called ~DLEE4.tmp.exe, that the malware DLL file was in C:\Windows\System32 and was called winlogondll.dll, and that there were a couple of Registry keys associated with the malware too. In Figure 18-32, we can see the startup Registry key that Autoruns highlighted for us and also the malware files itself.
Figure 18-32. You should delete all traces of the malware
Of course, the actual malware you’re trying to remove will likely be far nastier than the one I have demonstrated here, and the removal process might take some hours of investigation while you track down the multiple processes that are running. You should definitely be prepared to set aside a good amount of time and give this your full concentration.
Note:I want to include a note about rootkit removal. This is much more difficult in Windows 11 than it was in Windows 10 because of the increased security Microsoft built-in. This should make it more difficult for rootkits to infect the PC however. In Chapter 20, I detail how you can rebuild the Boot Configuration Database, which can help remove a rootkit, and how you can use the BCDEdit tool to remove unwanted boot entries. For rootkits though, you should always seek out a dedicated removal tool.
Third-Party Malware Removal Tools
Speaking of third-party tools, there are many available, and they vary considerably in functionality with some being highly specialist and others being more general, such as offline scanners.
You should always use the most up-to-date version of these tools, especially if they are antivirus scanners, so they include all the latest virus definition files, and the most up-to-date tools for removing malware.
Microsoft DaRT
If you are in a business using the Enterprise edition of Windows 10, you will have access to Microsoft’s Diagnostics and Recovery Toolset (DaRT). This allows you to create recovery media for a PC that includes the following tools:
- Computer Management console is the same as on the host Windows 10 PC and allows you to view that PC’s event logs, scheduled tasks, local users and user groups, device drivers, autorunning applications, and both Microsoft and third-party services.
- Crash Analyzer helps you determine the cause of crashes on the host PC, by examining the contents of the crash memory dump file(s) and having them interpreted for you.
- Defender is an offline version of the Windows antivirus package. This can be used to scan a PC for malware and remove it safely without the malware becoming active.
- Disk Commander provides tools to help you repair and recover corrupt disks and partitions.
- Disk Wipe can be used to delete all data from a hard disk, when you need to wipe a disk completely to eradicate a virus infection, before a reimage.
- Explorer is a full version of File Explorer that lets you examine and manipulate the files on the host PC. This can be used when you need to manually remove files as part of malware removal.
- File Restore is a file “undeletion” tool to help you recover files that were deleted accidentally or that were too large for the PC’s Recycle Bin.
- File Search is a general-purpose search tool for locating specific files or file types on the host PC.
- Hotfix Uninstall can be used to remove Windows Updates that can be causing the PC to become unstable.
- Locksmith lets you change and manage user account passwords for any account on the PC. This can be used if malware has locked you out of your own or the Administrator account.
- Registry Editor allows you to access the Registry on the host PC and manually remove any keys placed there by malware.
- SFC Scan, the System File Repair Wizard, checks all the Windows OS files on the host PC to determine if any have been changed or have become corrupt. It can then be used with up-to-date installation media to replace any modified or damaged files with the proper ones.
- Solution Wizard is a tool that can be used if you are not sure which of the DaRT tools is best to fix your specific problem. It asks a series of questions and will suggest the best way to fix your problem.
- TCP/IP Config can be used to manipulate the network settings on the host PC, so that you can access local network resources or the Internet to apply fixes.
ESET Online (and Offline) Scanner
Several companies, including some of those listed in this section, provide online scanners that can scan your PC for viruses through your web browser. ESET provides a scanner that can also be downloaded to use on your PC. This can be useful if you suspect your current antivirus software has missed a virus.
www.eset.com/us/online-scanner/
Norton Bootable Recovery Tool
Many of the following tools all fall into broadly the same category as Windows Defender Offline. Norton is the same in that it allows you to create a bootable DVD or USB Flash Drive that can be used to scan for and remove malware.
https://norton.com/nbrt
Sophos Bootable Antivirus
By this point, you might have guessed that the choice of which tool you download and use depends on your personal preference for antivirus vendor. It also needs to work, and not all of these tools will be up to date with the very newest viruses, however. The Sophos tool can only be used to create a bootable CD or DVD, and so it is less suitable for ultrabooks and tablets.
www.sophos.com/en-us/support/knowledgebase/52011.aspx
Kaspersky Rescue Disk
Kaspersky Rescue Disk is designed to create a bootable CD or DVD from which to remove malware, though instructions do exist on the website for how you can create a bootable USB Flash Drive.
https://support.kaspersky.com/viruses/rescuedisk
Kaspersky Ransomware Decryptor
A suite of free utilities that, while they can't defend against ransomware, will help you remove ransomware from an already infected PC and decrypt any files the ransomware has encrypted. You can download it at https://noransom.kaspersky.com
AVG Rootkit Scanner and Remover
The AVG Rootkit Remover is a tool that you download to an infected PC to scan for malware. If an infection is found, the tool will ask you to restart the PC so that removal and cleanup can take place.
www.avg.com/en/signal/rootkit-scanner-tool
F-Secure Online Scanner
This can be used to scan for and remove malware on your PC from a direct download, without having to install a package that could become infected with malware.
www.f-secure.com/en/home/free-tools/online-scanner
McAfee Free Tools
Security firm McAfee provides a selection of free security tools, which include the following tools.
GetSusp will scan for undetected malware on a PC and can be used if you suspect you may have undetected malware on a PC (www.mcafee.com/enterprise/en-us/downloads/free-tools/getsusp.html).
RootkitRemover is a stand-alone utility for detecting and removing complex rootkit attacks (https://pcs.tv/3CE2ewy). Stinger is used to remove a specific list of supported viruses and is updated regularly with the latest and most common virus definitions (www.mcafee.com/enterprise/engb/downloads/free-tools/stinger.html).
D7II
If money is no object, then subscribing to an annual license for D7II can pay dividends. It’s a complex suite to use and should not be used unless you’re proficient in maintaining and configuring PCs, but it includes a powerful anti-malware suite that includes tools from Kaspersky, Bitdefender, Sophos, McAfee, and more on the unfortunately named domain foolishit (funny; Ed).
www.foolishit.com/d7ii/
RKill
RKill can be used to terminate the running processes that malware is using to keep itself active on a PC. This can be useful if your standard antivirus software is unable to clean the infection. Run RKill first to stop the offending processes, then use your existing antivirus software to clean the infection as per normal.
www.bleepingcomputer.com/download/rkill/
Junkware/Adware Removal Tools
Sometimes, you can have software on your PC called junkware or adware. This isn’t actually a virus, but it can be really annoying and slow down your PC. Several companies provide free software for removing junkware including
Malwarebytes Adware Cleaner, www.malwarebytes.com/adwcleaner
Adlice RogueKiller, www.adlice.com/software/roguekiller/
Xplode AdwCleaner, available by searching online
Summary
Manual antivirus removal can be very difficult, though many tools are created to tackle and remove viruses, especially the biggest and most common threats. This is useful when the malware identifies itself to you. Often, this is the case especially with ransomware as the criminals want you to know who it is that has attacked you. It’s not always easy to get the name of the malware however, and this is where researching the malware using Process Explorer and AutoRuns can give you filenames you can search for online to find it.
Anyway, now we have the nasty subject of malware put to bed, in the next chapter we’ll take a deep dive into the Windows Registry and look at all aspects of it, its files, values, and keys. We’ll examine what’s important, what can go wrong with startup entries, and where the entries and keys are that you might want or need on occasion to change can be found. We’ll look at how you connect to the Registry files of other users, and other PCs on the network, and we’ll examine what all of this has to do with bees.